Whether your chronology is short and sweet or more complex, timelines in PowerPoint are a great way to present a series of events in a digestible way. All you need to create a timeline that will make your content shine is good planning and some knowledge of the basics.
A timeline provides more visual clarity and interest than a block of text or bulleted list and can really pack a punch when combined with simple animations. If timelines in PowerPoint are well executed, they can clearly and concisely communicate a complex process or important roadmap. This article will equip you with the skills you need to speed your next timeline slide back to the future!
Step 1 – Prepare your data
Although a timeline is an ideal way to show a sequence of events, it still requires some preparation to be executed correctly. Start with your data:
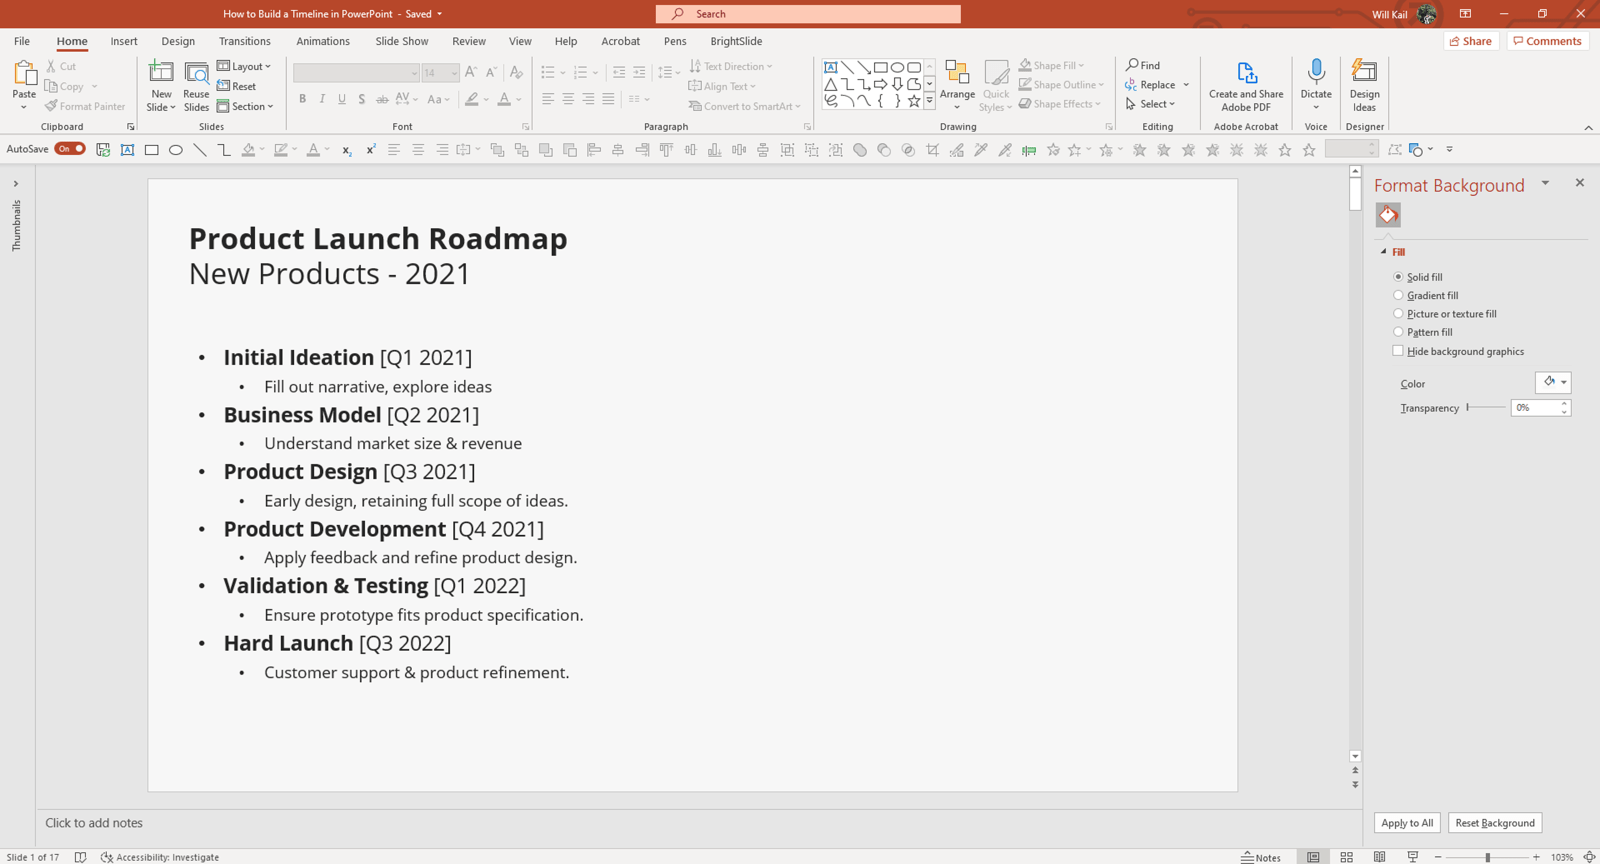
First, make a list of all your timeline events. Each should contain a time marker and a title; some may require a brief description. Try to keep all the text as succinct as possible allowing the presenter to provide more information.
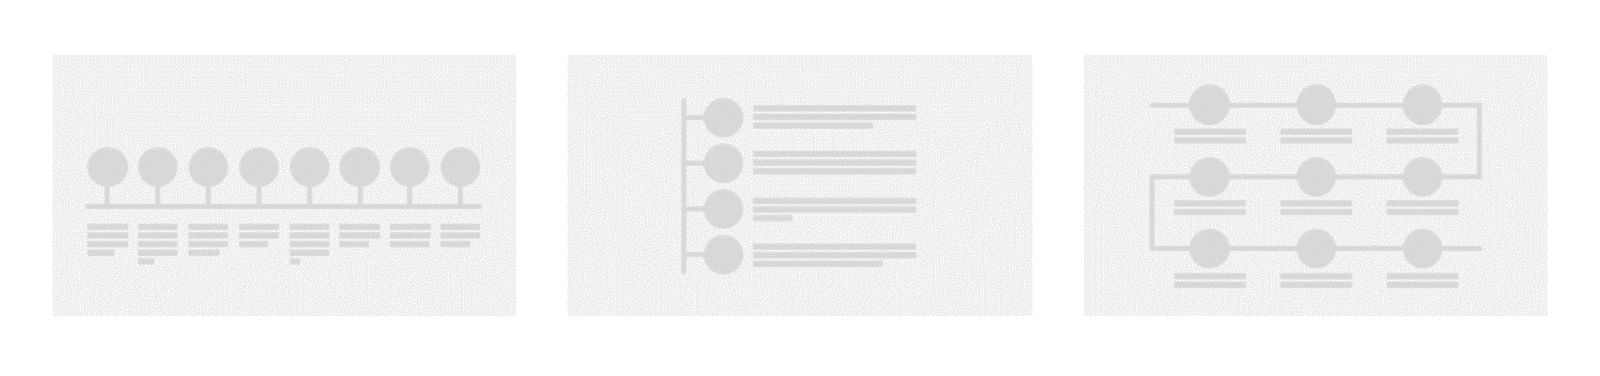
Timelines are traditionally presented in one of three ways; horizontal, vertical, and free flowing. Each has their strength. It’s important to pick the right format for your information. Two factors will determine the best layout – the number of events in your timeline and the amount of text required to describe each event.
Horizontal is the standard – and for good reason! Most presentations these days are built in widescreen (16.9). Matching the aspect ratio of your screen gives the maximum screen space to your timeline. Horizontal timelines can be created with space for events above and below the timeline, or placed at the bottom of the slide, with the events above. In PowerPoint horizontal timelines work well with up to 8 events, each with minimal text.
Vertical timelines can be great when you have fewer events, but more text/detail to communicate. As the timeline runs vertically, you have more horizontal space for describing each event. While this isn’t an invitation to write your company life story (we guarantee most of your audience don’t care about that!), it’s inevitable that some timelines require more detail than others – this is where the vertical format can work well.
Free-flowing timelines can be used to great effect, snaking round the page to create a more visually engaging slide. They are great for timelines with a high number of events as they can fit more events than a horizontal layout. However, they can be hard to execute. If you aren’t comfortable with design fundamentals such as balance, hierarchy and alignment, we’d recommend sticking to a straight line most of the time. You can read more about visual hierarchy here.
To summarise:
Horizontal timelines are work best with up to 8 points with short descriptions.
Vertical timelines are best for timelines with fewer points and more text.
Free-flowing timelines are appropriate if you have lots of points and a horizontal timeline won’t give you the space you need.
Step 3 – Build!
Ready? Go!
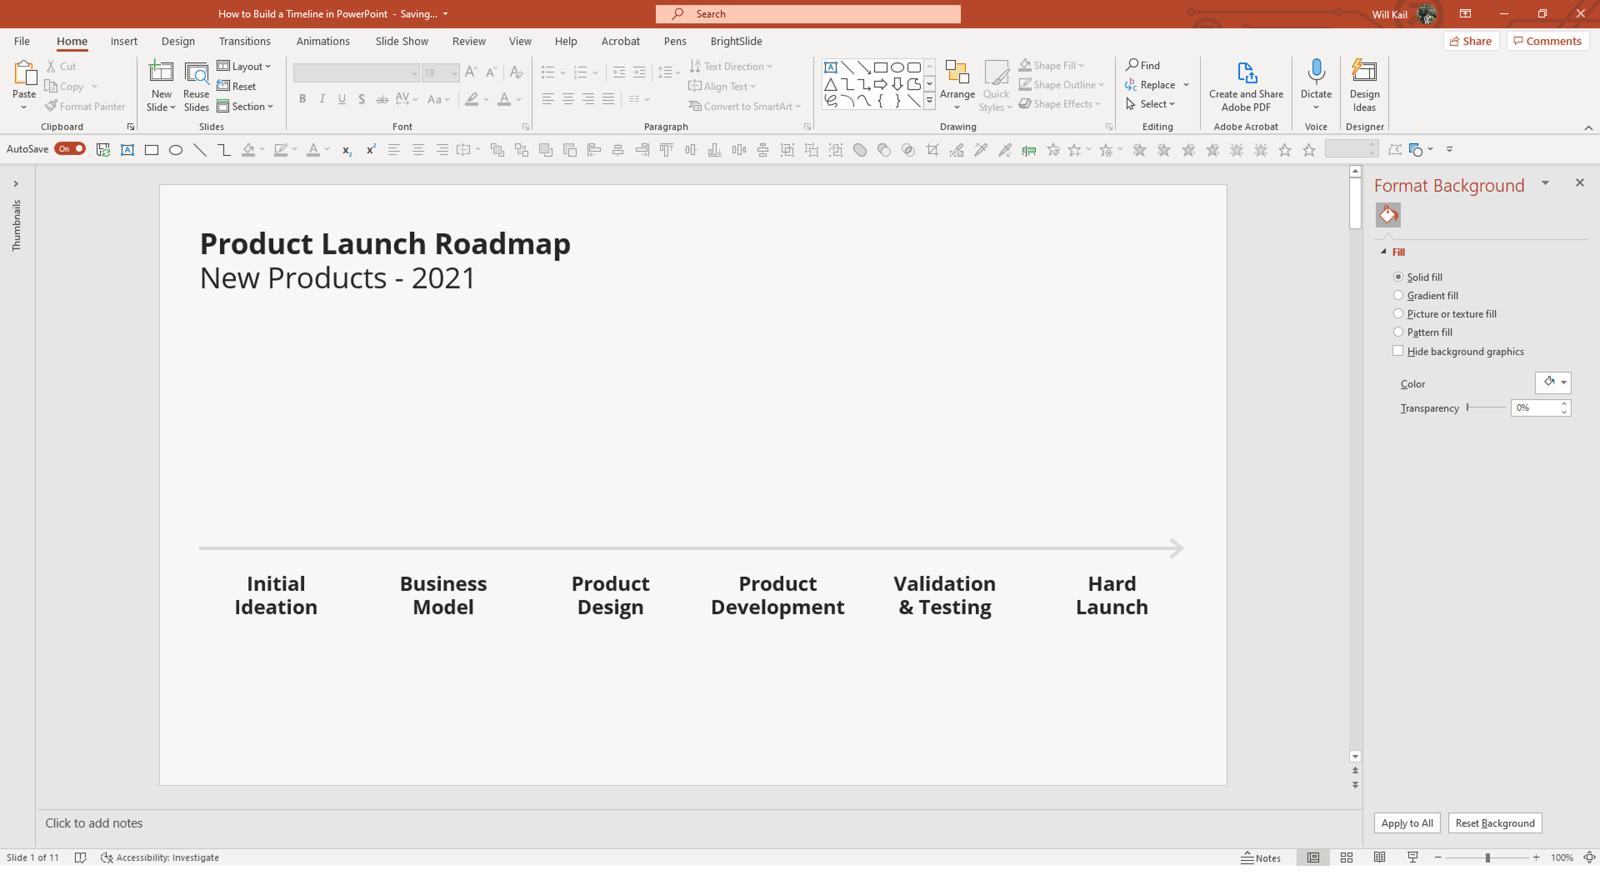
As it’s the most common PowerPoint timeline, I’ll be demoing a horizontal format.
The best place to start is with the timeline…line… itself. From there it’ll be easy to divvy up the slide’s real estate to each of the events. Through this tutorial the Align and Distribute tools will be your best friend. You’ll find them in the Home tab, under Arrange, then Align/Distribute.
You should also use guides whenever you’re designing in PowerPoint. They help keep everything aligned and are key to creating effective layouts that look neat and professional. If you’ve never used guides before, check out our article on grids and guides. You can turn on grid or guides by right clicking on your slide, selecting Grid and Guides, and checking Display grid on screen or Display drawing guides on screen.
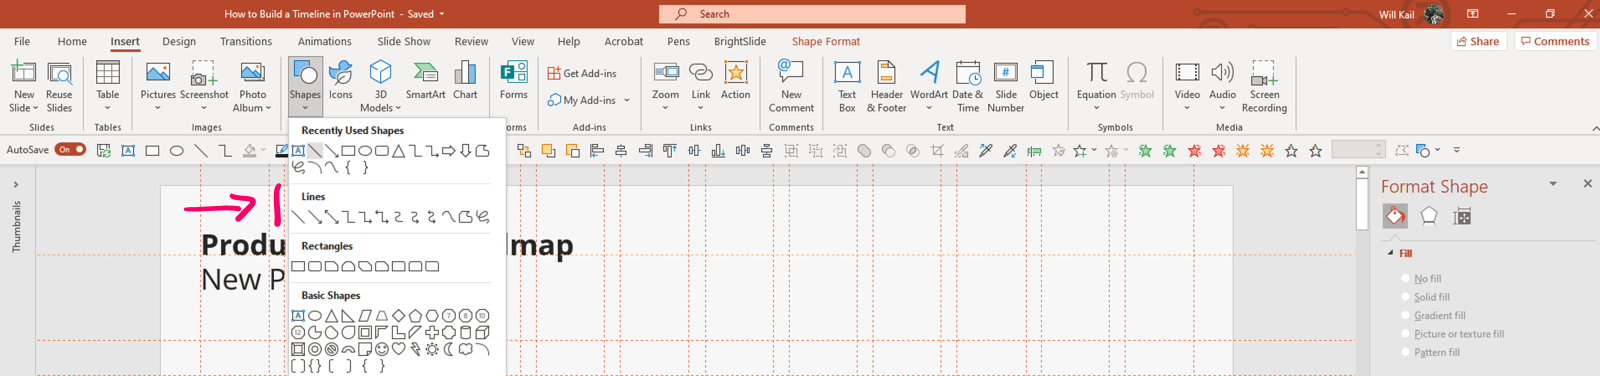
Open up a fresh slide and in the Insert tab, navigate to Shapes, then insert a new Line.
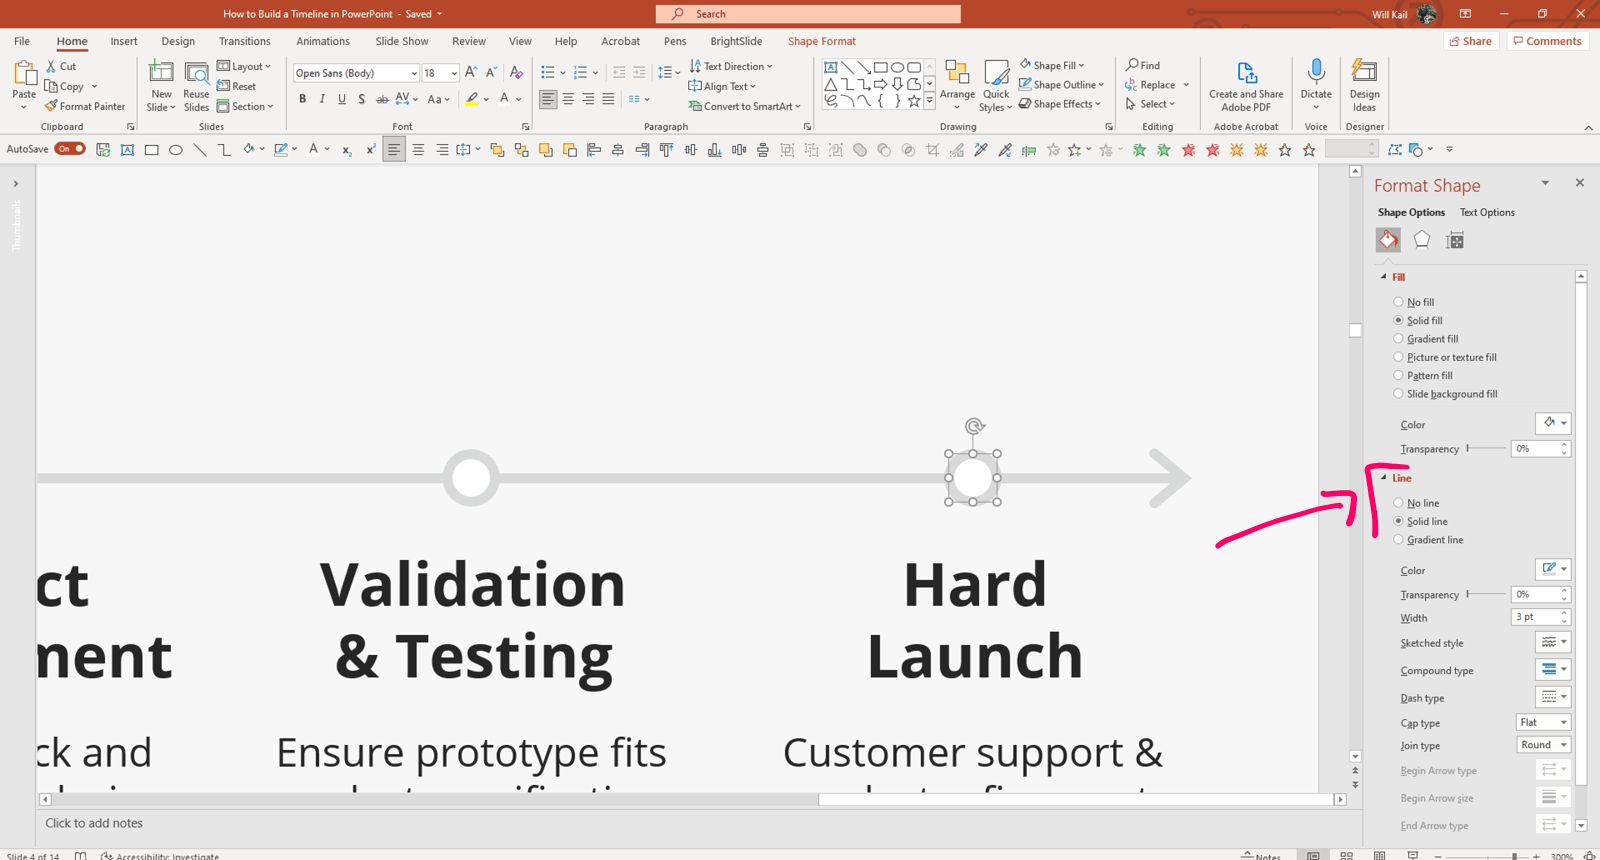
Hold Shift to lock the line horizontal and drag your line across the slide and up against your left and rightmost guides. You can give the line a bit of life by thickening it up, changing the colour and adding an end arrow to show the progression of time. You can do all this in the Format Shape window (Right Click > Format Shape).
Now, it’s time to add the events. As you have already prepared your data, you know how many intervals you need. Take a moment to feel smug at this point.
First, measure your timeline. Select the line and navigate to the Shape Format tab. Under Size it will tell you the width – my line is 31.28cm wide.
I have 6 events in my timeline, which means I’ll need to divide 31.28cm by 6. Before I do this, I’ll subtract a small amount off the width so that there is some breathing room between each event – let’s say 0.5cm between each. So, I’ll subtract 2.5cm from 31.28cm, giving me 28.78cm, then I’ll divide that by 6, leaving me with 4.8cm.
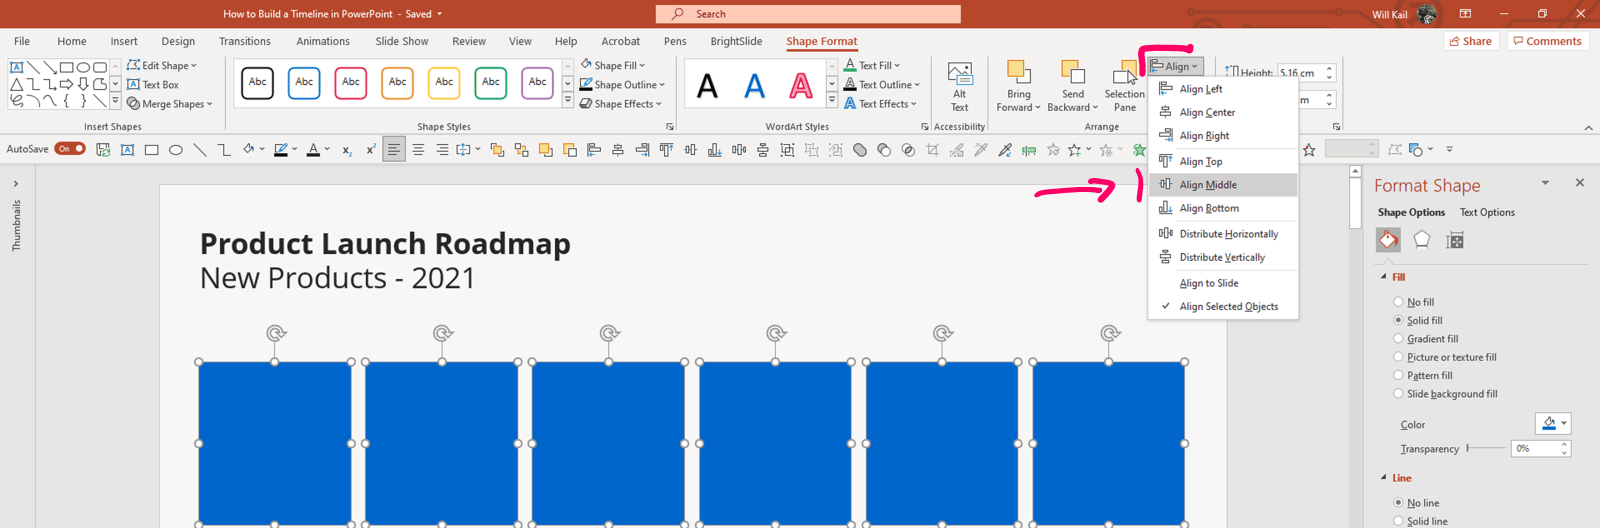
Go back to your Insert tab, navigate to Shapes, and insert a new rectangle. Back in the Shape Format Tab enter the final figure as the width – for me it’s 4.8cm.
Drag this shape over your slide so the left edge butts up against the start of your timeline, then Copy & Paste the rectangle so you have a total of six. Place one of these so the right edge butts up against the end of the timeline. The select all six and click Align Objects Middle, then Distribute Horizontally. All 6 event containers should now be perfectly aligned and distributed on your slide.
This method assumes the intervals between events are consistent. If your intervals are not consistent, use this method to divide your timeline into e.g., months or years, then place the events along time timeline at the appropriate intervals. If you have large time jumps between your events you can show this with a gap in the timeline to denote a time gap, or by using a slash in the timeline to denote a jump in time.
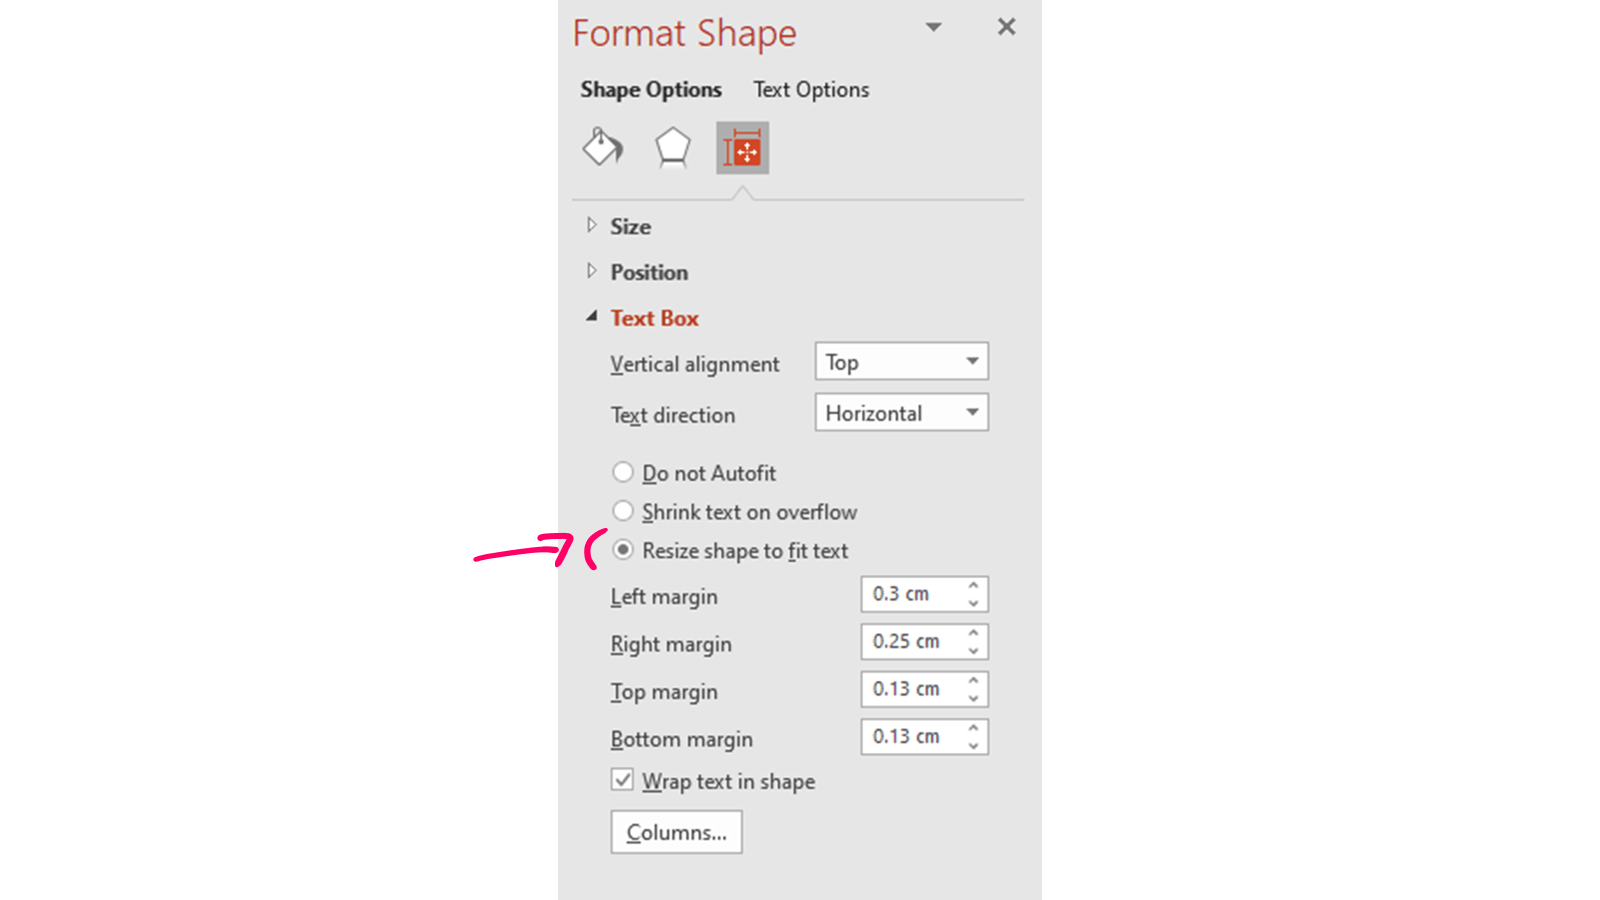
Type your prepared titles into each box, the change the shape fill to No Fill in the Format Shape tab. In the Size & Properties section, you can also tick Resize Shape to Fit Text, trimming down the boxes to size.
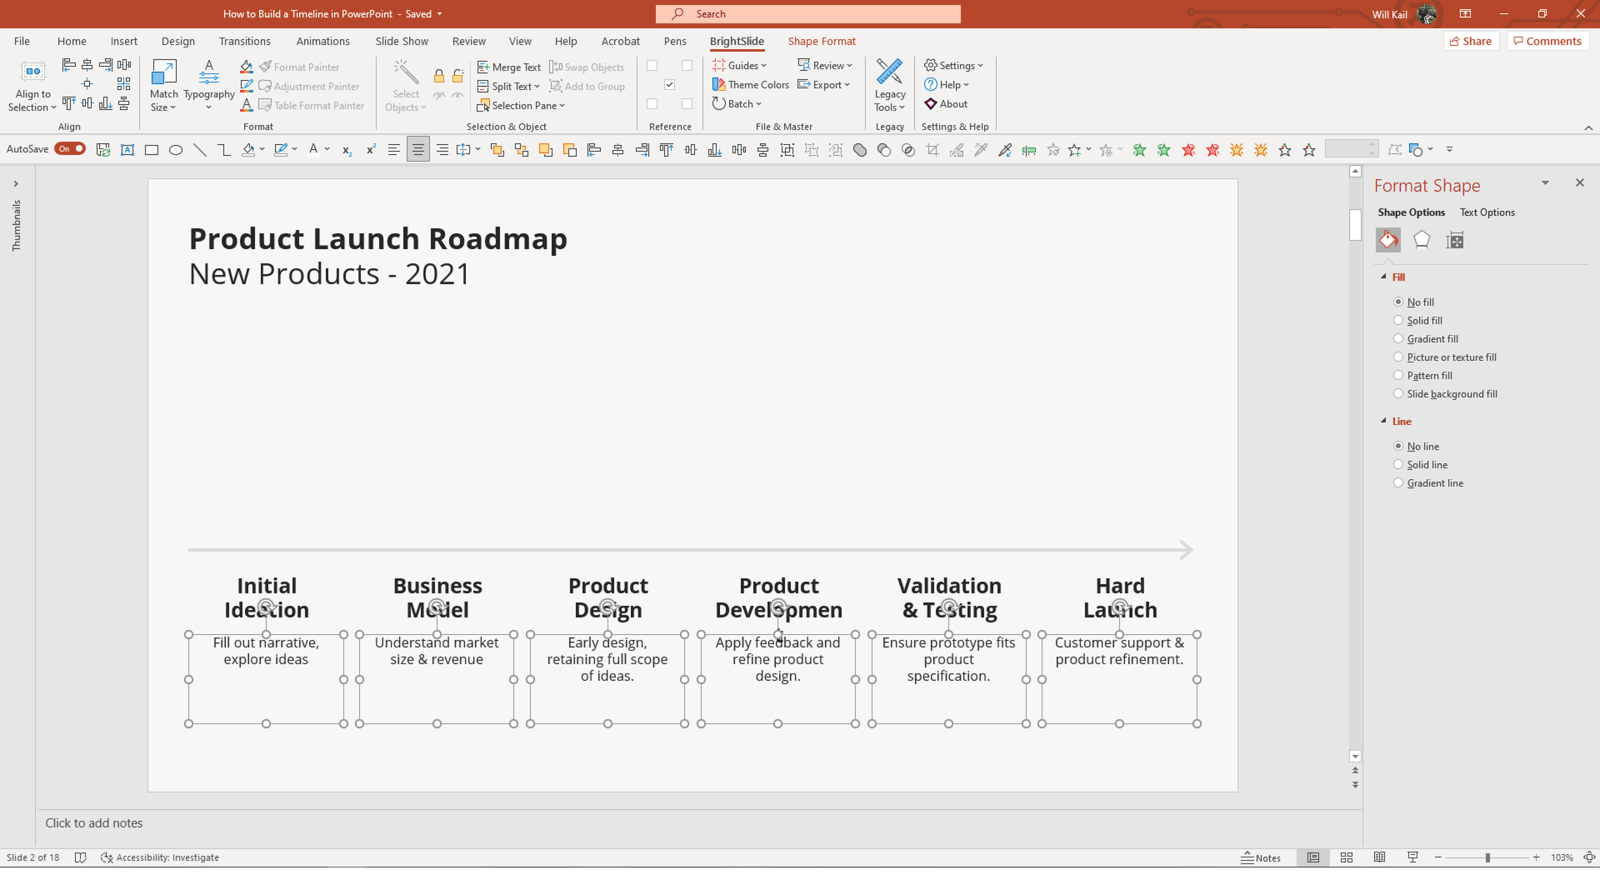
Next, select all your boxes, hold Ctrl + Shift, and drag them down vertically to duplicate all 6. Insert your descriptions in these boxes. Be sure to shrink the font size slightly so the titles pop.
Next, connect the timeline events to the line itself. Insert a new Circle (Insert > Shapes > Circle) and drag to resize (holdingShift while dragging to draw a perfectly round circle). My data contains 6 events, so I’ll need 6 circles. Select the circle, and holding Ctrl, drag the shape anywhere on the slide to make a duplicate. Repeat until you have once circle per timeline event. Align one circle on the timeline above your first event and another at the end one, then select all of the circles and use the Distribute Horizontally tool, followed by Align Objects Middle.
To change the look of the circles you can dive back into the Format Shape tab. I’m going to match the FillColour to the background and add an outline that matches my timeline for seamless effect.
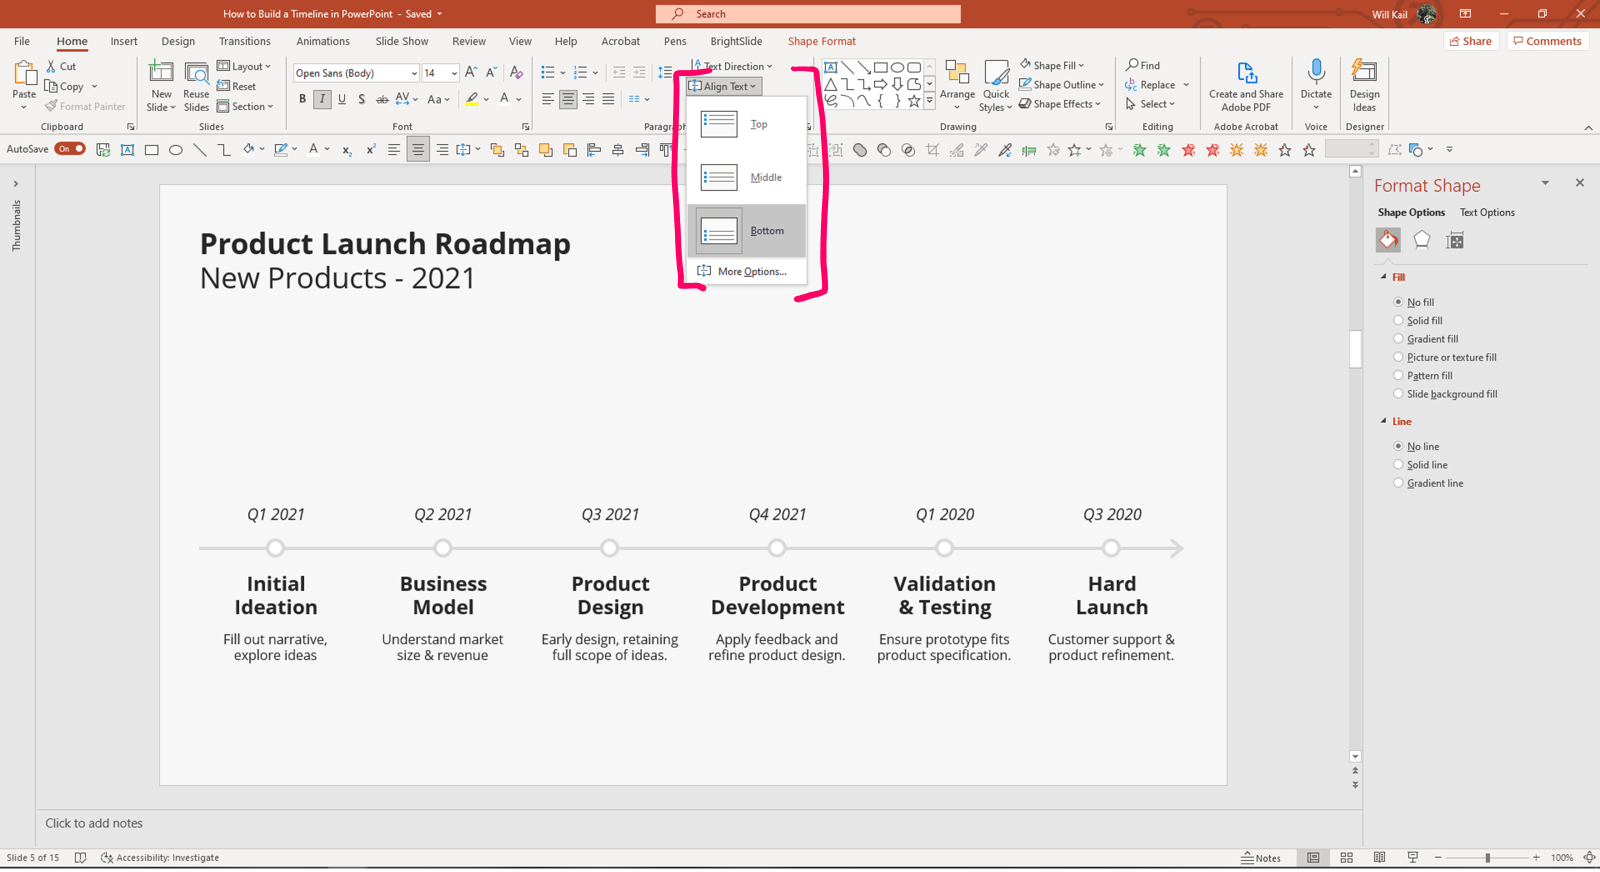
Now you can add a date or time marker above each event. Duplicate your title text boxes again (select all six, hold Ctrl to duplicate, and Shift to lock movement vertically, then drag the boxes upwards). Change the text to your dates, then change the Text Alignment to Bottom (Home > Align Text > Bottom) so the text sits close to the PowerPoint timeline at the bottom of the text boxes.
Finally, place icons above the dates to give the slide a splash of colour. Looking for some fresh icons? Check out our guide on where to find free icons online.
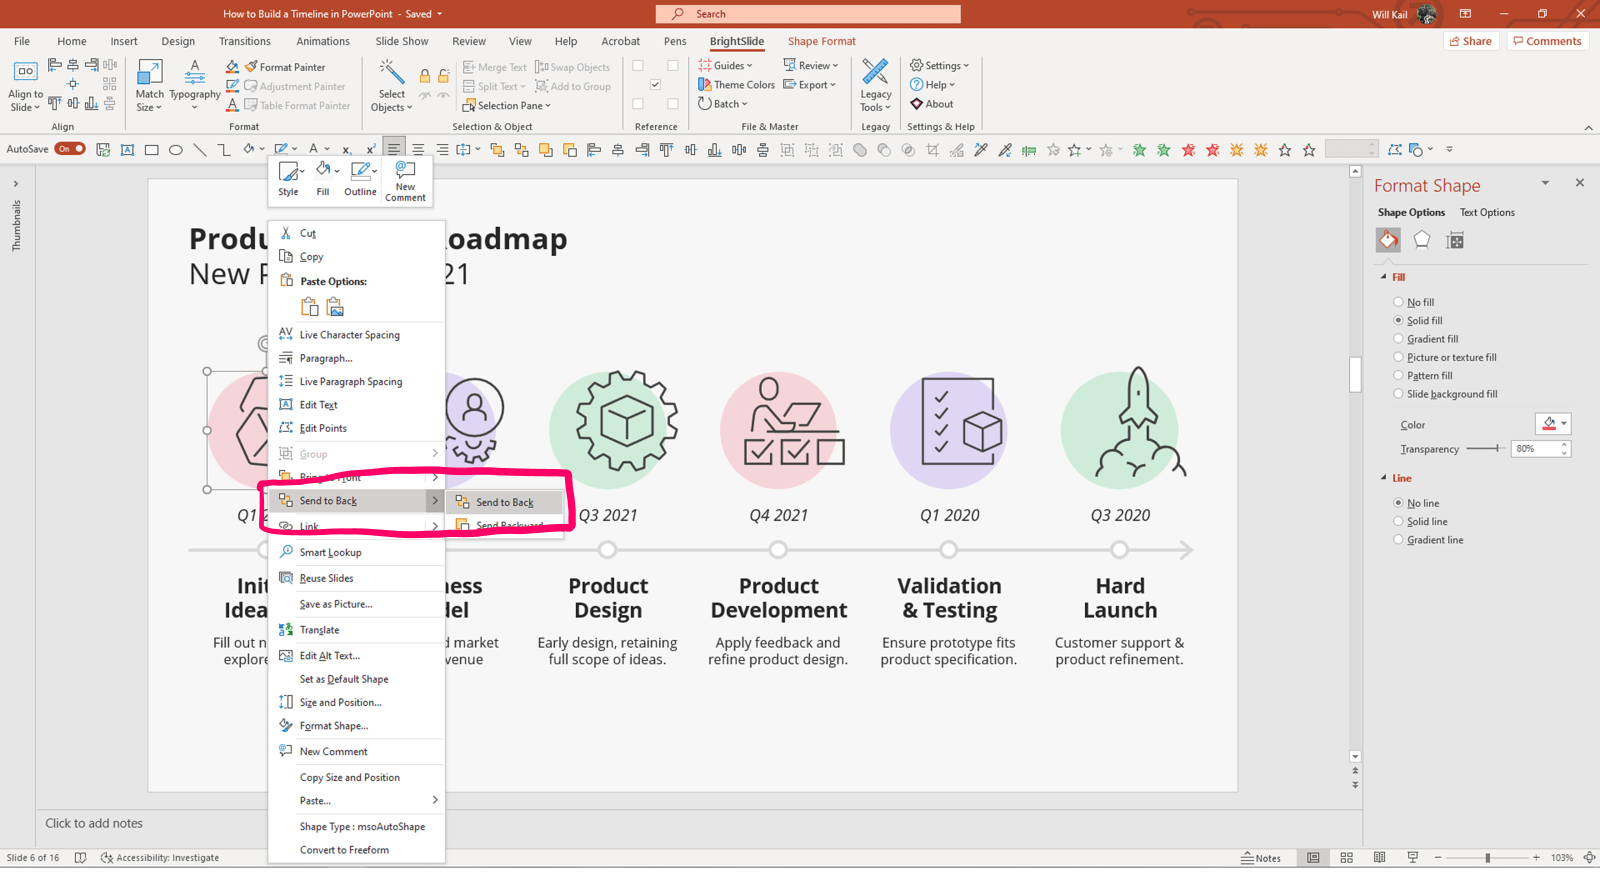
Again, align these above each timeline event. I’m using simple line icons, so for a splash of colour I’ve added a coloured circle behind each icon. To create this effect, align and distribute the shapes as you did for the small circles on the timeline, then use the Send to Back (Right Click > Send to Back) feature to make sure your icons are at the forefront.
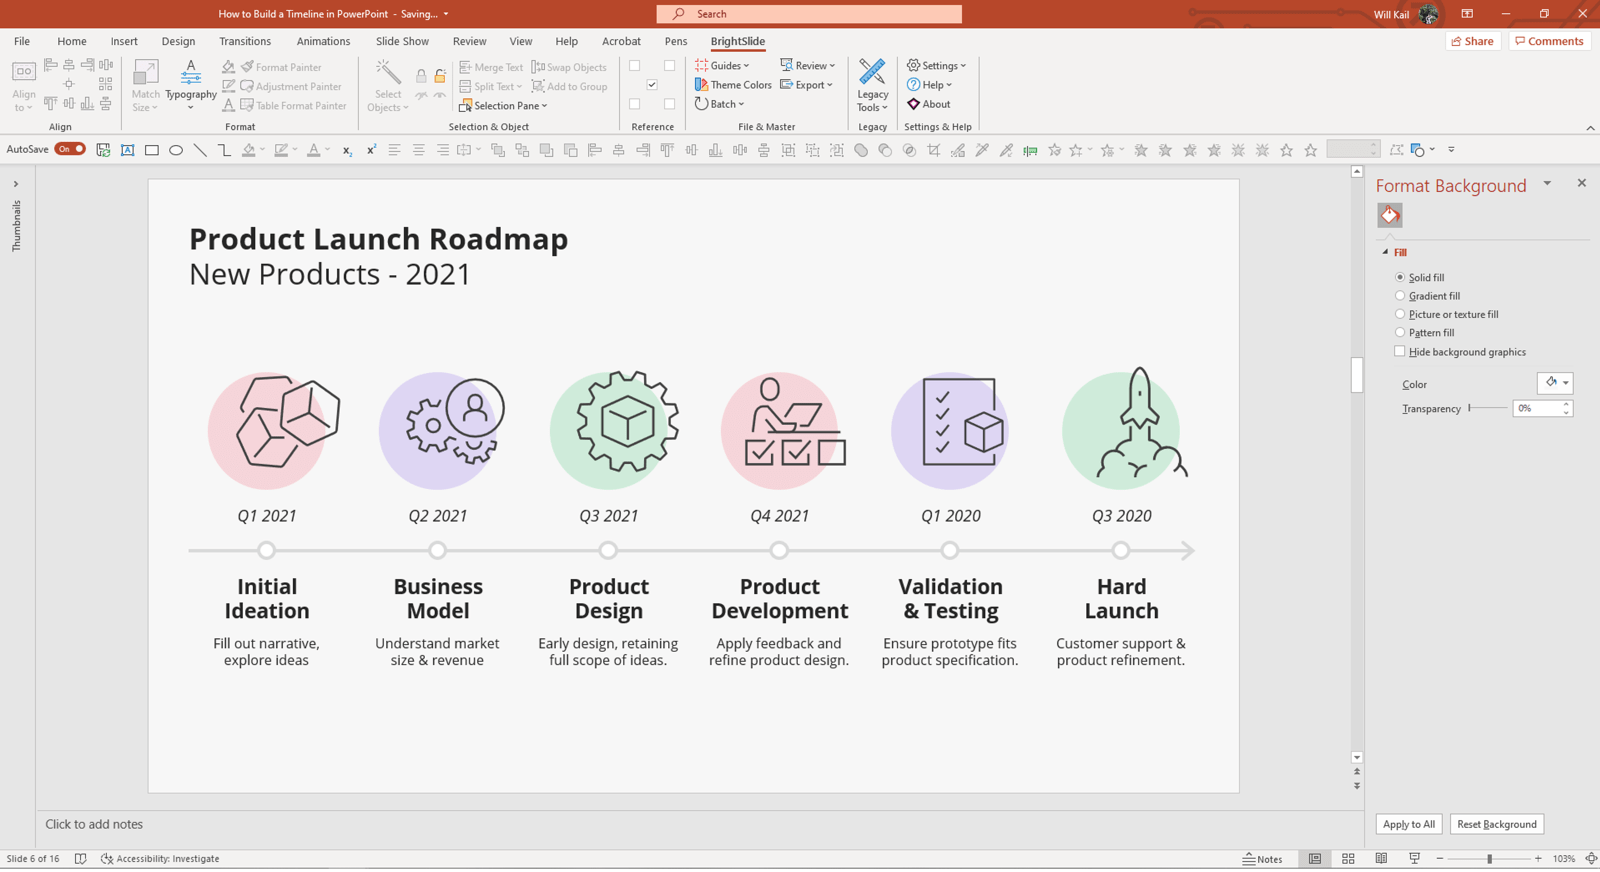
There’s your complete timeline in PowerPoint!
Think your PowerPoint skills need a polish? We’ve got you, click here for our fool-proof Presentation Design Principles guide.
At BrightCarbon we’re love a flourish. So here’s how you can use animation to elevate your PowerPoint timeline to the next level.
First, decide the animation order for objects on the slide. I want to animate in the following order:
The timeline line
Timeline circles (one by one)
Events (one by one) with the top and bottom sections animating in separately.
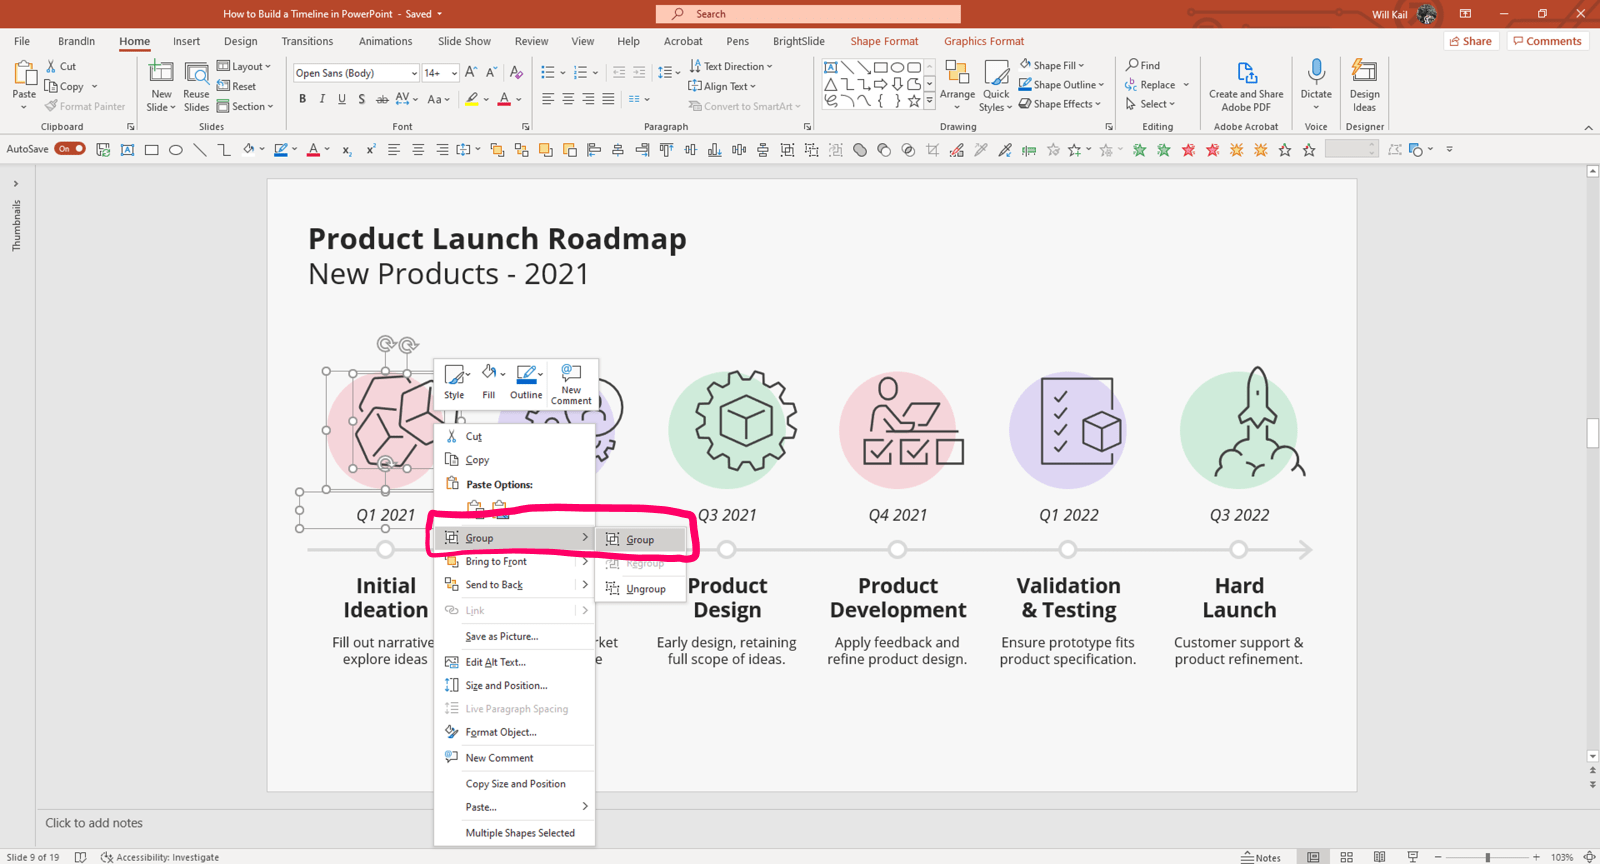
Now group objects accordingly. To group objects, select them, right click, and hit Group. Do this for the top and bottom sections of each event.
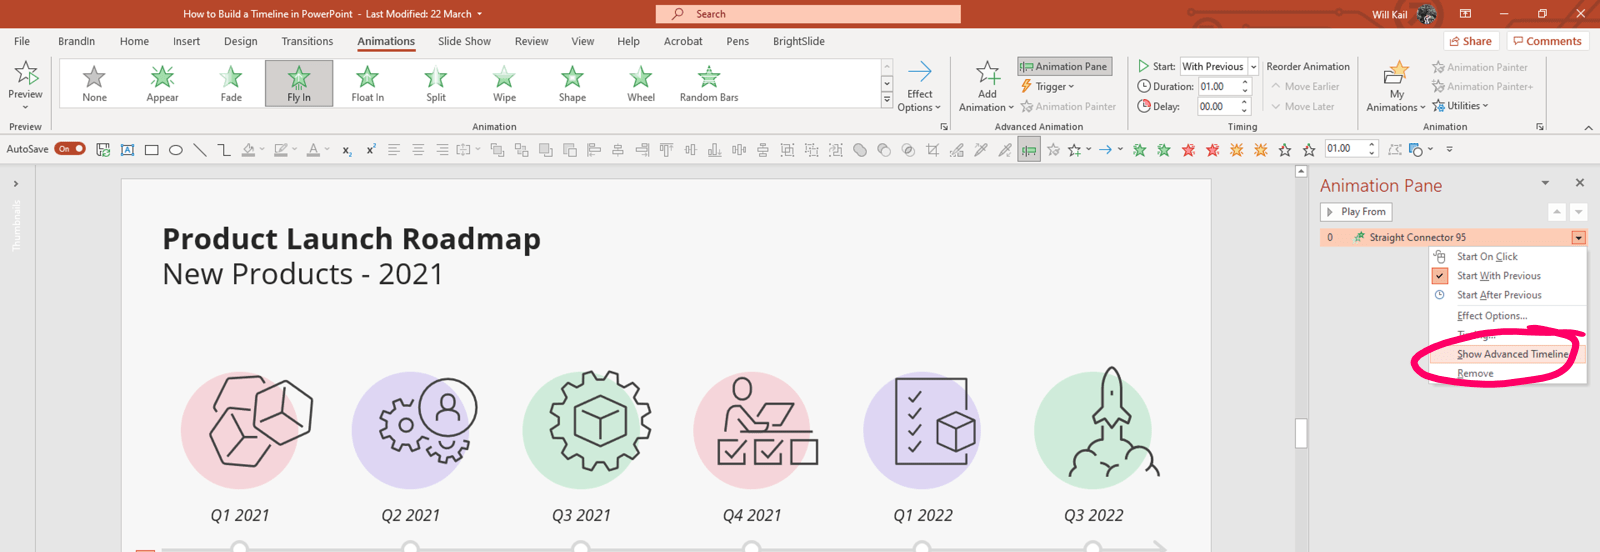
Next select the timeline line and navigate to the Animations tab. Select the Fly In animation. Under Effect Options, change the direction of the animation to From Left, and increase the Duration to 1s.
You can also open the Animations Pane on the right (Animations tab > Animation Pane), to see all animated objects and a detailed timeline of animations on the slide. Be sure to right click and select Show Advanced Timeline to enable this.
Expert-mode tip: To achieve silky smooth animation on your Fly In, right click on the object in the AnimationPane, select EffectOptions, and increase SmoothEnd to the maximum duration.
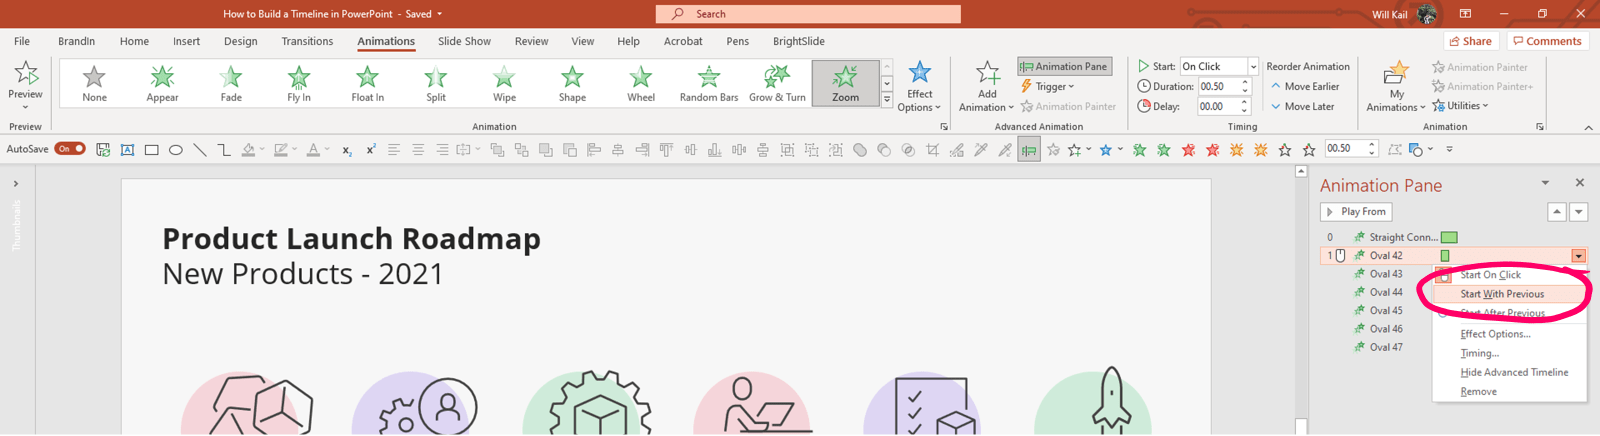
Next – the timeline circles. A Zoom or Fade animation will work nicely. Select all the circles and choose your animation. PowerPoint will set these to Start On Click by default. I want them to build in as soon as the timeline animates in. Navigate back to the AnimationPane, right click on the animation for the first circle, and click Start with Previous.
Stagger the animation of these circles by selecting the second circle animation in the Animation Pane and increasing the Delay by 0.25s. Then, select the third animation and increase the delay to 0.5s. Repeat this so each oval starts 0.25s after the previous one. Test your animation so far by clicking Play All at the top of the Animation Pane. You can drag animations up and down the pane to adjust the timings.
Finally, repeat the steps above with the timeline events. Select each group and add appropriate animation. I’m using the FadeUp and FadeDown animations built into the My Animations animation library of our free PowerPoint add-in, BrightSlide. Again click PlayAll to test.
Finito!
While there are no hard rules in terms of design, it’s important that you keep to the foundations laid out here:
Plan your content.
Trim down your text
Befriend the Align and Distribute tools
Nailed PowerPoint timelines? Then you might be ready to take your skills to the next level by creating interactive slides using a drop-down menu.
All the best things in life do loop-the-loops. Rollercoasters, fancy planes, and… PowerPoint! Learn how to make a loop-the-loop-ing infinite Motion Path in PowerPoint for silky smooth repeating image carousels, never-ending animations, and more!
A PowerPoint template is the only brand element you put in the hands of the whole organisation – regardless of computer literacy, or design skill: it has to be robust enough so that it can’t be broken, but strong enough to carry your brand voice into every meeting, or leave-behind, or proposal it gets used for. Read on for a list of the essential elements every PowerPoint template needs to have.
Designing content to be accessible doesn't have to mean you compromise on vibrant design, or your brand guidelines. In this article you'll learn more about colour contrast and how you can preserve colour vibrancy without having to sidestep WCAG accessibility guidelines.
From liaising with our high profile guest speakers to producing effective presentations for the whole day, BrightCarbon's input ensured the smooth running of this high profile event.