At BrightCarbon, we animate a lot in PowerPoint. Sometimes, it’s things as simple as a “Fade in” or “Zoom out”, sometimes it’s just a neat hack, but the rest of the time, it’s more complicated stuff that makes us look a bit like magicians. As we like to share the magic, here are a couple of tips that might make it easier for you when working with complicated animation sequences.
For the following advice on PowerPoint animation to make sense, you will first need to open the Animation Pane. You can access this through the ribbon here:
The “After animation” setting
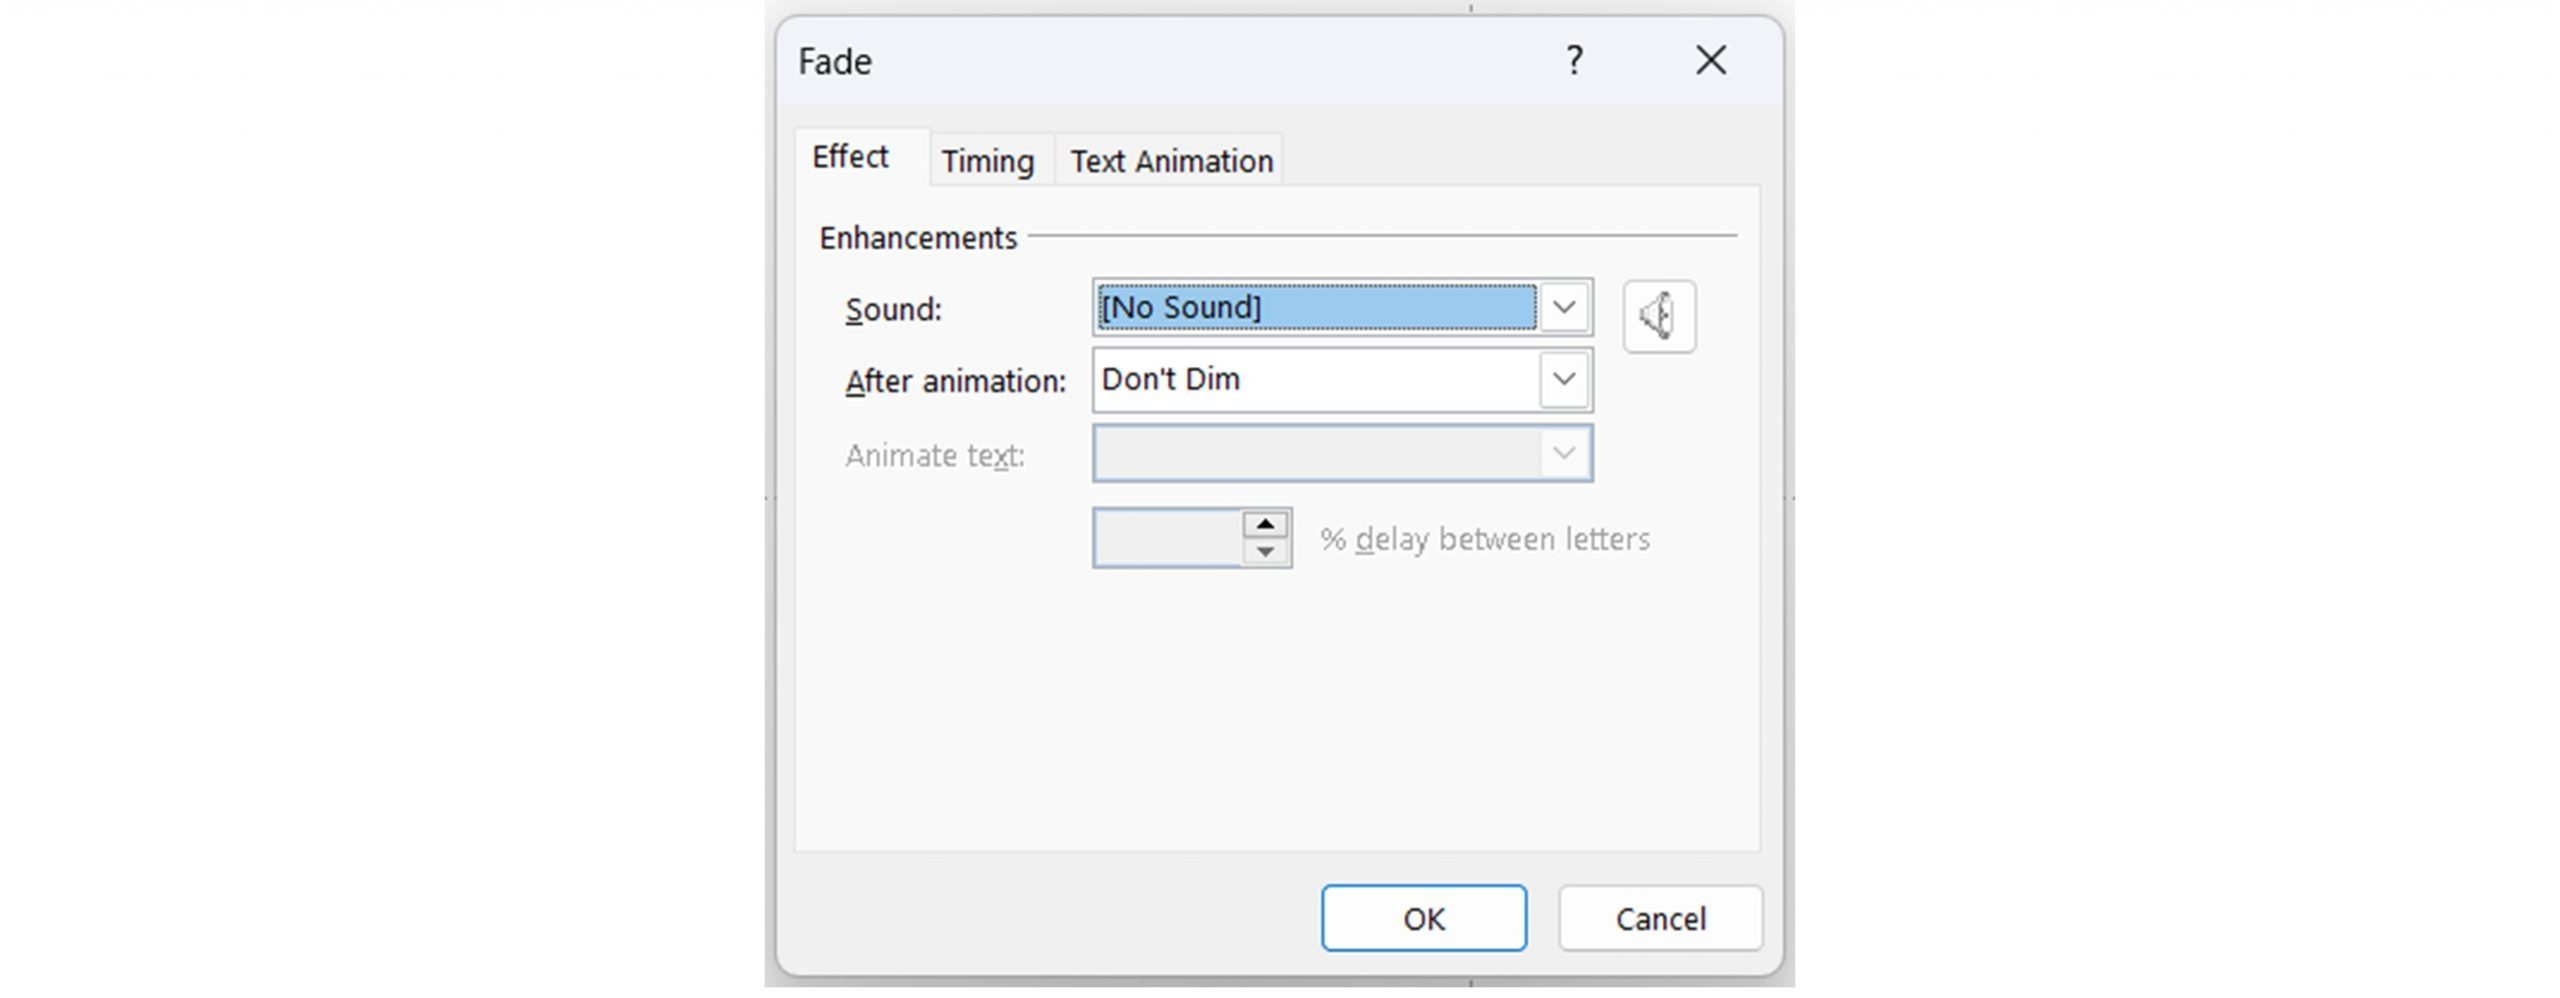
When you apply an animation effect to any object in PowerPoint, you usually have a range of options you can play with, whether it’s timing, delay, or just exactly how the animation appears. You can access this by double-clicking on the effect in the Animation Pane, or right-clicking on it, then choose Effect Options. It will then open a window similar to this:
Here, we’re going to focus entirely on the After animation option. It offers you four different options. Let’s have a look at how these might help you.
Don’t dim
This is the default setting and won’t have any effect on the animation after it is finished.
Colour change
Colour change allows you to change the colour of an object after the animation is finished. For example, you can have a blue circle fade in, or move along a motion path, then change its colour to orange. However, the colour won’t fade in and the change can appear a little brutal. Also, this will only work on single shapes, not on pictures or groups of shapes.
Hide after animation
This option will hide the selected object after the animation effect is finished. It can be really useful if you want to replace that object with another at the end of the sequence.
Hide on next mouse click
Similar to the previous option, this one will hide the object at the next click instead, which might help if you need to clear a slide to have other elements appear.
Zooming in and out of the timeline
When you work on complicated animation sequences, it can become tricky to adjust timings properly, especially if you’re using really short animations, or if you have a long sequence. The Animation Pane has a little hidden option that allows you to zoom in and out in the timeline, allowing you to adjust timings and animation in a more detailed way.
You can find it at the bottom of the Animation Pane by clicking on the Seconds box. You will then have the option to either zoom in or out:
We hope these two quick tips might help you create some stunning sequences!
*Bonus Tip*
BrightCarbon’s very own PowerPoint add-in, BrightSlide, is the ultimate productivity tool for designers working in PowerPoint. Along with lots of other nifty features, we included a few pretty amazing animation tools. The My Animations animation library is a total game-changer – it’s an in-built library you can stock with all your favourite custom animation combinations to use again and again.
Currently in PowerPoint, when you use the Animation Painter to copy and paste animations from one object to another, the latter loses any preexisting animations. Not so with BrightSlide’s Animation Painter+, pasted animations simply stack on top of preexisting animations meaning your hard work doesn’t go to waste! There are loads more tools just waiting to be discovered. Click here to see a full list of BrightSlide’s features.
When Microsoft brought out 3D models support in PowerPoint, we were all a bit excited, however there usually comes a point where you want to create your own 3D models in PowerPoint to add that little pinch of excitement to your presentation. If you don’t know where to begin, fear not. We have just the guide for you!
"PowerPoint found an error that it can't correct. You should save presentations, quit, and then restart PowerPoint." Except, well, you can’t save, because that’s when the error appears. And nobody likes to lose work...
Sometimes PowerPoint feels a bit finnicky, right? Lots of features and functions, but where is it all hiding? Surely there's a better way. You're right. There is a better way, and by applying three changes to your workflow you can shave hours off your slide creation time - no exaggeration.
Colour change allows you to change the colour of an object after the animation is finished. For example, you can have a blue circle fade in, or move along a motion path, then change its colour to orange. However, the colour won’t fade in and the change can appear a little brutal. Also, this will only work on single shapes, not on pictures or groups of shapes.


Colour change allows you to change the colour of an object after the animation is finished. For example, you can have a blue circle fade in, or move along a motion path, then change its colour to orange. However, the colour won’t fade in and the change can appear a little brutal. Also, this will only work on single shapes, not on pictures or groups of shapes.