The Quick Access Toolbar (QAT), is a super fast way to access often-used features in PowerPoint, without navigating endless menus or switching tabs in the ribbon. Here at BrightCarbon we all have our favourite tools, and we’ve created a customised toolbar packed full of them that you can download and use for free. It’s been available for a while, but we often get requests to make it available for PowerPoint users on Mac. Well, things are a little more complicated for the Mac but we don’t back down from a challenge!
The video below explains how to customise your QAT for PowerPoint on a Mac. The customisation file is available to download at the end of this page. Not on a Mac? Hop on over to the Windows version.
As I mentioned above, things are a little different on Microsoft 365 for the Mac (PowerPoint 2016 or higher). There are three main differences:
The QAT is automatically displayed above the ribbon and you can’t move it. This is a pity as the whole point of the QAT is to minimise mouse movement so you can get to the features you use most often in the shortest possible time.
There is no built-in interface to export or import any QAT or ribbon customisation you might want to share or load. Don’t panic, we have a solution, read on…
Some command controls (buttons, menus, galleries etc.) are not available on the Mac.
Since only Microsoft can address the first limitation, let’s deal quickly with the last one.
Not all of the command controls you can add to the QAT in PowerPoint for Windows can be added to a QAT in PowerPoint for Mac. This is either because the feature doesn’t exist on a Mac or the type of ‘control’ isn’t supported. For example, there is no animation motion path command on Mac and some text box entry controls aren’t supported, such as the animation delay control that’s in our QAT for a Windows PC.
Now all that gobbledygook is out of the way, how do we load a QAT customisation on Mac? You may know that if you open the QAT customisation dialog by clicking PowerPoint>Preferences>Ribbon & Toolbar>Quick Access Toolbar, there is no equivalent of the Import/Export feature available to Windows users. You can only reset it to the default using the gear icon:
Back over on Windows PCs, there are actually two types of file that provide the QAT customisation experience. The first is a user-generated file ending with the extension .exportedUI and it’s this file that’s created when you export a customisation, and the one to use when importing the Windows customisation we’ve created for you. When importing a user interface (UI) customisation, this file overwrites the QAT (and ribbon) customisation file that PowerPoint loads each time it starts. This system-generated file has an app-specific .officeUI extension which in the case of PowerPoint is cunningly named PowerPoint.officeUI and can be found in the %LocalAppData%\Microsoft\Office folder.
You can create and maintain multiple files of the first type, enabling you to switch between several customisations for different projects and workflows.
You can only ever have one file of the second type and you’ll find both types on a Windows PC in the folder %UserProfile%\Documents which usually points to C:\Users\username\Documents
On a Mac, the first type (exportedUI) doesn’t exist, hence there is no support for the Import/Export feature. However, the second type (officeUI) does exist and you can manually replace the one for PowerPoint with our carefully-crafted QAT customisation file for Mac.
Warning: Don’t simply take the PowerPoint.officeUI file from a Windows PC and put it on your Mac as there are subtle differences in the internal XML encoding of the customisation which can cause PowerPoint Mac to ignore the customisation or even crash every time you start PowerPoint!
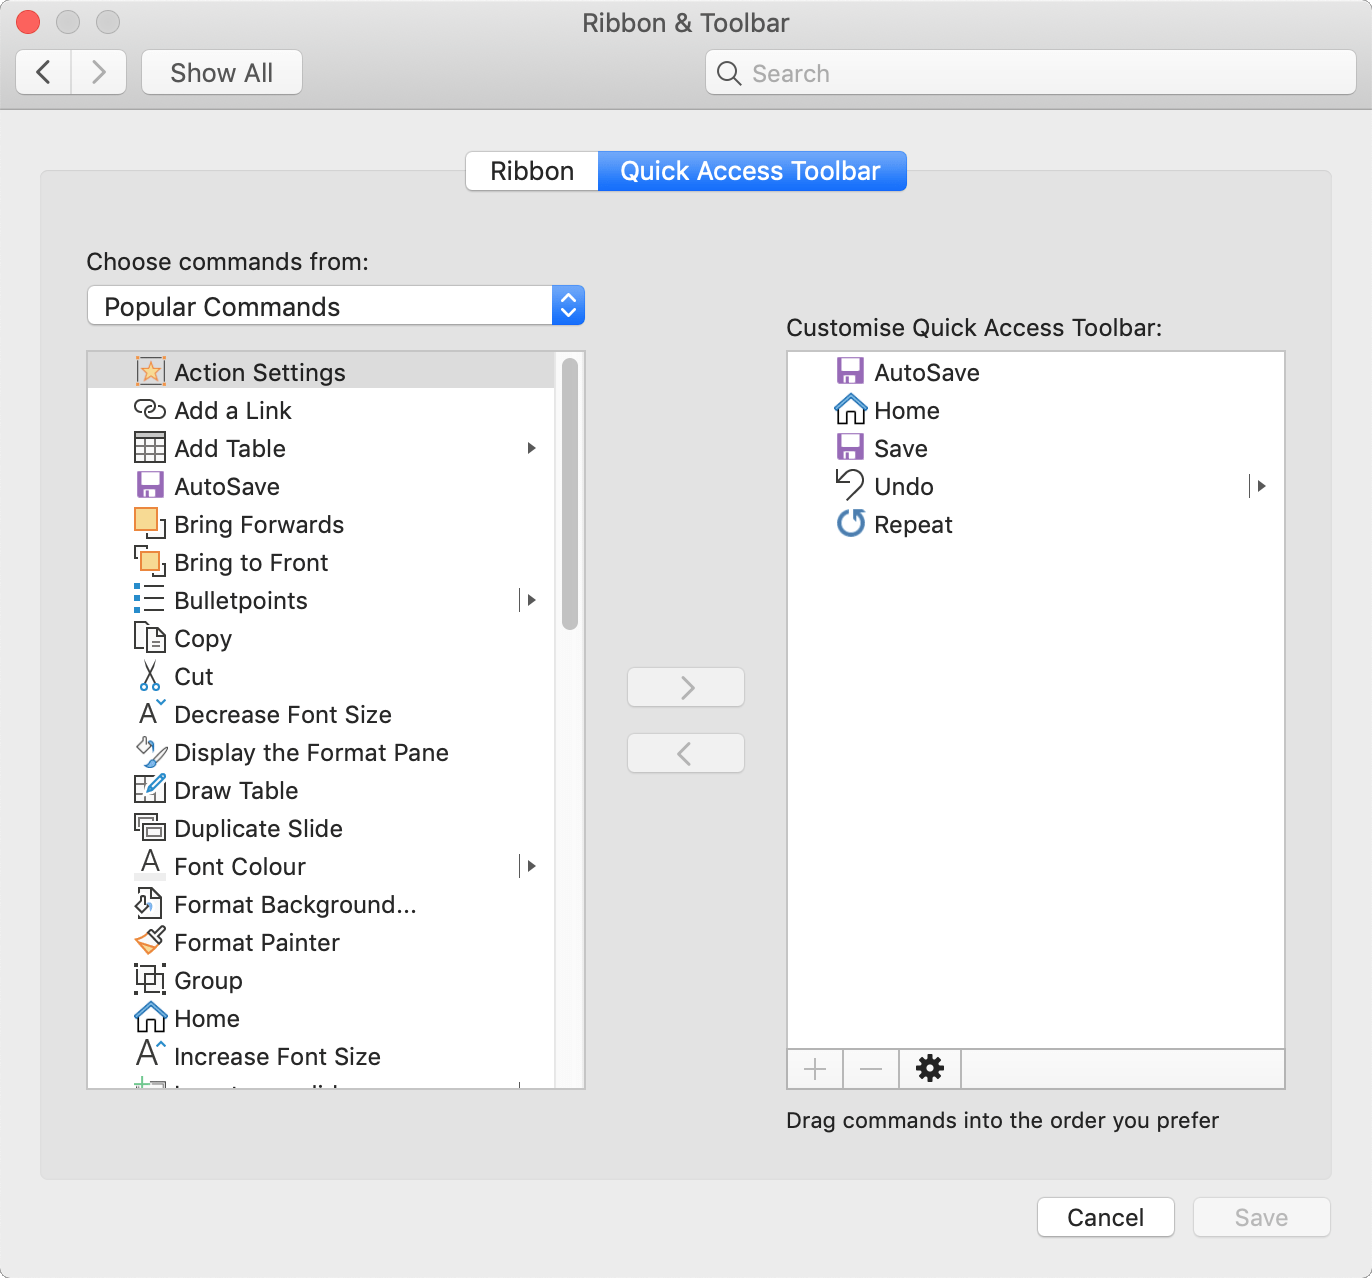
If you’ve never made any customisation changes to your QAT or ribbon, the PowerPoint.officeUI file won’t exist on your system and you’ll see the default Microsoft configuration with just five controls above your ribbon. These are AutoSave (for files saved on OneDrive or SharePoint), Home, Save, Undo and Repeat/Redo:
If you have made changes using the drop down arrow at the end of the QAT or in the PowerPoint Preferences window then the steps below will replace those customisations made to your PowerPoint ribbon and/or QAT. If needed, you can create a backup of your customisation file between steps 5 and 6.
Click Go from the menu bar and select Go to Folder…
Copy and Paste the following location, and then press the Go button: ~/Library/Containers/com.microsoft.Powerpoint/Data/Library/Preferences
Move the PowerPoint.officeUI customisation file to this folder
You’re all done! You can now restart PowerPoint and use your shiny new Quick Access Toolbar.
Once you’ve followed the steps above, your QAT will look like this, with the best tools available at your fingertips (albeit above the ribbon), regardless of which tab is active:
Feel free to make it your own and customise it further by clicking PowerPoint in the OSX menu bar followed by Preferences / Ribbon & Toolbar and selecting the Quick Access Toolbar tab.
Reuse Slides is a PowerPoint feature that will be phased out by 1 January 2026. If you're a fan, read on to discover what Microsoft might replace it with, and two alternatives to Reuse Slides to get you using your on-brand, pre-approved content quickly and easily across your whole organisation
For years, PowerPoint has been synonymous with boardroom presentations and academic lectures. Its default 16:9 slide ratio is tuned for projection screens, not LinkedIn grids or TikTok thumbnails. But what if the same tool that powers your pitch decks could also become your go-to design app for social media content?…
As the saying goes, a picture speaks a thousand words. PowerPoint offers you multiple image sources to help you create your latest presentation masterpiece, but it isn't very consistent in how it presents them to you. Let's fix that!
Great article Jamie. The differences between Mac and Windows versions are odd to say the least and I wish Microsoft would at least make the interface the same.
One of the best features of the Quick Access Toolbar (on Windows) is the option ‘Show Below the Ribbon’ as this makes everything much quicker to actually get to. I have no idea why Microsoft didn’t include this option for Mac.
I can’t even begin to tell you how helpful your tools are for me and my team. I get so frustrated with my Mac interface with PPT and right when I am about to give up, I come to your site and find a solution for exactly my issues! You have saved me time and time again!!! Thank you!!!!
I love BrightSlide so much, I adore it. BUT I have a problem with QAT – when i try to add features to it from BrightSlide they just don’t appear. In-build features are adding without a problem, only BrightSlide ones won’t appear 🙁
I can confirm that this is a Microsoft bug, and unfortunately this is currently not possible to do on Mac. We’ve reported it to Microsoft.
It would be helpful if you could send your feedback to Microsoft as well. You can do so by clicking the “Help Improve Office?” button at the right end of the top orange PowerPoint bar, and then clicking the frown icon to submit. This will help the bug get fixed.
OMG, life-changing! I have this on my PC and was like “I’m not going to do this one by one.” Mahalo for doing all the great things you offer and support the community!
Thank you for your great tools. I and my team used your adding for Windows PowerPoint for more than a year now. And it helps us very much! I switched the system to MacOS recently, and I am not very surprised that it (PowerPoint) doesn’t work as well as the Windows version but I still want to ask if there is a possibility to customize your UI file to add more commands from Brightside. Because I can not do that from the “more commands” menu. It doesn’t add commands from BrightSlide, only basic PowerPoint tools.


This was so unbelievably useful. It worked perfectly. Thank you for your detailed step by step.
Thank you so much for the kind feedback Gio and I’m glad it’s proven useful for you.
Thank you so much for making the QAT available for Mac!
You’re very welcome indeed Pauline le Rutte.
Great article Jamie. The differences between Mac and Windows versions are odd to say the least and I wish Microsoft would at least make the interface the same.
One of the best features of the Quick Access Toolbar (on Windows) is the option ‘Show Below the Ribbon’ as this makes everything much quicker to actually get to. I have no idea why Microsoft didn’t include this option for Mac.
I couldn’t agree more Alan Lomer. Microsoft is making great progress in this area but there’s more to be done. You can vote for the QAT below the ribbon and more on UserVoice: https://www.brightcarbon.com/blog/powerpoint-mac-quick-access-toolbar/#comment-32999 Note the top requests here https://powerpoint.uservoice.com/forums/288925-powerpoint-for-mac/filters/top
Great instructions and very easy to install for Mac. I appreciate it so much!
Thank you Antoinette. We have more Mac articles heading your way soon!
I love this. Thanks for sharing such a cool shortcut set!
I can’t even begin to tell you how helpful your tools are for me and my team. I get so frustrated with my Mac interface with PPT and right when I am about to give up, I come to your site and find a solution for exactly my issues! You have saved me time and time again!!! Thank you!!!!
I love BrightSlide so much, I adore it. BUT I have a problem with QAT – when i try to add features to it from BrightSlide they just don’t appear. In-build features are adding without a problem, only BrightSlide ones won’t appear 🙁
Hi Kris, thank you for th kind words.
So that we could help you a bit better, is there a particular feature you’re having issues with adding to the QAT?
Yeah, I tried with “match size\height\width”, “align objects\middle\center” and “split\merge text”
And all of them are not adding
Hi again Kris,
I can confirm that this is a Microsoft bug, and unfortunately this is currently not possible to do on Mac. We’ve reported it to Microsoft.
It would be helpful if you could send your feedback to Microsoft as well. You can do so by clicking the “Help Improve Office?” button at the right end of the top orange PowerPoint bar, and then clicking the frown icon to submit. This will help the bug get fixed.
I’m facing the same bug as reported by Kris for my own PowerPoint add-in (IguanaTex), and would love to hear more if you get feedback from Microsoft. I asked a question about this on a Microsoft forum but couldn’t get a workaround: https://answers.microsoft.com/en-us/msoffice/forum/all/can-add-in-commands-be-added-to-the-quick-access/6872187f-3c17-40ee-8620-80a4068edc82?page=2&messageId=8a6ec3ae-4481-40f6-9fc6-5f22a3ccc758
We’ll chase this with Microsoft Jonathan.
OMG, life-changing! I have this on my PC and was like “I’m not going to do this one by one.” Mahalo for doing all the great things you offer and support the community!
Awesome! This will be BEYOND helpful! Thank yo.
Thank you for your great tools. I and my team used your adding for Windows PowerPoint for more than a year now. And it helps us very much! I switched the system to MacOS recently, and I am not very surprised that it (PowerPoint) doesn’t work as well as the Windows version but I still want to ask if there is a possibility to customize your UI file to add more commands from Brightside. Because I can not do that from the “more commands” menu. It doesn’t add commands from BrightSlide, only basic PowerPoint tools.
Thank you for nice tools! It makes my efficiency to make proposal document fast!