
30th Oct 2023
How to create PowerPoint templates that work
- PowerPoint design
- Comments: 2
Without a proper PowerPoint template, presentations can be a bit of a mess. Here are the building blocks for developing a PowerPoint template that works!
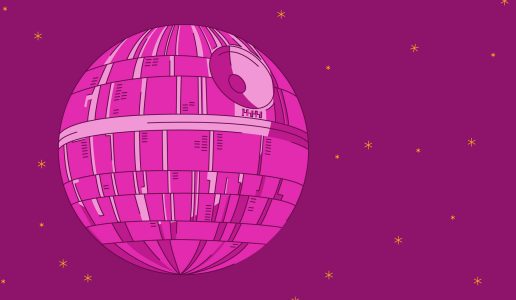
You know when you’ve got a conference call and you’re first online, and there’s that blissful silence when you can contemplate anything in the world? What do you do? …Well, you could use the PowerPoint bevel, 3D rotation and morph tools at your disposal to be like Darth Vader, and build your very own Death Star.
The content from the video can be found in the article below.
Let’s start on the spheroid, with a large concave dish in the northern hemisphere – or Death Star and superlaser emitter as you might know it. How would you do it – without getting a whole load of Geonosians and a Galactic Empire?
Start with a circle and then go to the Format tab on the ribbon, then the Shape Effects function. From there, choose Bevel and then 3-D Options, which will bring up the full 3D Format Options menu. This is where the construction begins.
Let’s take a moment to understand the bevel function. If you imagine a shape in PowerPoint, like a circle, as a flat piece of paper laying on a table that you’re looking down on, the bevel function works on the shape in two ways. The top bevel provides height and form to the top of the shape – the part that you’re looking at. The bottom bevel provides depth and form to the other side of the shape – the part that’s resting on the table.
Then you need to understand what the PowerPoint bevel options mean. If you choose the standard round bevel for example, you can see that the shape gets a bit of a 3D edge to it. It’s now like a cookie, rather than a piece of paper, with a bit of height and rounded edges that curve to the flat top. The height is how much the shape sticks out towards you, while the width determines how rounded the edges are, and how far the bevel gets stretched into the shape.
If you increase the width, the shiny edge created by the bevel function gets closer to the centre, and stretches as the curve becomes flatter. If you increase the height it becomes more defined again, as the shape gets taller.
To make it easier to see and understand, put things into 3D using some 3D rotation. In the Shape Effects menu, under the 3D Format options open up the 3D Rotation options, go to presets, and choose the Perspective: Relaxed option. This spins the shape around and you can more easily see the height and the curve of the shape. If you increase the height on the 3D Format options you see the shape getting taller, and if you increase the width, you see it getting rounder.
If you’re keen eyed, you’ll notice that the top of the shape is rounded, but it cuts off sharply at the bottom. That’s where the bottom bevel comes in. If you do the same using the bottom bevel, clicking on the options to choose a round bevel, and then increase the height and the width, you see how the shape starts to fill out underneath now as well. So that’s how the 3D format options and bevels work.
Our spheroidal Death Star needs to closely resemble a ball. This requires a careful balancing and matching of the height and width of the bevels you use, and typically, I find that they should be similar numbers. If you create a circle, put a round bevel effect on it and increase the height to maybe 100 and the width to the same, you start to get a nice hemisphere on the top. The actual numbers you use for height and width will vary, depending on the size of your original circle. Larger circles need larger numbers, so try a few to see which gets closest. Once you have a nicely rounded top, do the same to the bottom to get your basic sphere. Marvellous.
But what about the large concave dish in the northern hemisphere for the superlaser emitter? It wouldn’t be any use without that.
This is where you need to think about the type of bevel you need. If you look back at the bevel options, you’ll see that there are several choices. We’ve used the basic round bevel shape so far, but the next one along in the list – beguilingly called relaxed inset – gives you a different profile. Rather than being rounded and smooth, this one is rounded at the edges and then dips into the middle. This has some promise and is a feature that all leading mega death laser designers look for.
If you choose the relaxed inset bevel, it doesn’t look quite right initially. The dish will probably be far too large, which as you well know would lead to a diffuse laser that is difficult to focus. So adjusting the width of the bevel to bring in the curve is needed, which in turn reduces the diameter of the dip. And when you bring it in just enough, you end with the perfect dimensions.
The final thing to create the Death Star like appearance is the skin of it. This is achieved using a texture flood fill effect. Go to the fill options and select texture, where you’ll find a whole load of choices that I’d never recommend you use. But amongst them, the newsprint option in the middle gives, at a distance, a rough approximation of the pattern on the Death Star. Ta dah! Or should I say, Ta DAH DAH DAH, DAH DAH DAH DAH DAH DAH! [imagine to the tune of the Imperial March theme].
Now, what about that cool trick where you get to fly around it and view your new creation? That’s achieved using the Morph transition, which, sadly for many, is only available in PowerPoint 2016, and even then, not the early versions of 2016, so make sure that you’re up to date in your Office 365 account.
Morph works across two slides and recognises any objects that are on both and seamlessly transitions from one slide to the next. If you re-position the object on the second slide, during the morph transition, the object will move. Change the colour and it will blend to that new colour. You can even change the shape and size of an object. And amazingly, if you change the 3D rotation of the object, it will spin the object around to the new orientation, which is pretty funky.
To enhance the effect, put an image of a starry sky in the background and then copy it onto the second slide. There, you should resize it and re-position it, so that during the transition you get a nice parallax effect with the Death Star in the foreground and the stars in the background moving independently of each other.
If you’re as enthralled by Morph as we are, you should check out the other articles we have on this topic to learn more about the cool stuff it can do!
And there you have it, your very own mobile, planet-destroying super weapon, made using only the PowerPoint bevel, rotation and morph tools. Please, use it carefully and don’t leave the plans lying around.
Leave a commentWithout a proper PowerPoint template, presentations can be a bit of a mess. Here are the building blocks for developing a PowerPoint template that works!
By applying some key principles of presentation design, you can make your PowerPoint design really standout and deliver both a more ‘popping’, but also more effective presentation.
Most presentations are a cascade of text-heavy Death-by-PowerPoint slides. Online learners suffer the torture of brochures converted to click-through-eLearning. Most people now recognize that using visuals is the way to go. But how do you make visual presentations and eLearning that work? We think there are six steps you need to follow.
Join the BrightCarbon mailing list for monthly invites and resources
Tell me more!This is awesome! You guys are great to work with and we will absolutely recommend you to others.
John Capuano Lone Beacon


I was reluctant to move to PP 2016 (from 2010) but now I want to! I’m not sure if I’ll need a Death Star (you never know, though) but I will be prepared with your useful and entertaining tutorial.
You are an inspiration to me to improve the training I develop.
I couldn’t think of a better use of one’s time.
Well done! Excellent tutorial. I use morph extensively in presentations and am often frustrated to find how few times the feature is supported on other user’s machines. I wish there were some way to be certain they have it.
What a great tutorial!
Hello Bright Carbon
I am a Training Specialist at the Veteran’s Affairs; Acquisition Academy; Program Management School, in Frederick, Maryland USA. I attended the ATD Virtual Conference and viewed your “Mind Blowing Power Point Presentations; No Really!” presentation. Great presentation, by the way. I was intrigued by your Bright Slide product and its use with the Morph capability in Power Point.
I wanted to bring my presentations to the next level and incorporate it into our training some of the techniques your presentation demonstrated, but I have a challenge. We use Adobe Connect to deliver virtual classes and Adobe strips away some functions, like morph and the Bright Slide effects when we upload the Power Point slides to the Share Pod. The transitions change the position of the items, but no smooth movement is seen. It just jumps to the end of the transition. Can you share a work around?
Hi Bryan, so pleased that you found the session useful, thanks! Morph is indeed an amazing function in PowerPoint. Sadly, most online sharing platforms don’t support morph. So when you upload your PowerPoint into the Connect content pod, it converts the Morph transition to a simple fade, which is why the objects shift, but don’t move smoothly along a path. The workaround is to make the content pod a screen share, rather than uploading content. That way, people will see everything on your screen, and it will be PowerPoint running the content.
As far as I’m aware, the only online meeting platform that supports the Morph transition with uploaded content (as opposed to screen sharing) is Microsoft Teams, which uses PowerPoint for the Web under the hood.
iSpring is another conversion engine that supports Morph, but that creates HTML5, which isn’t really suitable for live sharing. And of course you can convert PowerPoint files to video or animated GIFs which will also show the Morph movement.
Thanks for the kind words on BrightSlide too. Just to be clear though, Morph is not part of BrightSlide. BrightSlide is simply a productivity tool that allows you to create content using standard PowerPoint functions much more quickly and easily. It doesn’t add new functionality to PowerPoint.
What an excellent tutorial! And who would have thought those bizarre textures could ever be useful for something? World domination! That’s what they’re for! Got it! 🙂
This video, besides being very cool, also taught me things about Bevel that i had never considered, thank you so much. You guys do such excellent tutorials. 🙂
Greetings from Canada!