We’re often asked whether it’s possible to ‘cut out’ images in earlier versions of PowerPoint. Well, the good news is that it is, and the even better news is that I’ve written a guide to show you how to crop an image in PowerPoint. Let’s go!
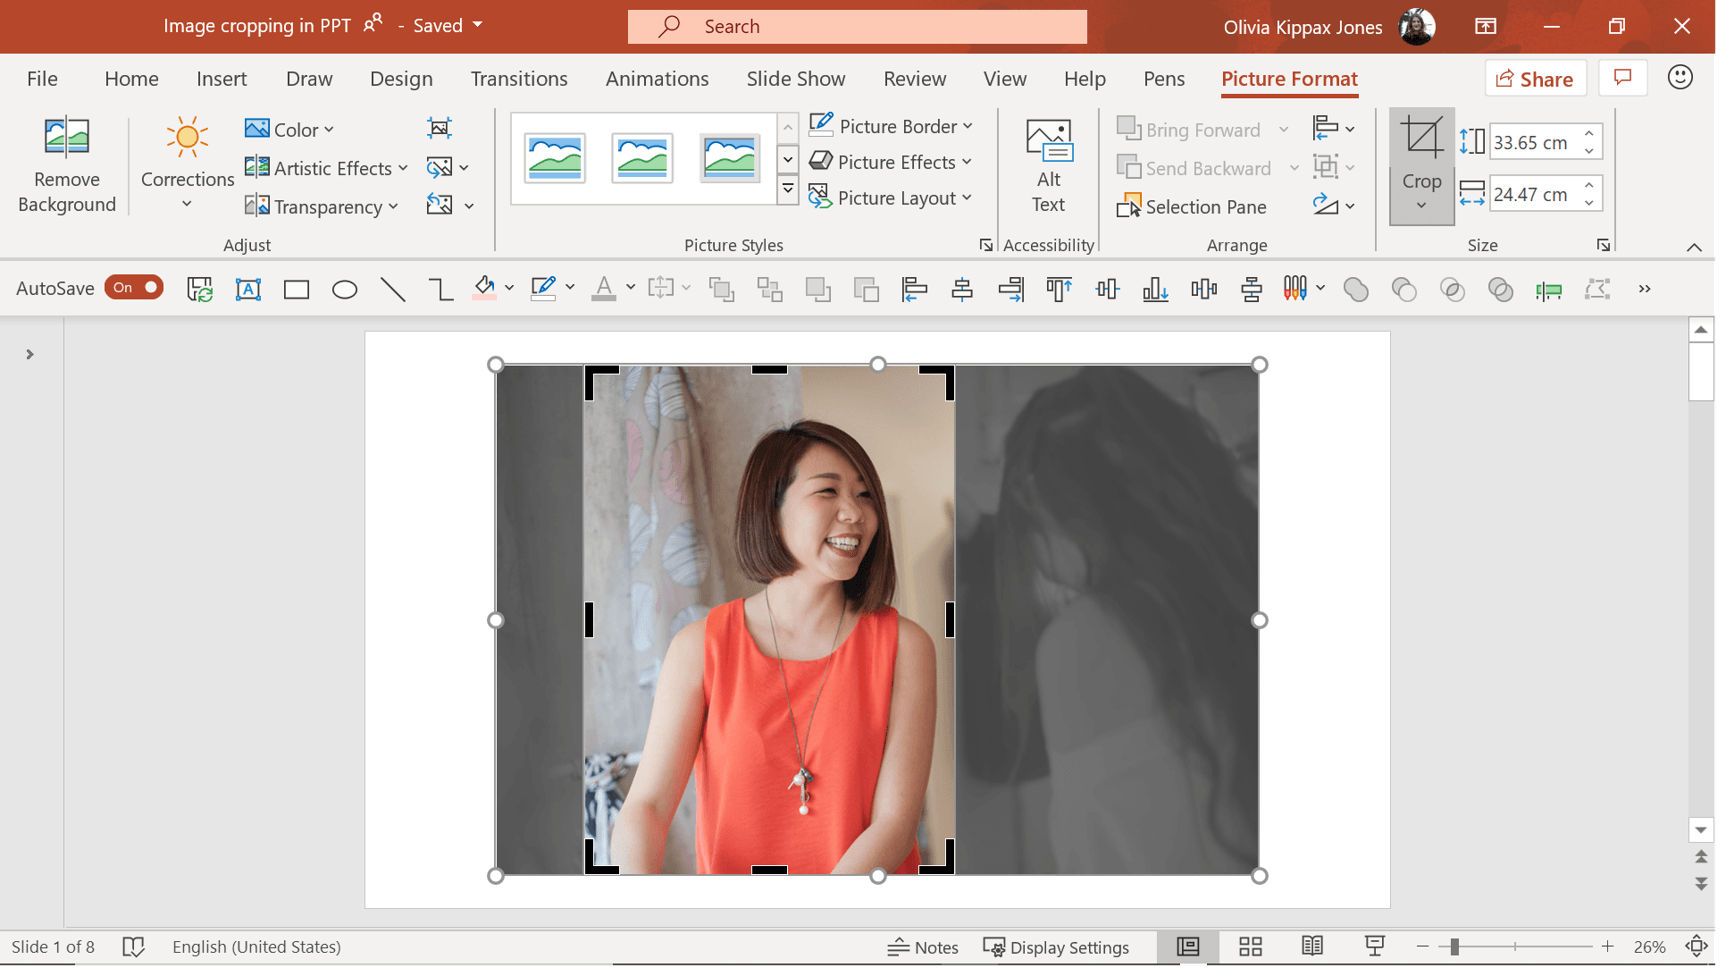
How to crop an image in PowerPoint 2010 or earlier: Square or rectangle
1. Select your image.
2. In the Picture Format tab, select Crop
3. Resize the cropped section using the black V handles that appear, resize the image itself by using the white circle handles, and move the image within the cropped area by dragging the image itself.
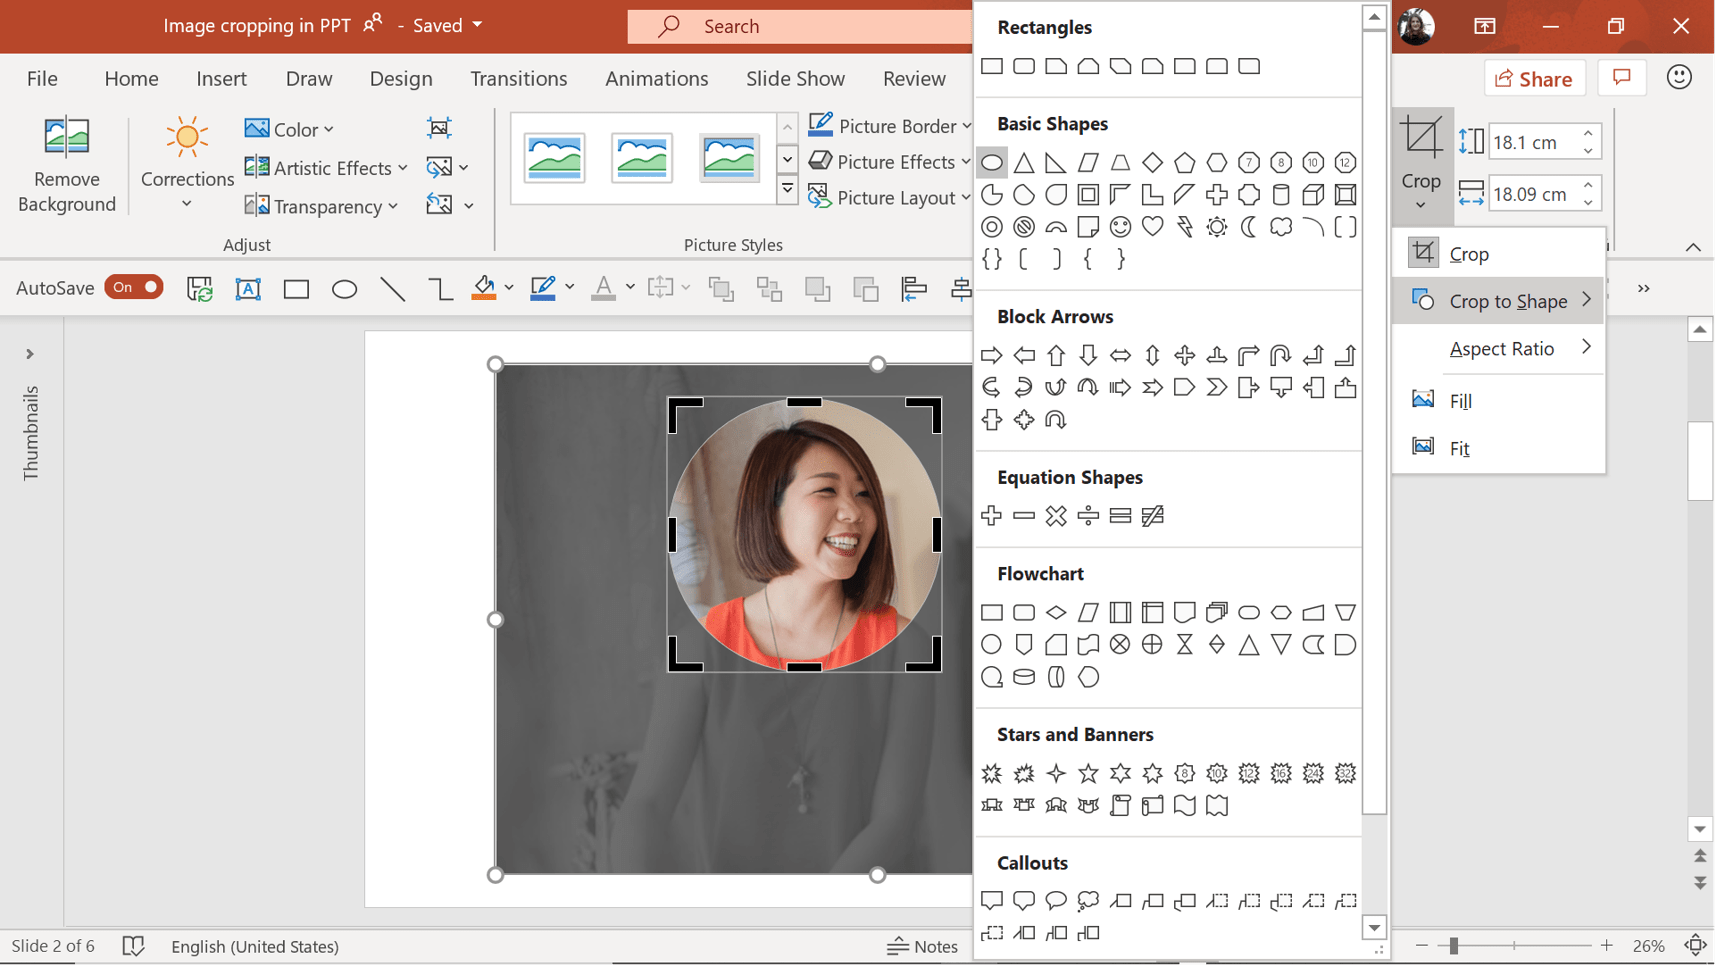
How to crop an image in PowerPoint 2010 or earlier: Simple shapes (circle, triangle, arrow)
1. Select your image.
2. In the Picture Format tab, click on the small arrow underneath the Crop button to display more options.
3. Choose Crop to Shape from this menu, and select whichever shape you require.
4. By default, PowerPoint stretches your chosen shape to cover the entire image. To change the size, shape or position of the cropped area, click on Crop again.
5. Resize and reshape the cropped section using the black V handles, resize the image itself by using the white circle handles, and move the image within the cropped area by dragging the image itself.
This technique can also be used to highlight an area on an image. Before you begin, create a duplicate version of your shape and apply an effect to it (such as recolouring, blurring, etc.). Place this version of your image behind the one you want to crop. Make sure you line both images up before you start step one.
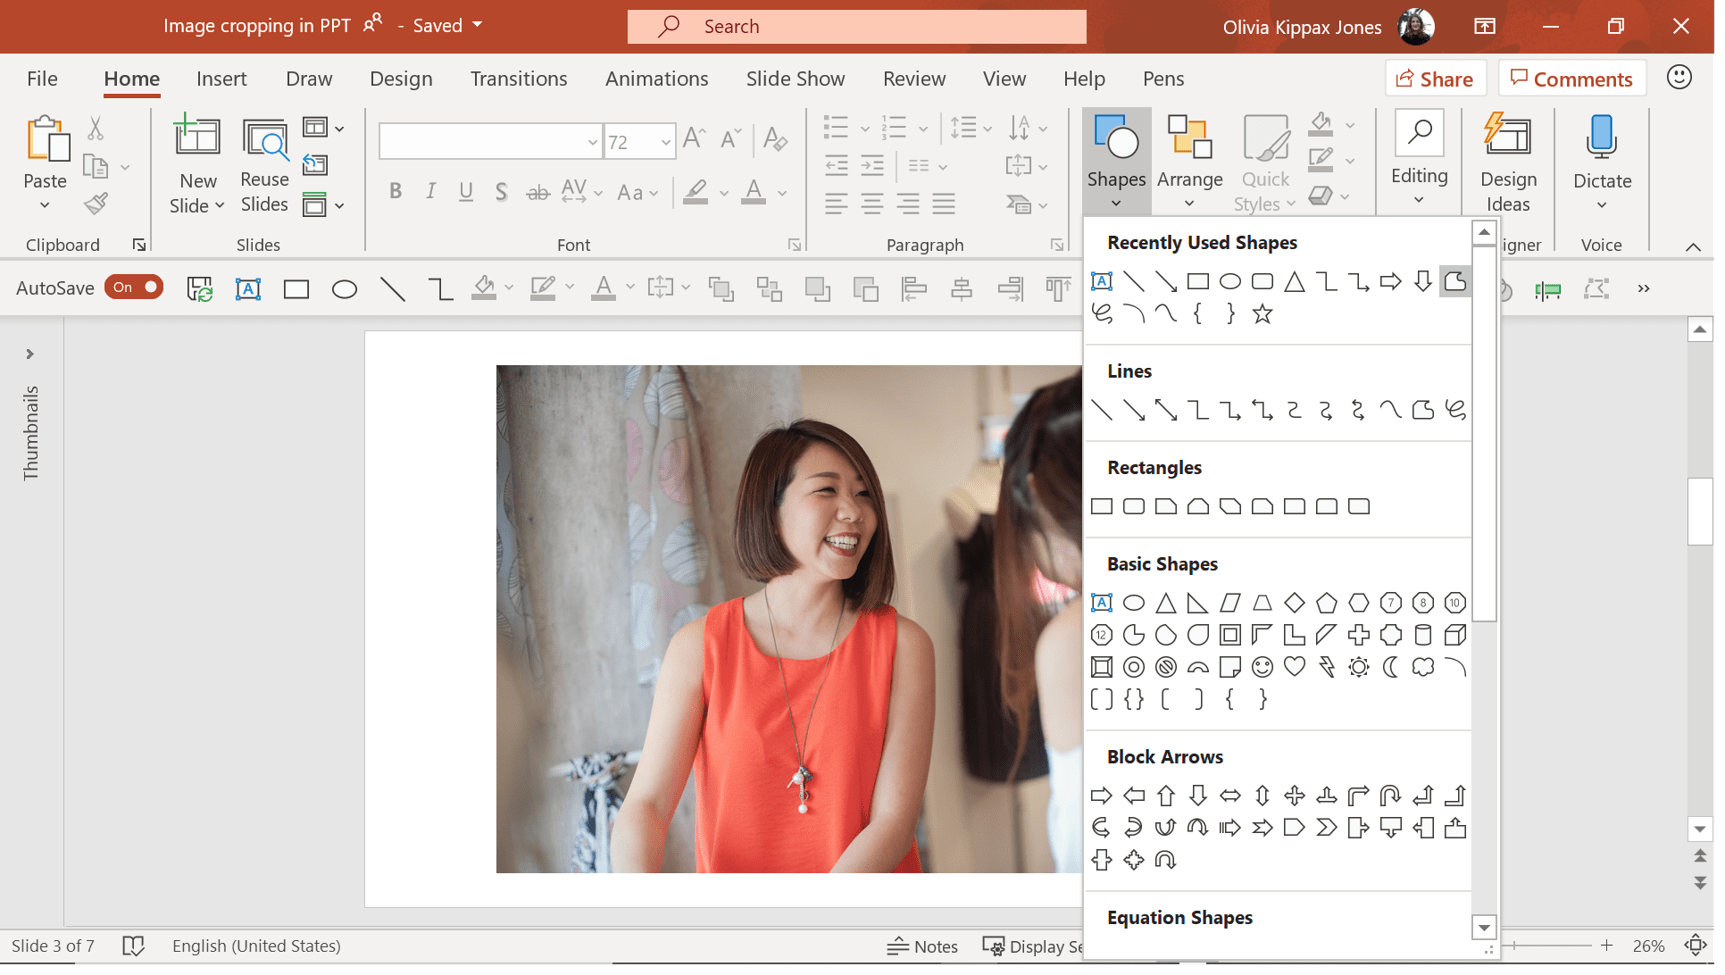
How to crop an image in PowerPoint 2010 or earlier: Custom shape
1. Head to the Autoshapes menu and select Freeform.
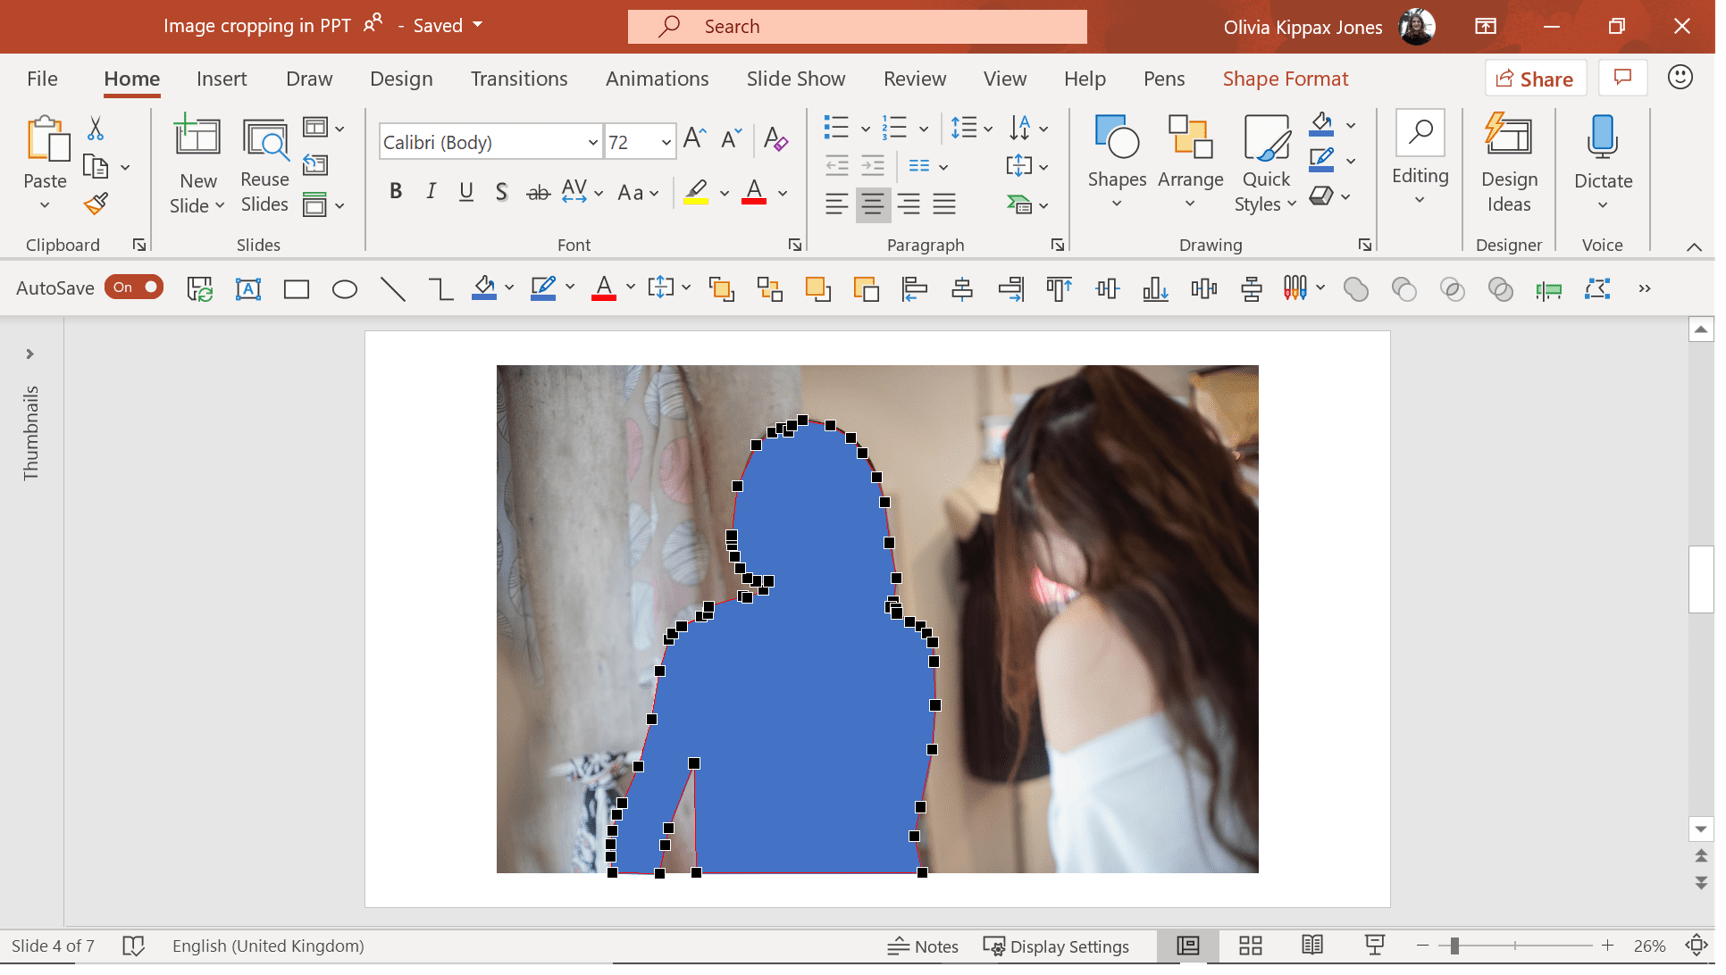
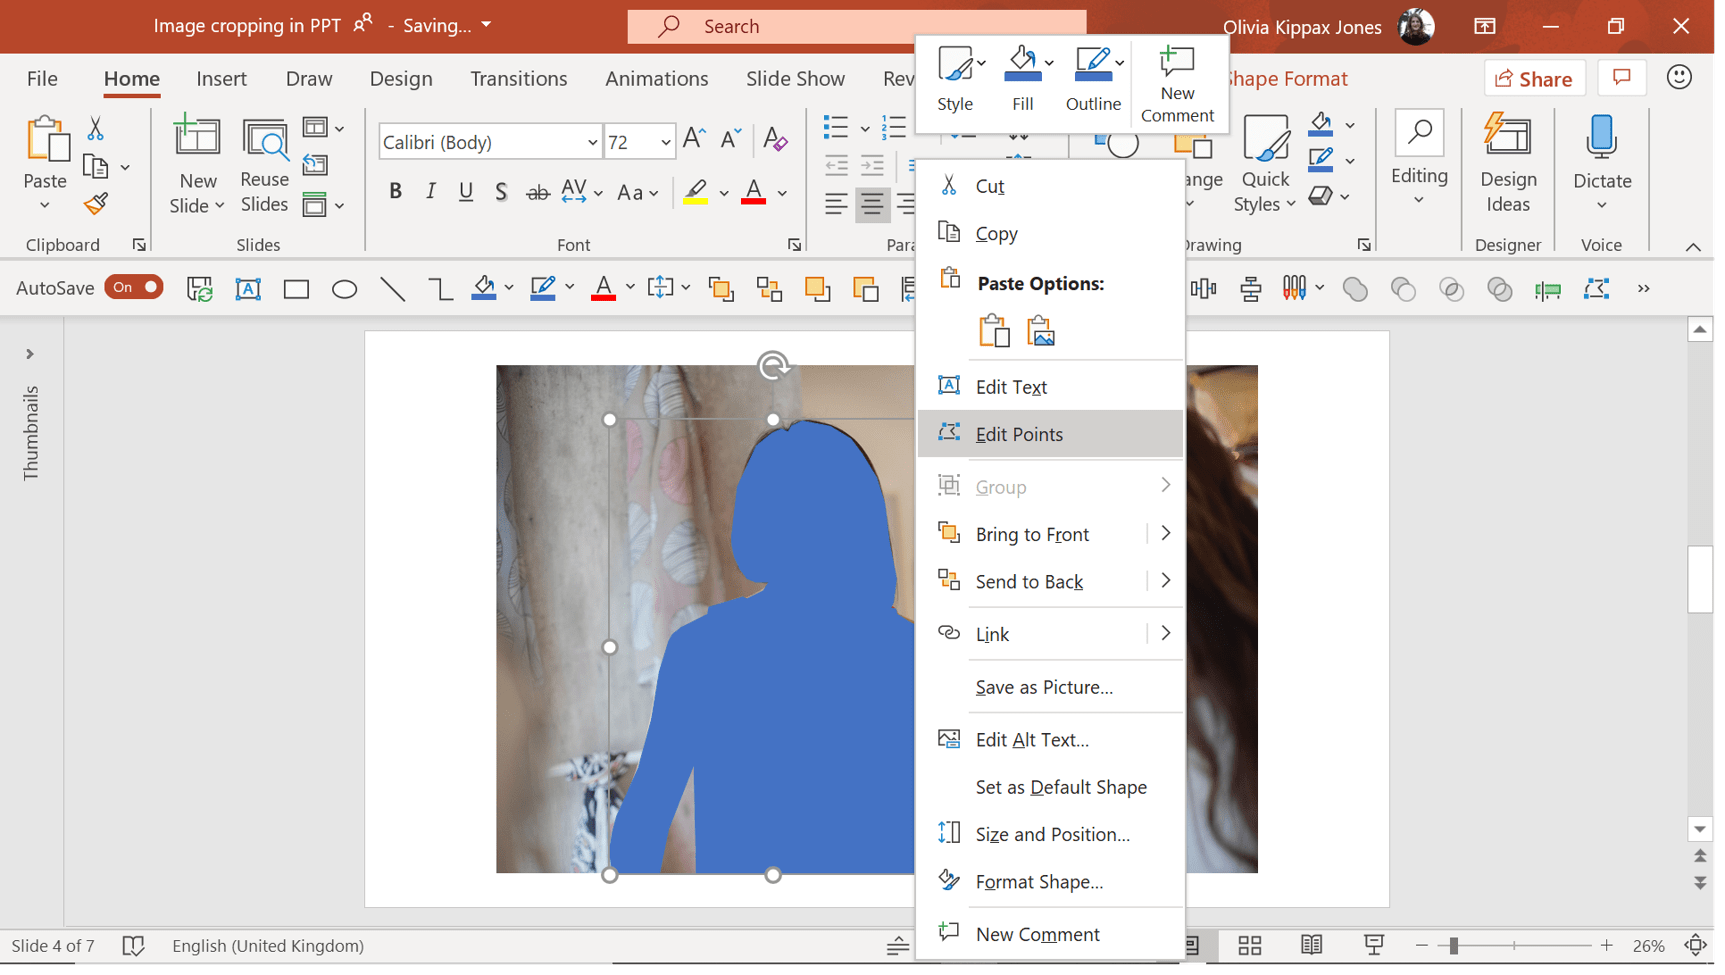
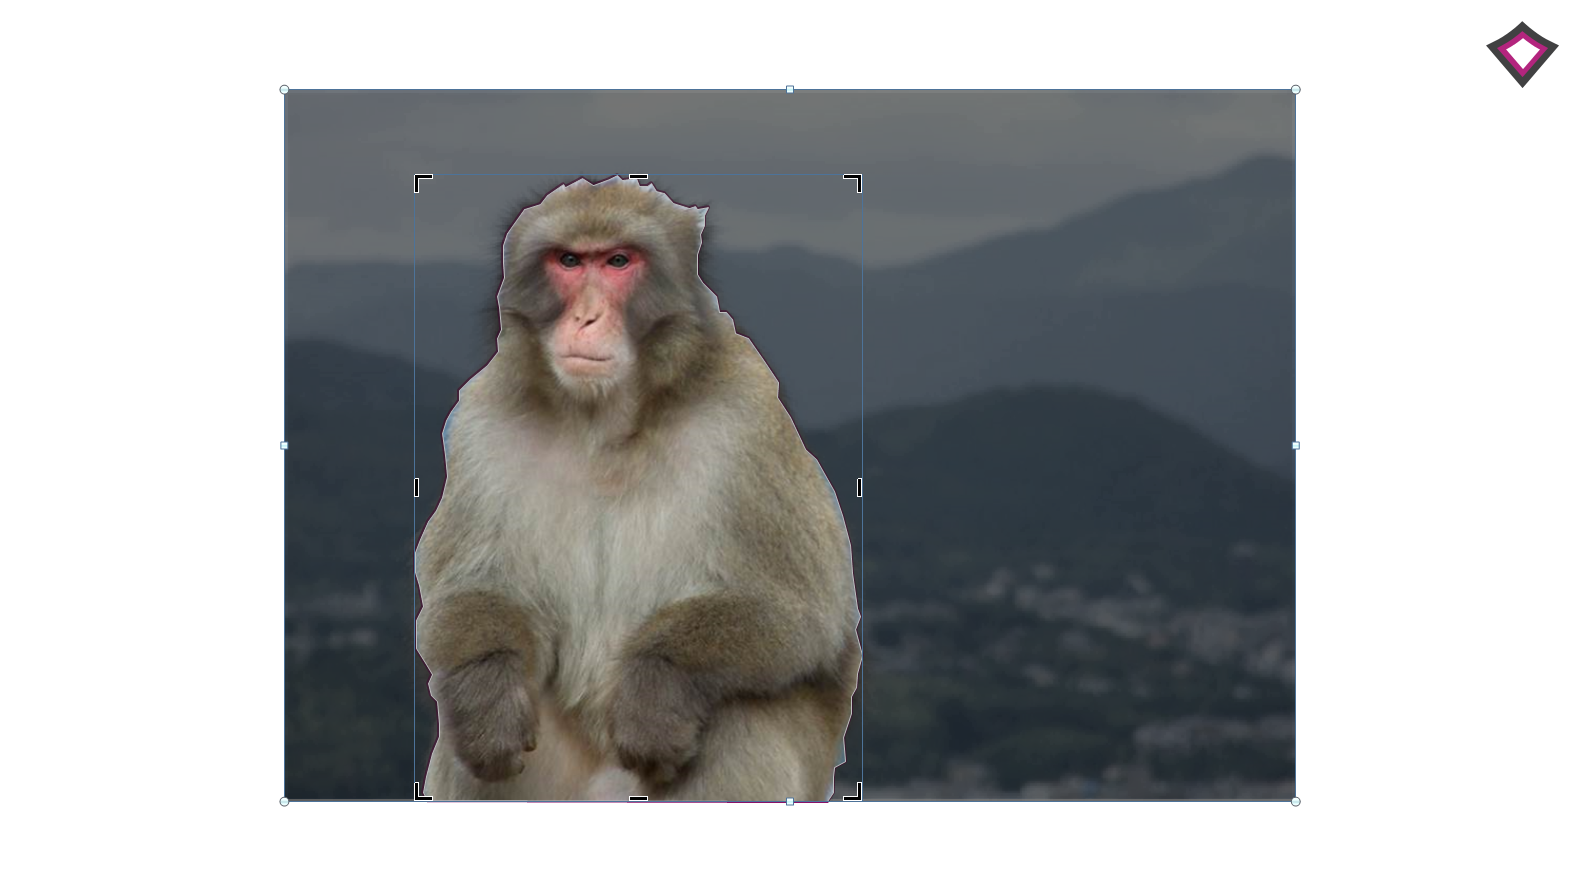
Draw a freeform shape over your image, tracing out the part of the image you want to keep. Here, I’ve drawn around the woman. To create a shape, make regular clicks along the outline of your chosen object to drop points – think of it like a child’s dot-to-dot picture.
2. Make sure you close the path of your custom shape by double-clicking after you drop your final point. If you don’t, right-click on your shape, choose Edit Points, then right-click again on any of the points you’ve made and click ClosePath. You can also use Edit Points to drag points around and create a more accurate shape.
3. Once you’re happy with the outline you’ve created, you need to fill your shape with a version of your image. Right-click on the original image and click Copy (or press Ctrl+C on your keyboard).
4. Now select the freeform shape and, under the Shape Format tab, select Shape Fill. You can also select the freeform shape you’ve drawn and right-click on it, choose Format Shape then select Fill.
5. Now select Picture.
6. Click on Clipboard.
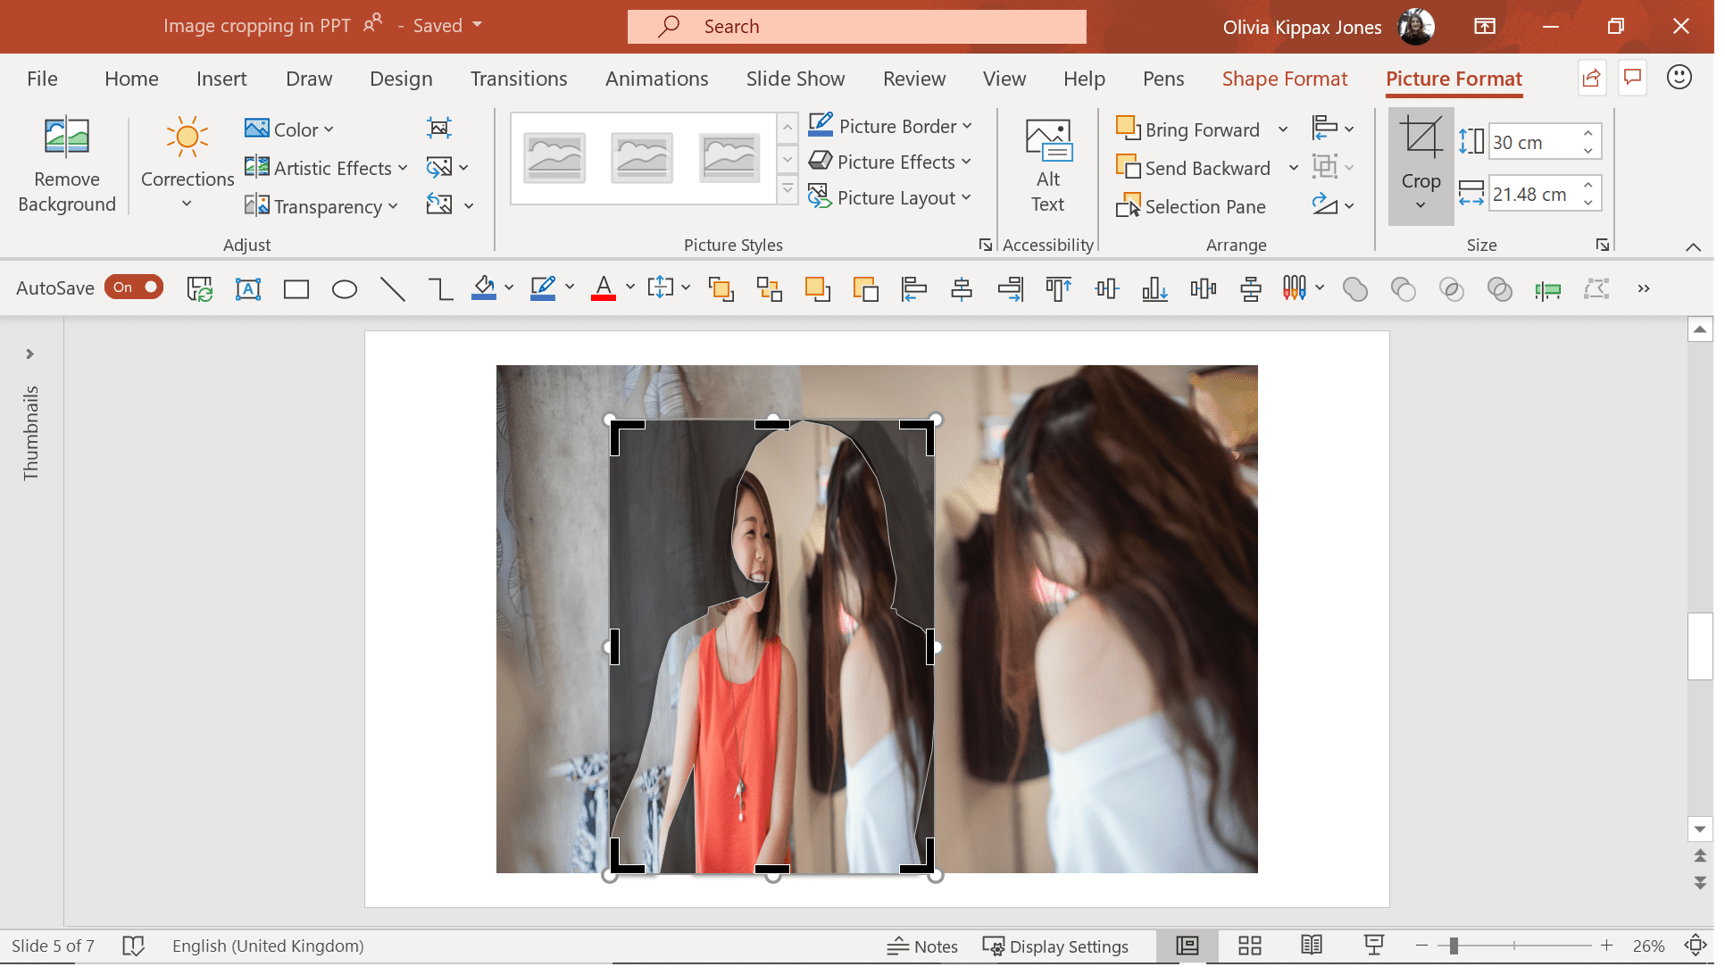
7. By default, PowerPoint shrinks the image to fit inside the shape. To make it look right, you need to stretch the image back to its original size. To do this, select the squashed image and click Crop under the Picture Format tab.
8. Use the white circle handles that appear to stretch the image to match the original behind it. Don’t move the black V handles or you’ll lose the freeform shape you’ve drawn!
9. Once the image inside the freeform shape matches the one behind, you can delete the original image (or leave it there and apply an effect as you can see below). You should also remove any outline that your freeform shape may have had.
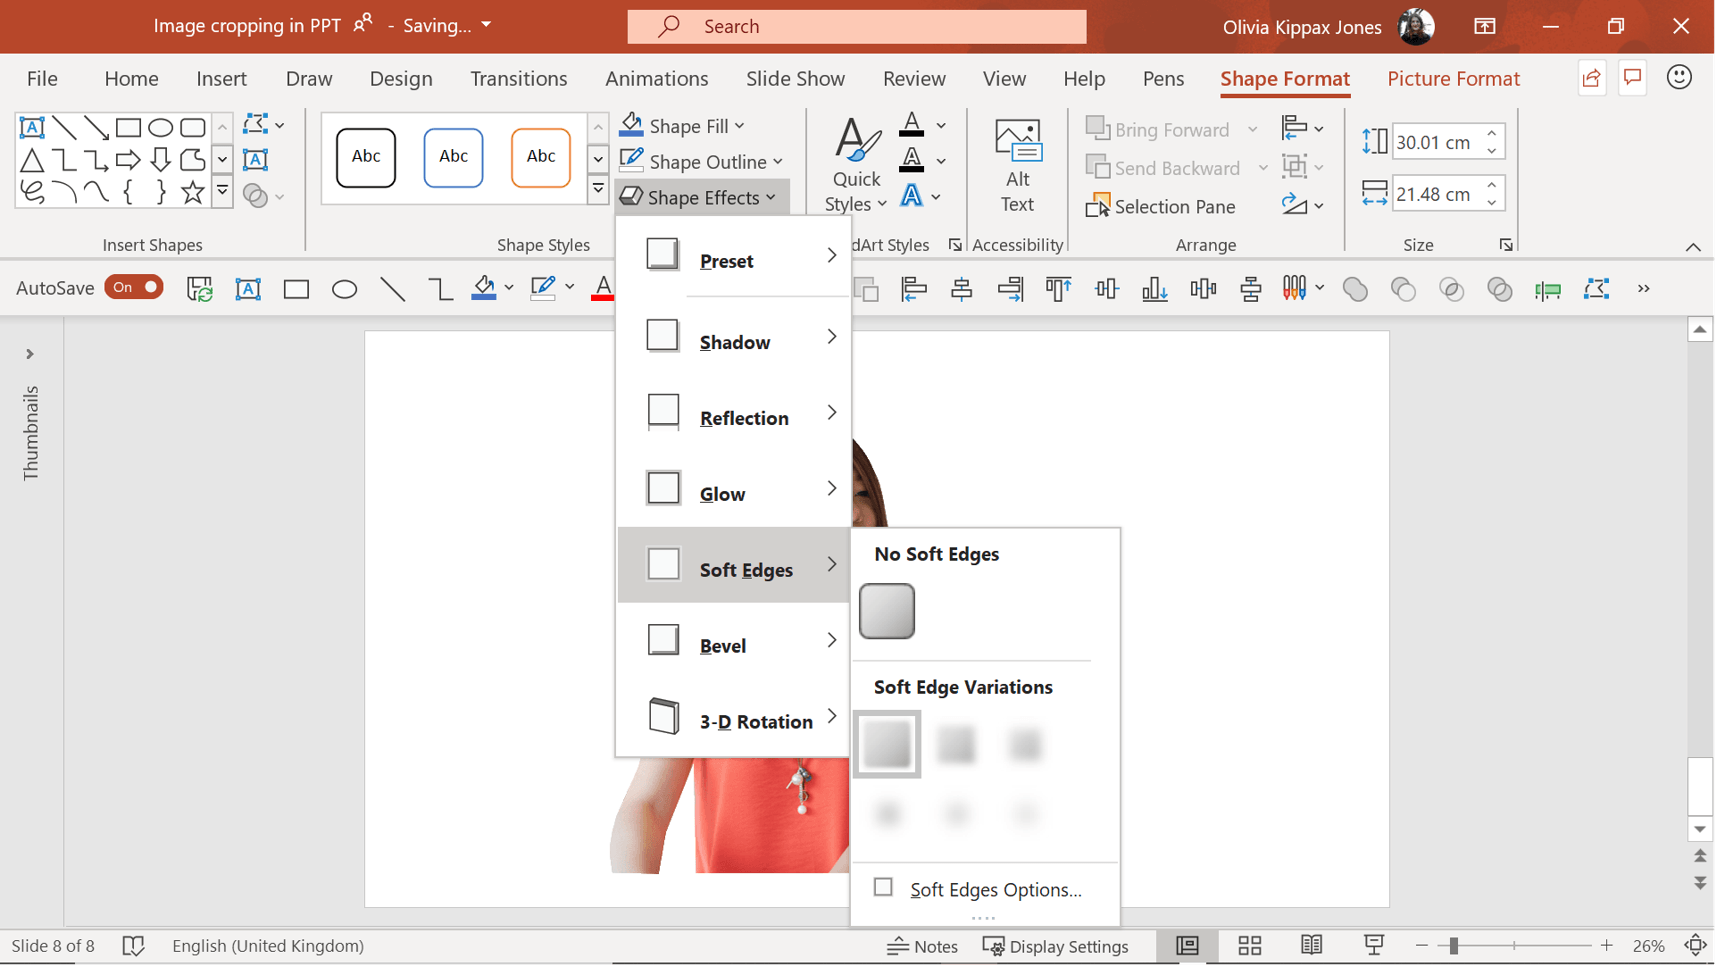
Top tips
If your shape’s edges look a little jagged, you might want to add a drop shadow or apply the ‘soft edges’ effect. This will blur the edges a little, giving it a slicker look. You can now sit your cropped image on top of another, or leave it just as it is – either way, it’s a cool technique that you’ll use time and time again.
You could even take your newly-acquired cropping skills to the next level, and combine a custom crop with the Morph transition. Take a look at this how-to blog article to find out how.
The National University of Singapore have developed an add-on software called PowerPointLabs. If you are an ambitious PowerPoint user who doesn’t have time to fiddle around with learning all the tricks that experts such as the BrightCarbon staff have figured out, then you may find PowerPointLabs to be very helpful.
There’s a new feature in PowerPoint 2016 called ‘Screen Recording’ that allows you to record video (exported as an MP4) of hand-drawn sketches, which can serve as a great tool for many different applications, including presentations, eLearning and training. For anyone who is new to the Screen Recording tool, this blog will serve as an easy introduction on how to best use its functionality and get the best results...
Awesome. It was quite simple… So much so that I thought “Why didn’t I think of that??”
But the fact is I didn’t, and this is really a neat way to go about it. One tip, though… Step 7 could be made slightly simpler. PowerPoint shrinks the image in this step, like you said… unless you put the setting “Tile picture as texture”- This makes the image repeat in the original size… But since your outline is a 1:1 ratio, it will keep the same size as you want… You just need to reposition it slightly.
But that’s just a minor improvement. The article is just superb. 🙂
Oops; My ’tile picture as texture’ method has a drawback. I can’t scale the object without screwing up the fill image. So your method is better in most cases.
You are a hero. I was so desperate to crop in special shapes that I was about to buy Photoshop. You saved me loads of cash and a lot of hassle. Thank you for the great post
I came looking to fill a rotated shape, thanks for your help.
To explain my solution further for anyone wishing to fill a rotated shape (the square with rounded corners for example), you can follow a similar method to “To crop an image to a custom drawn shape (something not in the Autoshapes menu)”.
Draw your shape, and rotate it as you wish. Essentially you are setting up your frame.
Copy your source image (you may need to repeat the process, if you have a shape that is 1:1 ratio, i.e. a square, then you will need a source image that is cropped 1:1 (this can be easily done in the crop menu)).
Then go to format picture > picture or texture fill, but first make sure that you untick the “Rotate with shape” box, otherwise you will get your source image on an angle.
cant you specify your freeform cropping i cant figure it out !!!!!!!!!! THERE IS NO SUCH THING IN THE AUTOSHAPE CROP THAT SAYS IT IS A FREEFORM TOOL !!!!!!!! I EVEN TRIED FINDING IT IN THE AUTOSHAPE INSERT AND THERE IS NOTHING CALLED THE FREEFORM TOOL !!!!!!!!!
Hi, Sorry for causing confusion here. The Freeform shape tool is in the Shapes menu. Click in (either from the Home tab or Insert tab) and open up the full list. In the Lines section, the Freeform tool is second from the right between Curve and Scribble. The icon is a bit like a rounded rectangle with a bite taken out of the top right corner. Use this to draw around the object, clicking to create new points on it, and then double click to finish it. This will then give you the shape to fill with the image. Bonus tip: If you have PowerPoint 2013 or 2016, you can use the Merge Shapes tool (Format Tab, on the left, next to the Shapes list) to use the Freeform shape you’ve created to cut out the right area from the image. Select the image, then the Freeform shape, and then use the Intersect tool.
I managed this awful job once but not subsequently.
I was confused by the open/closed path instructions; you have to play around with the edit points and find close path – it didn’t come up on mine until I went back into the edit points – it seems unsure if you have closed it.
On my second and third attempt, the previous copied clipboard picture came out to fill the edit points shape I had created. Laughter. But I had delted them from the clipboard!
Your instruction “Use the white circle handles that appear to stretch the image to match the original behind it. Don’t move the black V handles or you’ll lose your drawn shape.” is baffling. I see some black right angles with white surrounds but what do you mean? No wonder I lost the image – or did I?
Similarly, your instruction: “Once the image inside you shape matches the one behind, you can delete the original image from behind” is bewildering. If the image doesn’t snap into place and still seems to cover the edit points shape – how are you to know which is which and which to delete?
Think you need some extra screen grabs in – these stages are not simply clear. I would say that I’m using Powerpoint 2016 which is falling over itself to help you with advice (so some of the menu options don’t quite match your article ) but Powerpoint 2016 it fails dismally.
Does this method not work in word 2007? i go through all the steps except the final cropping to get the pic to fit the shape…..at that point the crop button is greyed out…..help! I really need this technique to work for a newsletter I publish
Unfortunately this doesn’t work in Excel 2011 for Mac because there is no Clipboard option in the Format Shape dialog box. So I guess I’m still in the same boat as before…
But please update if you find a solution for Macs!!
Hi.. Keiran.. tried as you said.. did it also but not sure about / able to understand your point 8 & 9.. actually it is not happening.. request you ( may be i am bothering you.. sorry for that) if you can show us a video of it… actually it is very useful.. otherwise Corel would be the only help which would be expensive even for daily needs
Hi I did this method twice! It worked really well the first time but I didn’t like the shape I had drawn so I did it again. I had to group the shape together and when I filled it with picture it had a massive gap in the middle. What did I do wrong? Please help
Thanks for the comment. It’s a little difficult to diagnose your issue without more detail. The above method is for a single shape. If you are trying to fill multiple shapes with a single image, it would be best to combine them into a single shape before you fill them (use the Union Shape tool to do this). This might work better than grouping them. It’s also worth bearing in mind that if you don’t like the shape you’ve drawn, you can edit it by right-clicking and choosing ‘Edit Shape’.
Hey Joe, Sorry to hear that you’ve become frustrated with these directions, can you please be more specific about where you get lost? We’d be happy to help you figure it out so you can master the custom crop.
Thank you for sharing this powerful technique in easy to use and clear instructions! It’s late, I’m tired and rising early, and my project is due tomorrow morning (actually today but I just returned from big cross country skiing adventure with sons in Yosemite and my client will understand). This feature does just what’s needed for a virtual design sample. Brilliantly explained!
Hello! I love this technique, thank you very much for the tutorial. I wanted to know if there was a way to draw smooth lines in PowerPoint. I know I can blur the contours of my shape but I wish I could draw a less jagged free form. Maybe with a graphic tablet ?
Interesting – but there is “pen” tool in the forms menu that works exactly like Photoshop or Affinity Photo enabling to trace and cut out with precision in PP or Word for that matter – just duplicate the image first!
Not overly helpful if you have a skewed shape. I need to fit a square screen shot on an image of a laptop at an angle. No amount of cropping or rotating made the fill (image) work. 🙁
Thanks for the guide! I was worried I’d have to download some image editing software to crop out the background of an image, but I’m happy to see it’s possible within powerpoint. Tried it out and it works well for what it is, so I’ll definitely be putting this technique to use in the future.
In trying to copy a cut-out image, I got to Step 3 on this set of instructions just fine, but then after that I got lost. I saved my edit-points outline, but couldn’t progress after copying the outline. Still, the instructions for editing the points was perfect. I had never tried that before but, after reading the instructions, I had get success shaping the points.
I wanted to make sure I send you both a HUGE thank you for making this story come to life and creating amazing graphics to help. We really appreciate BrightCarbon for stepping up our presentation game massively!


Awesome. It was quite simple… So much so that I thought “Why didn’t I think of that??”
But the fact is I didn’t, and this is really a neat way to go about it. One tip, though… Step 7 could be made slightly simpler. PowerPoint shrinks the image in this step, like you said… unless you put the setting “Tile picture as texture”- This makes the image repeat in the original size… But since your outline is a 1:1 ratio, it will keep the same size as you want… You just need to reposition it slightly.
But that’s just a minor improvement. The article is just superb. 🙂
I Have a confusion.
How do you select the dots ?
Please answer
Oops; My ’tile picture as texture’ method has a drawback. I can’t scale the object without screwing up the fill image. So your method is better in most cases.
Hard to use to crop photo.
Thank you so much! This was easy and is a wonderful tool!
THANK YOU SO MUCH!! FO REALLL!! THANK YOU FOR THESE CUSTOM CROP TIPS!! 😀
You are a hero. I was so desperate to crop in special shapes that I was about to buy Photoshop. You saved me loads of cash and a lot of hassle. Thank you for the great post
Hi,
I came looking to fill a rotated shape, thanks for your help.
To explain my solution further for anyone wishing to fill a rotated shape (the square with rounded corners for example), you can follow a similar method to “To crop an image to a custom drawn shape (something not in the Autoshapes menu)”.
Draw your shape, and rotate it as you wish. Essentially you are setting up your frame.
Copy your source image (you may need to repeat the process, if you have a shape that is 1:1 ratio, i.e. a square, then you will need a source image that is cropped 1:1 (this can be easily done in the crop menu)).
Then go to format picture > picture or texture fill, but first make sure that you untick the “Rotate with shape” box, otherwise you will get your source image on an angle.
Thank you very much, small things can be very important sometimes!
cant you specify your freeform cropping i cant figure it out !!!!!!!!!!
THERE IS NO SUCH THING IN THE AUTOSHAPE CROP THAT SAYS IT IS A FREEFORM TOOL !!!!!!!! I EVEN TRIED FINDING IT IN THE AUTOSHAPE INSERT AND THERE IS NOTHING CALLED THE FREEFORM TOOL !!!!!!!!!
Hi, Sorry for causing confusion here. The Freeform shape tool is in the Shapes menu. Click in (either from the Home tab or Insert tab) and open up the full list. In the Lines section, the Freeform tool is second from the right between Curve and Scribble. The icon is a bit like a rounded rectangle with a bite taken out of the top right corner. Use this to draw around the object, clicking to create new points on it, and then double click to finish it. This will then give you the shape to fill with the image.
Bonus tip: If you have PowerPoint 2013 or 2016, you can use the Merge Shapes tool (Format Tab, on the left, next to the Shapes list) to use the Freeform shape you’ve created to cut out the right area from the image. Select the image, then the Freeform shape, and then use the Intersect tool.
I managed this awful job once but not subsequently.
I was confused by the open/closed path instructions; you have to play around with the edit points and find close path – it didn’t come up on mine until I went back into the edit points – it seems unsure if you have closed it.
On my second and third attempt, the previous copied clipboard picture came out to fill the edit points shape I had created. Laughter. But I had delted them from the clipboard!
Your instruction “Use the white circle handles that appear to stretch the image to match the original behind it. Don’t move the black V handles or you’ll lose your drawn shape.” is baffling. I see some black right angles with white surrounds but what do you mean? No wonder I lost the image – or did I?
Similarly, your instruction: “Once the image inside you shape matches the one behind, you can delete the original image from behind” is bewildering. If the image doesn’t snap into place and still seems to cover the edit points shape – how are you to know which is which and which to delete?
Think you need some extra screen grabs in – these stages are not simply clear. I would say that I’m using Powerpoint 2016 which is falling over itself to help you with advice (so some of the menu options don’t quite match your article ) but Powerpoint 2016 it fails dismally.
Not up to your usual high standard!
Excellent!!! This has saved me many, many hours (of course after many hours trying to figure it out myself).
Thank you for making this knowledge accessible!
p.s. Am using PowerPoint 2016 and it worked just fine.
Does this method not work in word 2007?
i go through all the steps except the final cropping to get the pic to fit the shape…..at that point the crop button is greyed out…..help! I really need this technique to work for a newsletter I publish
This was a great tip – Exactly what I needed.
Unfortunately this doesn’t work in Excel 2011 for Mac because there is no Clipboard option in the Format Shape dialog box. So I guess I’m still in the same boat as before…
But please update if you find a solution for Macs!!
Hi.. Keiran.. tried as you said.. did it also but not sure about / able to understand your point 8 & 9.. actually it is not happening.. request you ( may be i am bothering you.. sorry for that) if you can show us a video of it… actually it is very useful.. otherwise Corel would be the only help which would be expensive even for daily needs
this worked absolutely fantastic for me! i am using powerpoint 2013. THANK YOU! you’re a genius!
Hi I did this method twice!
It worked really well the first time but I didn’t like the shape I had drawn so I did it again. I had to group the shape together and when I filled it with picture it had a massive gap in the middle. What did I do wrong? Please help
Hi Daisy,
Thanks for the comment. It’s a little difficult to diagnose your issue without more detail. The above method is for a single shape. If you are trying to fill multiple shapes with a single image, it would be best to combine them into a single shape before you fill them (use the Union Shape tool to do this). This might work better than grouping them.
It’s also worth bearing in mind that if you don’t like the shape you’ve drawn, you can edit it by right-clicking and choosing ‘Edit Shape’.
Great stuff. Turns ppt into basic photoshop functions. Thanks for stretching my categories.
Thanks Wesley. You might like this article about other Photoshop functionality that can be achieved with PowerPoint.
thanks a lot for the work! I used to struggle with Photoshop which is slow but by now I am enjoying the power of PowerPoint!!
Great article. Thanks a lot for the tips.
Looks good I will now have another try
not working anymore as in the version that I have there is no autoshape but background editor
What version of PowerPoint are you in?
This is really helpful. Thanks a lot!
bad bad bad bad bad bad bad bad
need free form cropping…
directions immediately become frustratingly less specific at this point.
this article sucks.
click bait
Hey Joe, Sorry to hear that you’ve become frustrated with these directions, can you please be more specific about where you get lost? We’d be happy to help you figure it out so you can master the custom crop.
SO much helpful, thank you! I am doing ppt for a birthday and your instruction are so easy to follow
Still using the vs 2007 and it’s working. Thank you.
Thank you! That was a REALLY good tip. I appreciate it!
This is basically what I’m doing
but I would love to see it in
animation and stop motion
or both of them together
Thank you for sharing this powerful technique in easy to use and clear instructions! It’s late, I’m tired and rising early, and my project is due tomorrow morning (actually today but I just returned from big cross country skiing adventure with sons in Yosemite and my client will understand). This feature does just what’s needed for a virtual design sample. Brilliantly explained!
Thank you very much for the work!
Hello!
I love this technique, thank you very much for the tutorial.
I wanted to know if there was a way to draw smooth lines in PowerPoint. I know I can blur the contours of my shape but I wish I could draw a less jagged free form.
Maybe with a graphic tablet ?
you could try the pen tool in forms…
Interesting – but there is “pen” tool in the forms menu that works exactly like Photoshop or Affinity Photo enabling to trace and cut out with precision in PP or Word for that matter – just duplicate the image first!
Very helpful
Would have been nice if you said what PowerPoint release actually has Auto . . . and Freeform . . .
Not overly helpful if you have a skewed shape. I need to fit a square screen shot on an image of a laptop at an angle. No amount of cropping or rotating made the fill (image) work. 🙁
its very brilliant but i am not finding that free form option in my powerpoint while using shapes in crop option. Do i need to download it externally?
awesome, this helped me so much
Thanks for the guide! I was worried I’d have to download some image editing software to crop out the background of an image, but I’m happy to see it’s possible within powerpoint. Tried it out and it works well for what it is, so I’ll definitely be putting this technique to use in the future.
Thank you so much bro
In trying to copy a cut-out image, I got to Step 3 on this set of instructions just fine, but then after that I got lost. I saved my edit-points outline, but couldn’t progress after copying the outline. Still, the instructions for editing the points was perfect. I had never tried that before but, after reading the instructions, I had get success shaping the points.
Thanks!
Everything was well explained.
The part with dots especially.
I’ll add you in my Favorites