Welcome to the final instalment of our four-part series on eLearning assessments! We’ve come so far together, but our journey ends here. We’ve travelled through the forest of eLearning assessment theory, through the choppy waters of PowerPoint eLearning quizzes, and across the mountains of authentic assessment in Articulate Rise. In the final part of our journey we’re going to level up one more time by creating realistic scenarios in Articulate Storyline.
The branching conversation scenarios that we looked at in Part 3 are a good assessment method, but they still rely on learners picking from pre-determined multiple-choice responses. To create something even more immersive, you can make a scenario where learners have less prompts and guidance. This realistic approach means that learners have to call upon everything they’ve learned and demonstrate their skills and knowledge, which allows you to assess higher-level learning objectives. It also gives learners a safe space to practice situations that are uncomfortable or hazardous, so that they can make mistakes and learn from them without real-life risk.
In this post, we will work with an example all about health and safety in a laboratory. We’ve published the final product so that you can see how it all comes together: open and explore the example here.
And don’t worry if you don’t create training about hazardous chemicals! There are endless possibilities for the kinds of scenarios you can build in Storyline. Check out the eLearning Heroes community for lots of inspiration and use this post as a guide to create your own realistic scenarios.
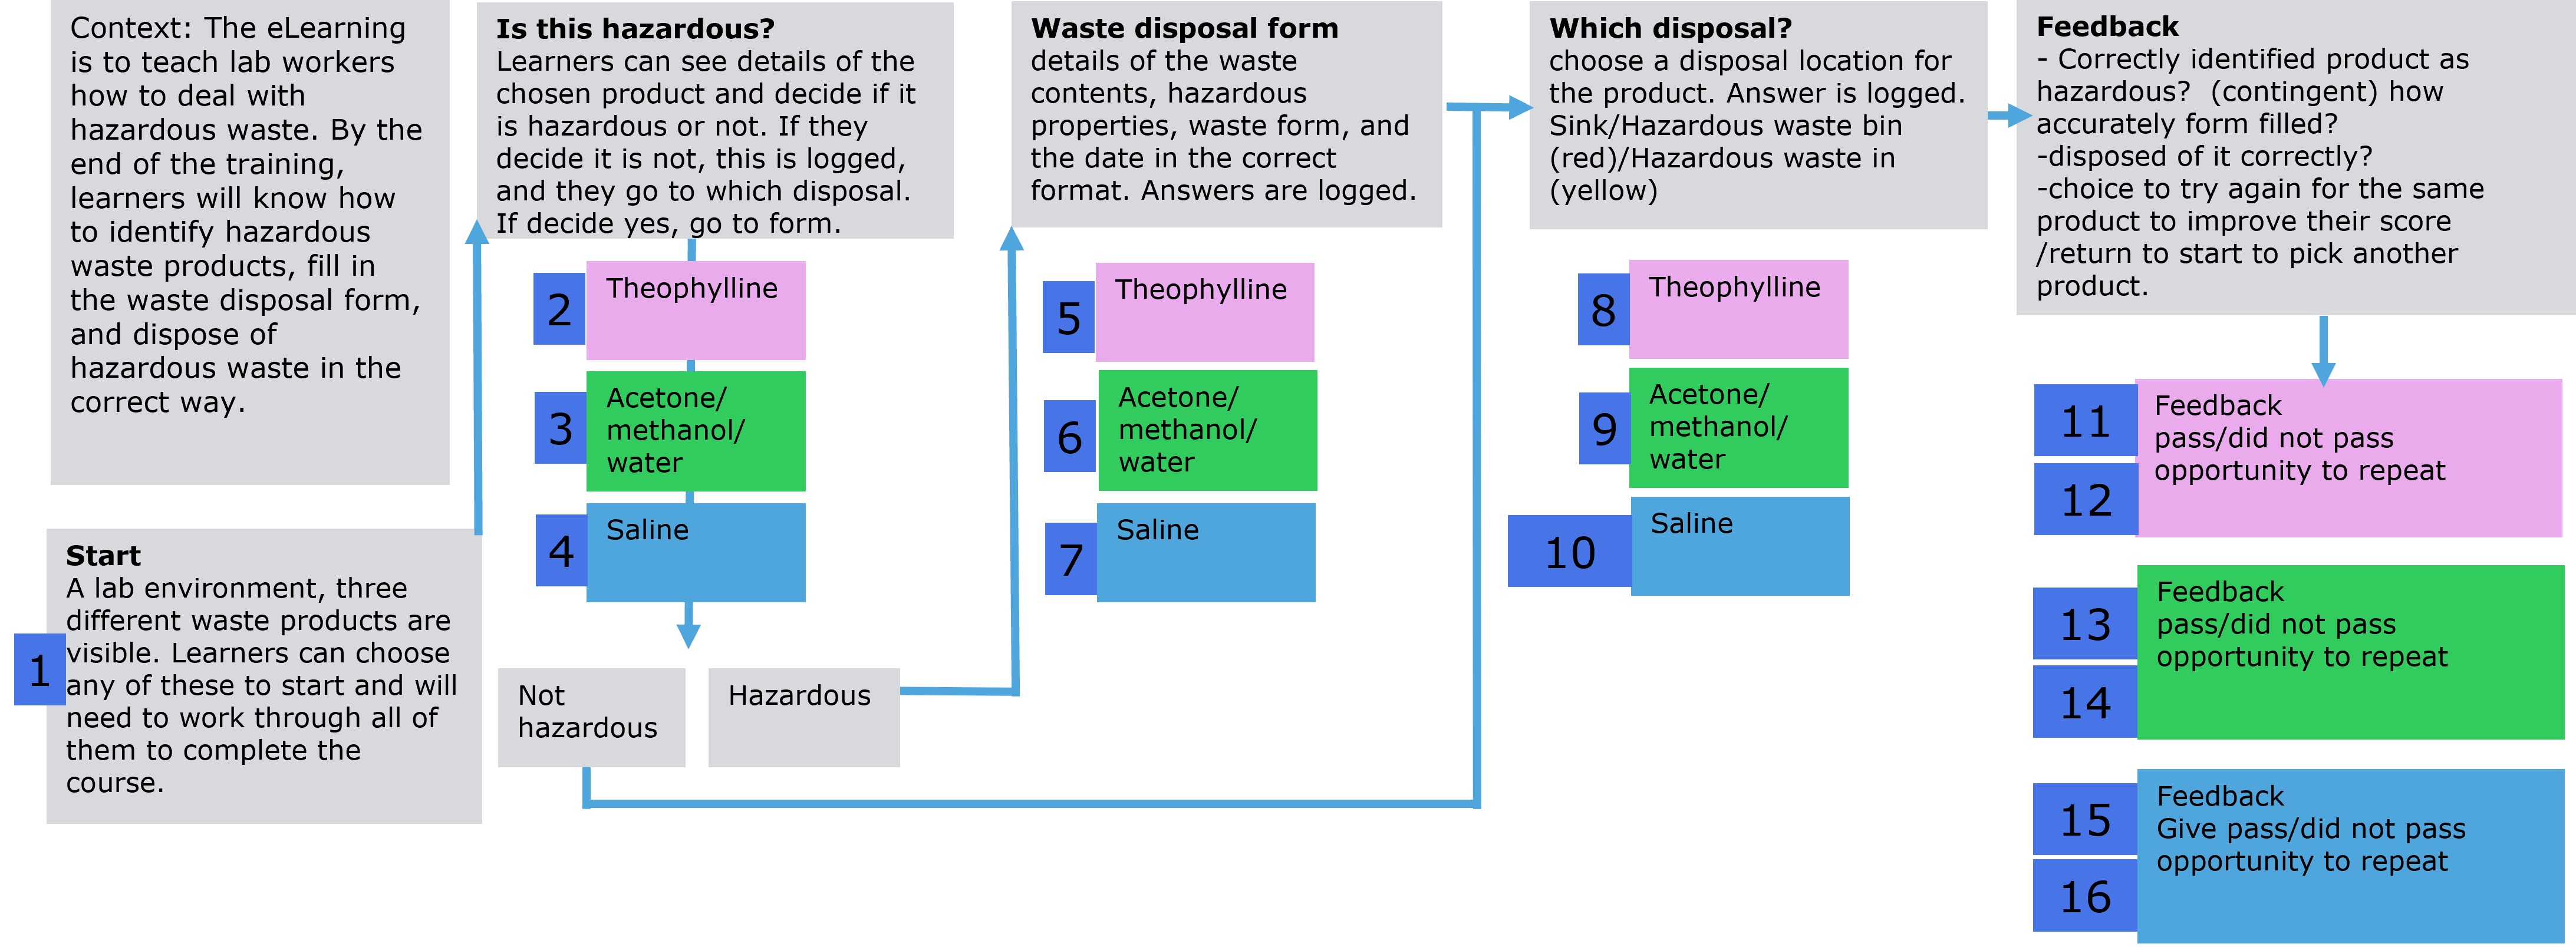
In Part 2, we talked about creating a flowchart for scenario content before you begin. You’ll want to do this before starting in Storyline, as well. Here is the flowchart which we will use to create realistic scenarios in Storyline:
As you create your flowchart, consider how you’re going to give feedback. Will you use intrinsic or extrinsic feedback? (If you’re not sure what that means, go back to Part 1 for a recap!) Will you give consolidated feedback on their performance at the end or give feedback bit-by-bit, as they progress? You could use a mix of feedback styles depending on how difficult a learner is likely to find the assessment, how long it is, and what objectives you have.
Another important thing to decide is whether your assessment is going to be scored or not. This will help you to pick the right format for your slide in Articulate Storyline. If it won’t be scored, you can just use standard content slides. This can give you more flexibility in the kind of interactivity you build. However, if you need to capture data about learners (e.g. pass/fail marks), then you’ll need to score your assessment. In this situation, it’s best to use freeform question slides. Let’s go through both these options.
Option 1: Using freeform questions
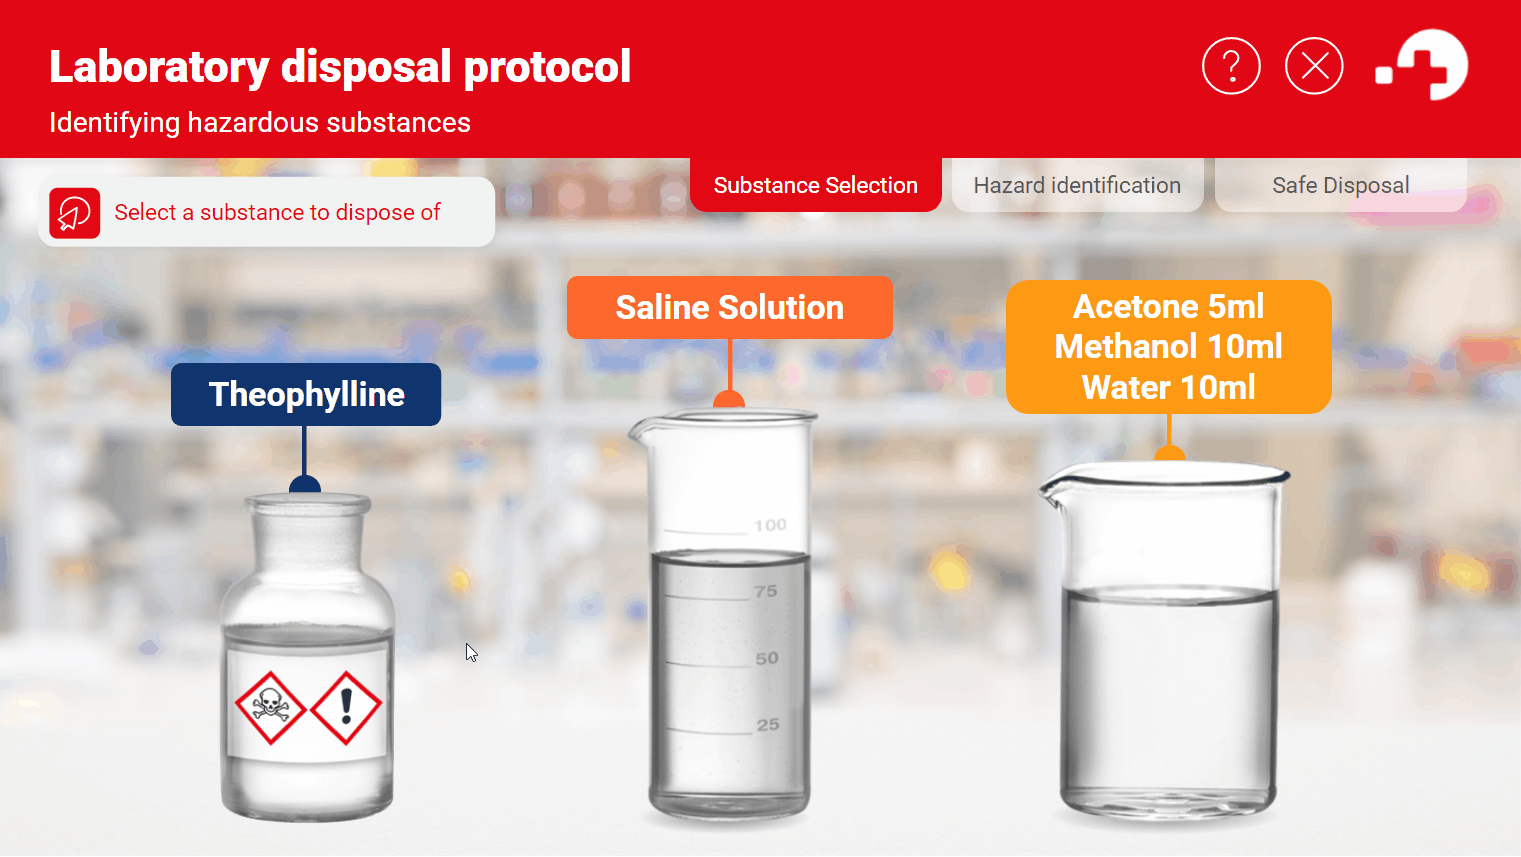
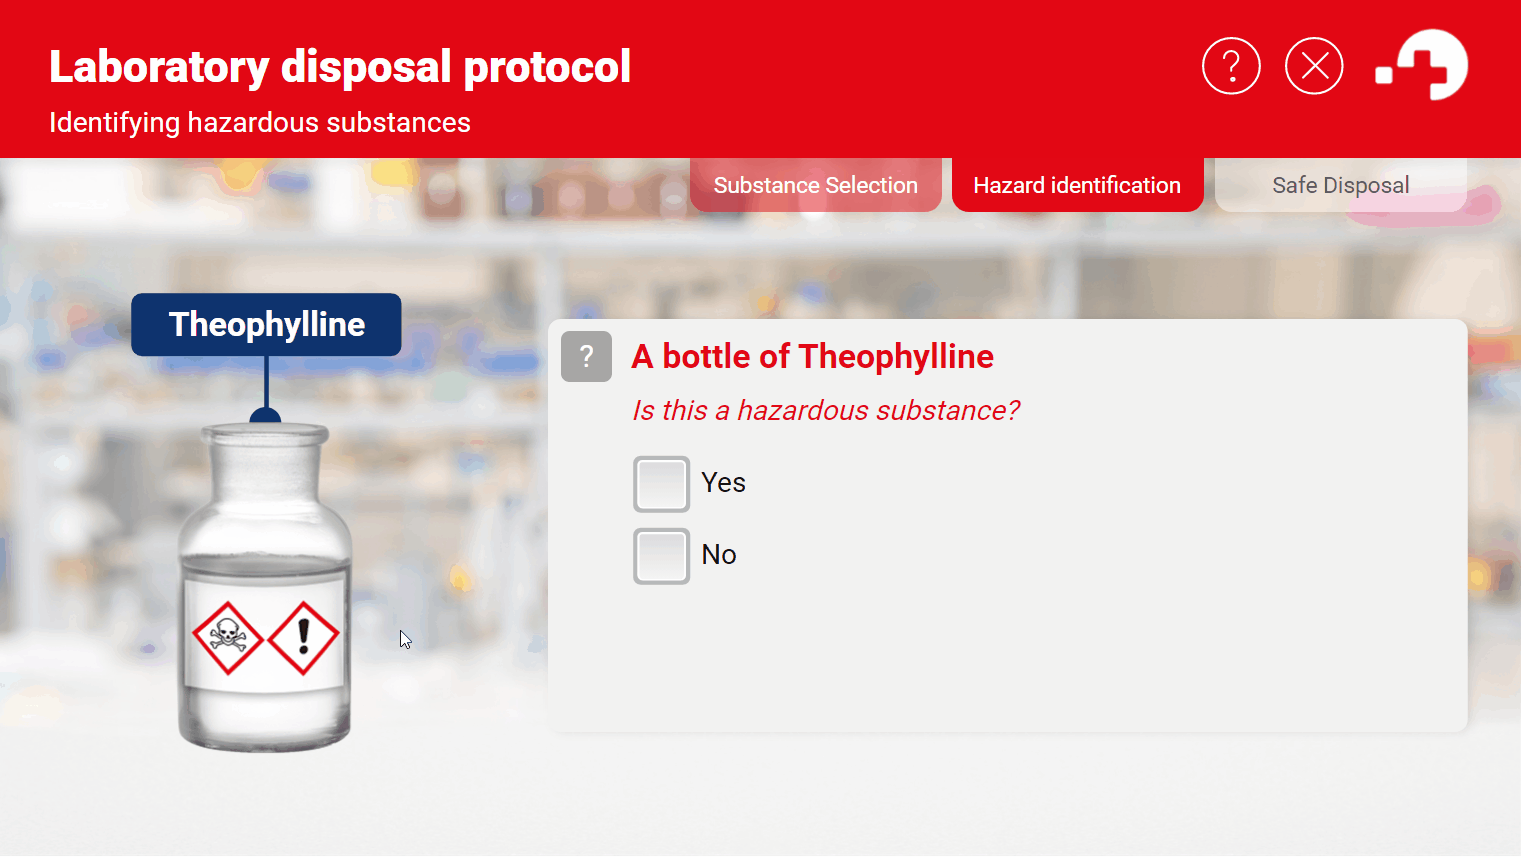
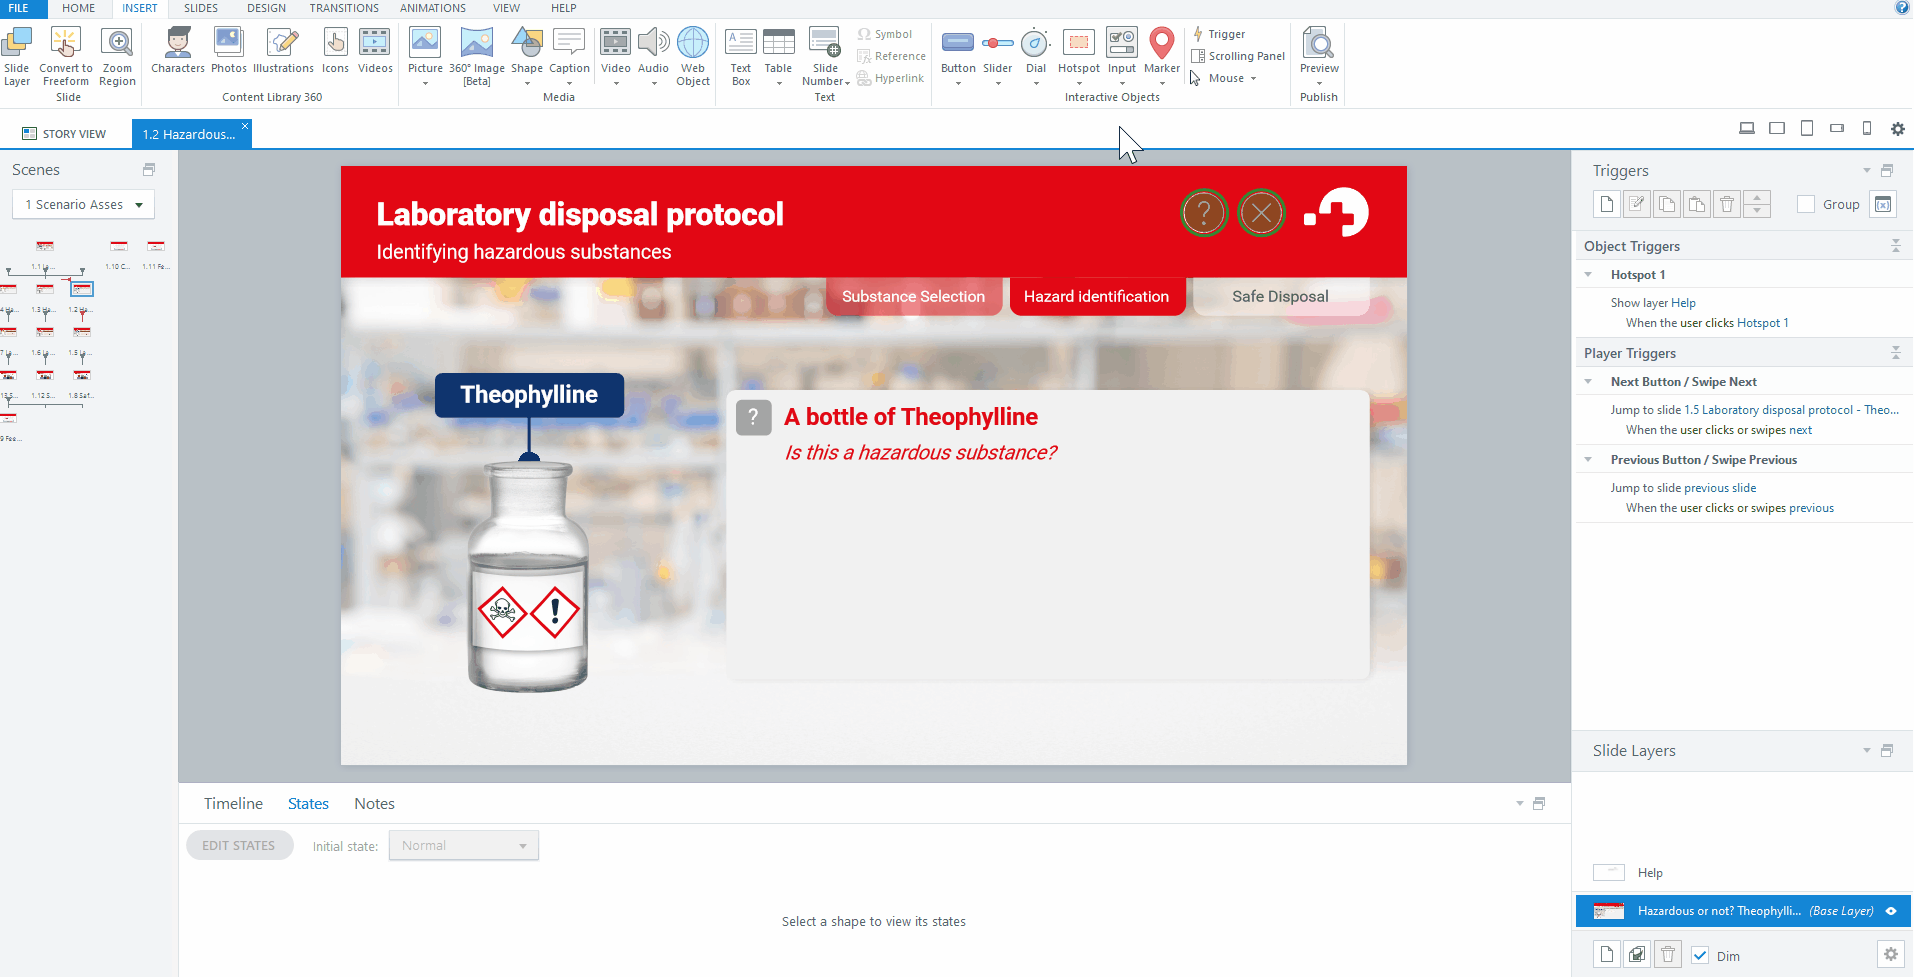
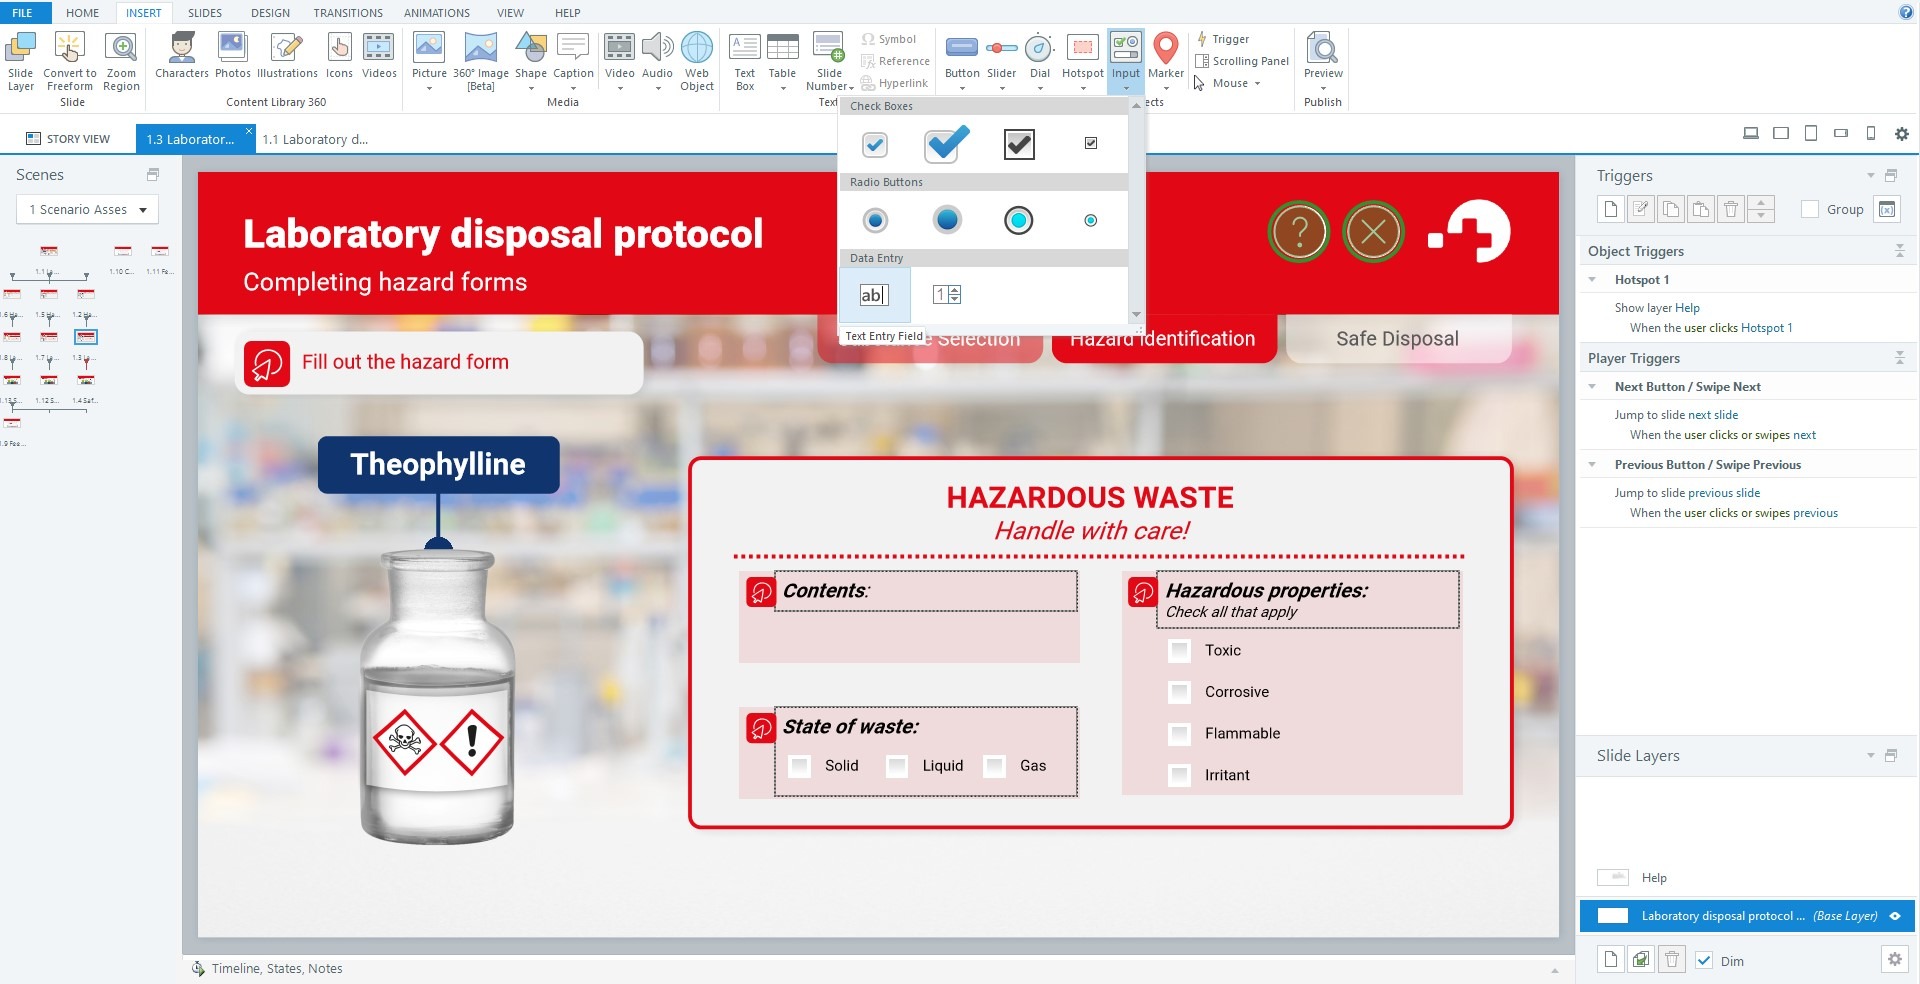
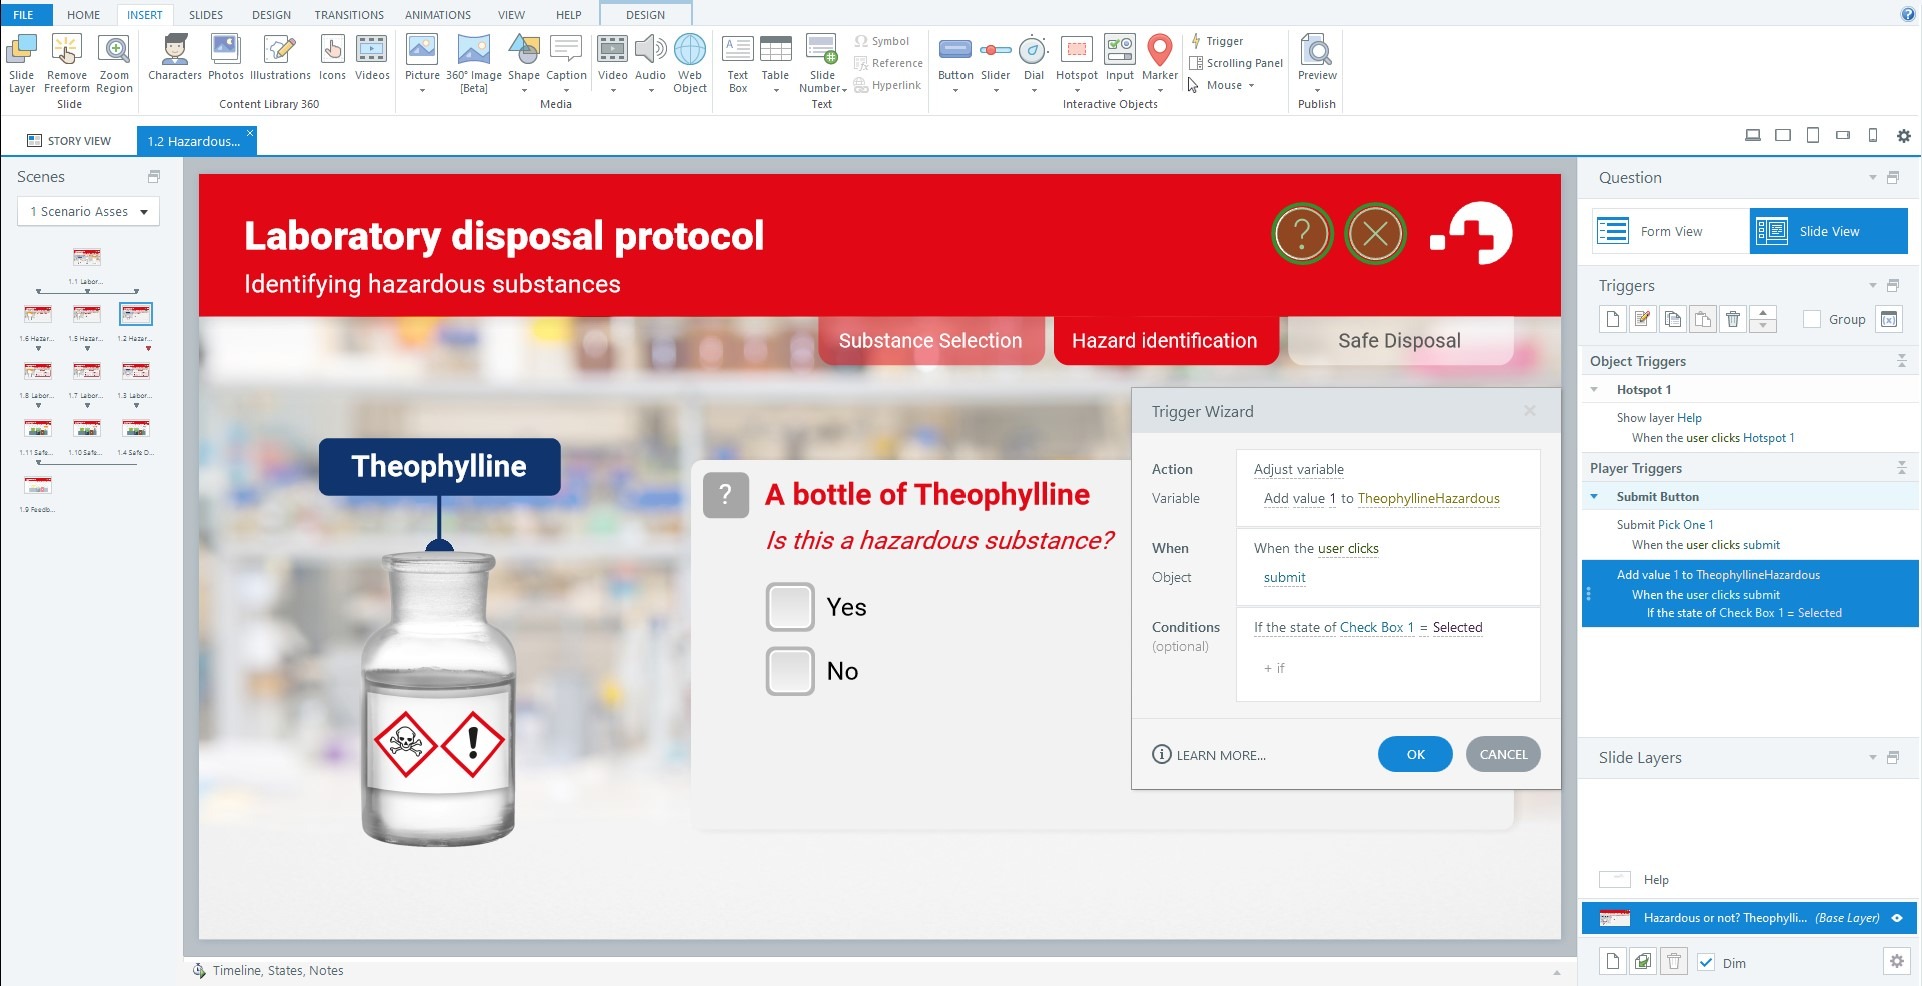
For this example, we’ll look at the first task the learner has to do as part of our assessment in Articulate Storyline. They need to decide whether a chemical mixture is a hazardous substance.
The first thing you need to do is add a new slide. You can choose a basic layout or freeform question. For now, let’s choose a basic layout: it’s possible to turn any slide into a freeform question even if you’ve picked a non-question layout at first! Once you have added your slide, lay out your assets on the slide. Go to the Insert tab to add your content.
On this slide we’ve laid out some text, images, and interactive check boxes. The check boxes can be added from the Input sub-menu on the Insert tab. Storyline’s check boxes are great because they are automatically interactive – you don’t have to add any special states or programming to them!
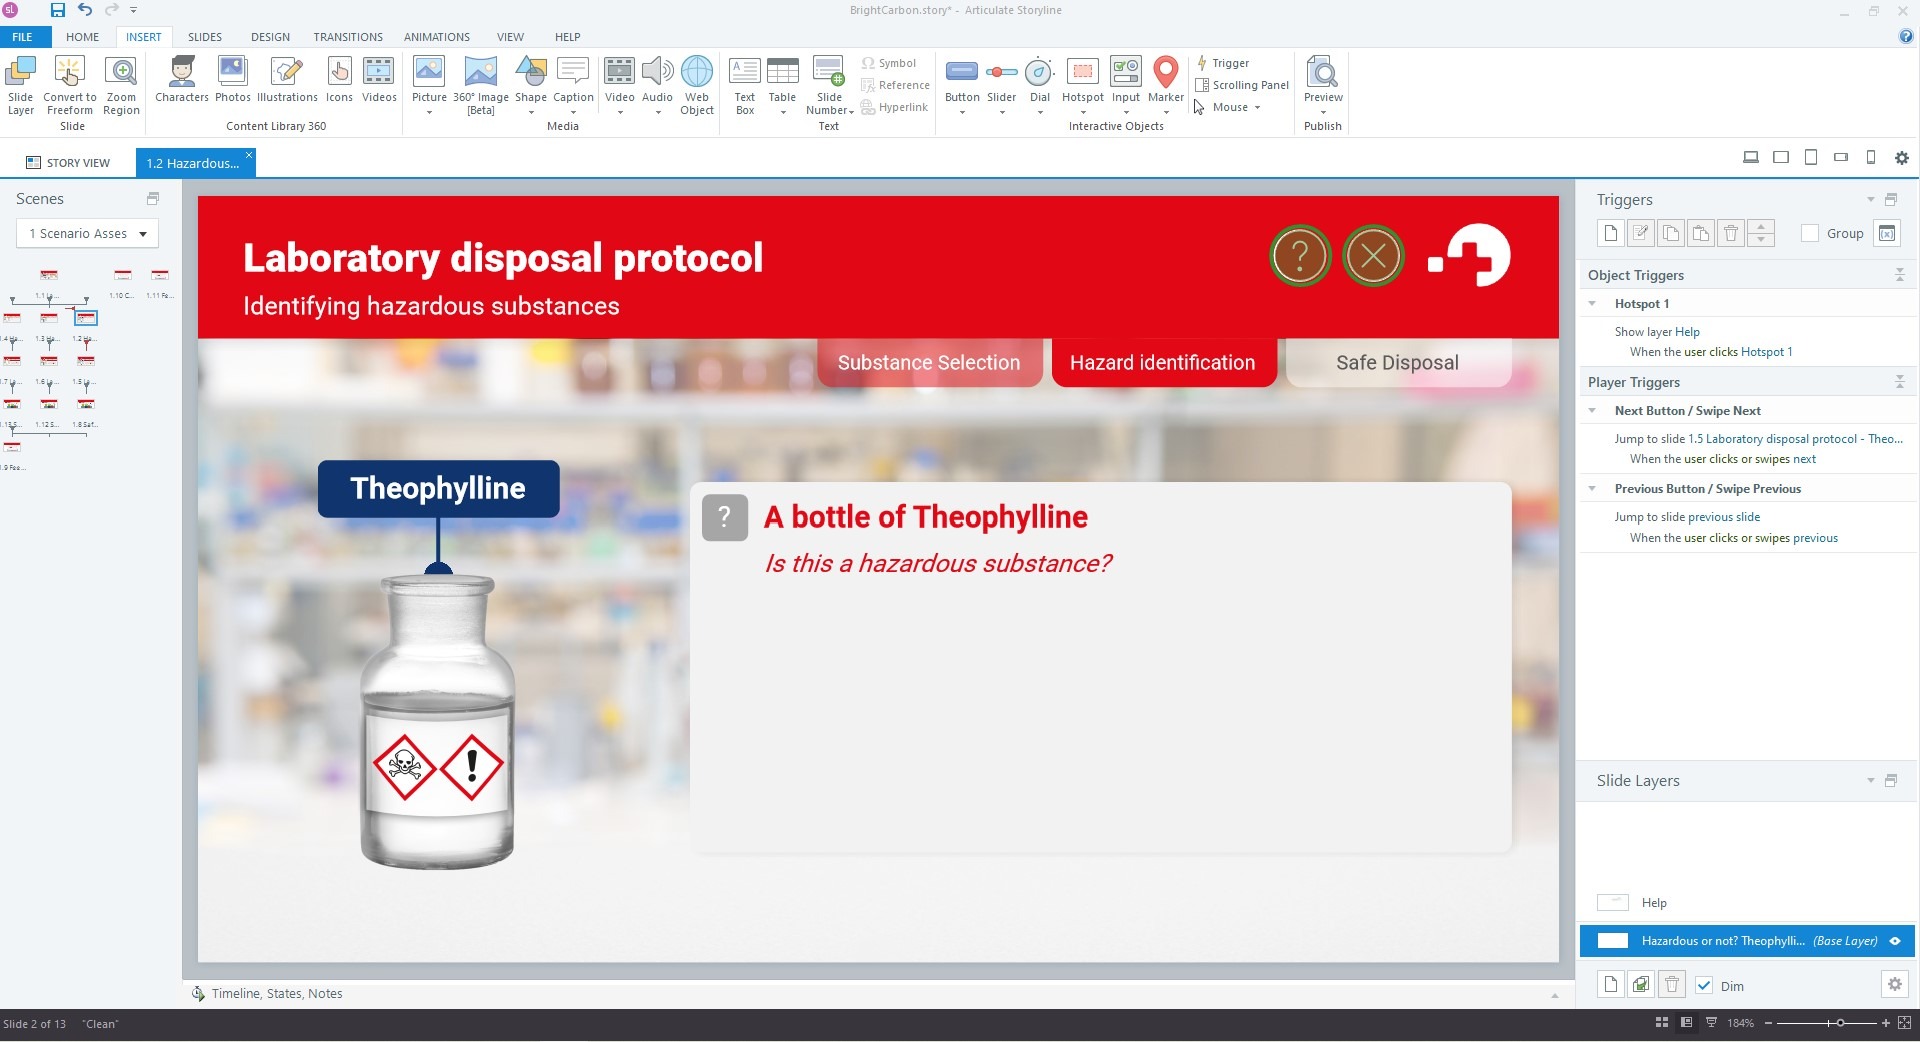
Now that you have everything laid out, you can convert your slide into a freeform question if you haven’t already chosen that slide type. Again, go to the Insert tab, then select Convert to Freeform. This will bring up a pop-up with different options. For this slide, we want a Pick One question as it the scenario gives a limited number of options for the learner to choose from. Select OK and the slide now shows a question form.
From here, you will indicate which objects on your slide you want the learner to be able to choose between. We’re going to choose the two check boxes. Select the space next to Choice A and then choose the object from the drop-down menu. The preview on the Question menu will highlight each object or group as you hover over it, making it easy to select the one you want. Repeat this for all the options the learner has to choose between. Then select the Correct choice using the radio buttons on the left of the form. For this example, the correct answer is ‘Yes’ which is Choice A.
Finally, it’s time to add feedback. When you’re using freeform questions and scoring a quiz, Storyline automatically generates feedback. You can have the same feedback for each option the learner chooses, or different feedback for each response. You could also choose to turn the feedback off. Adjust the feedback by going to the Question tab and selecting By Question, By Choice, or None from the Feedback drop-down.
The choice on what kind of feedback to include should have been made when you were creating your flowchart. For this example, we chose to have no feedback. This is because we decided that the learner should work through the entire scenario before finding out if they got the answers correct or incorrect. This may be more appropriate for learners with high levels of confidence in the material and problem-solving tasks with multiple parts that all need to be completed correctly under pressure. We’ll look at how to give summary feedback in the Tracking and summary feedback section of this article.
If you choose to have feed-back then you can customise it in the feedback section of the form. Select More to open up the text editor: you can change your feedback to make it more relevant to the scenario, and even add audio. In the latest version of Storyline 360, you can also choose branching options from here: this makes creating graded branching assessment scenarios really easy! Just make sure you have all your slides set up first, before adding the branching.
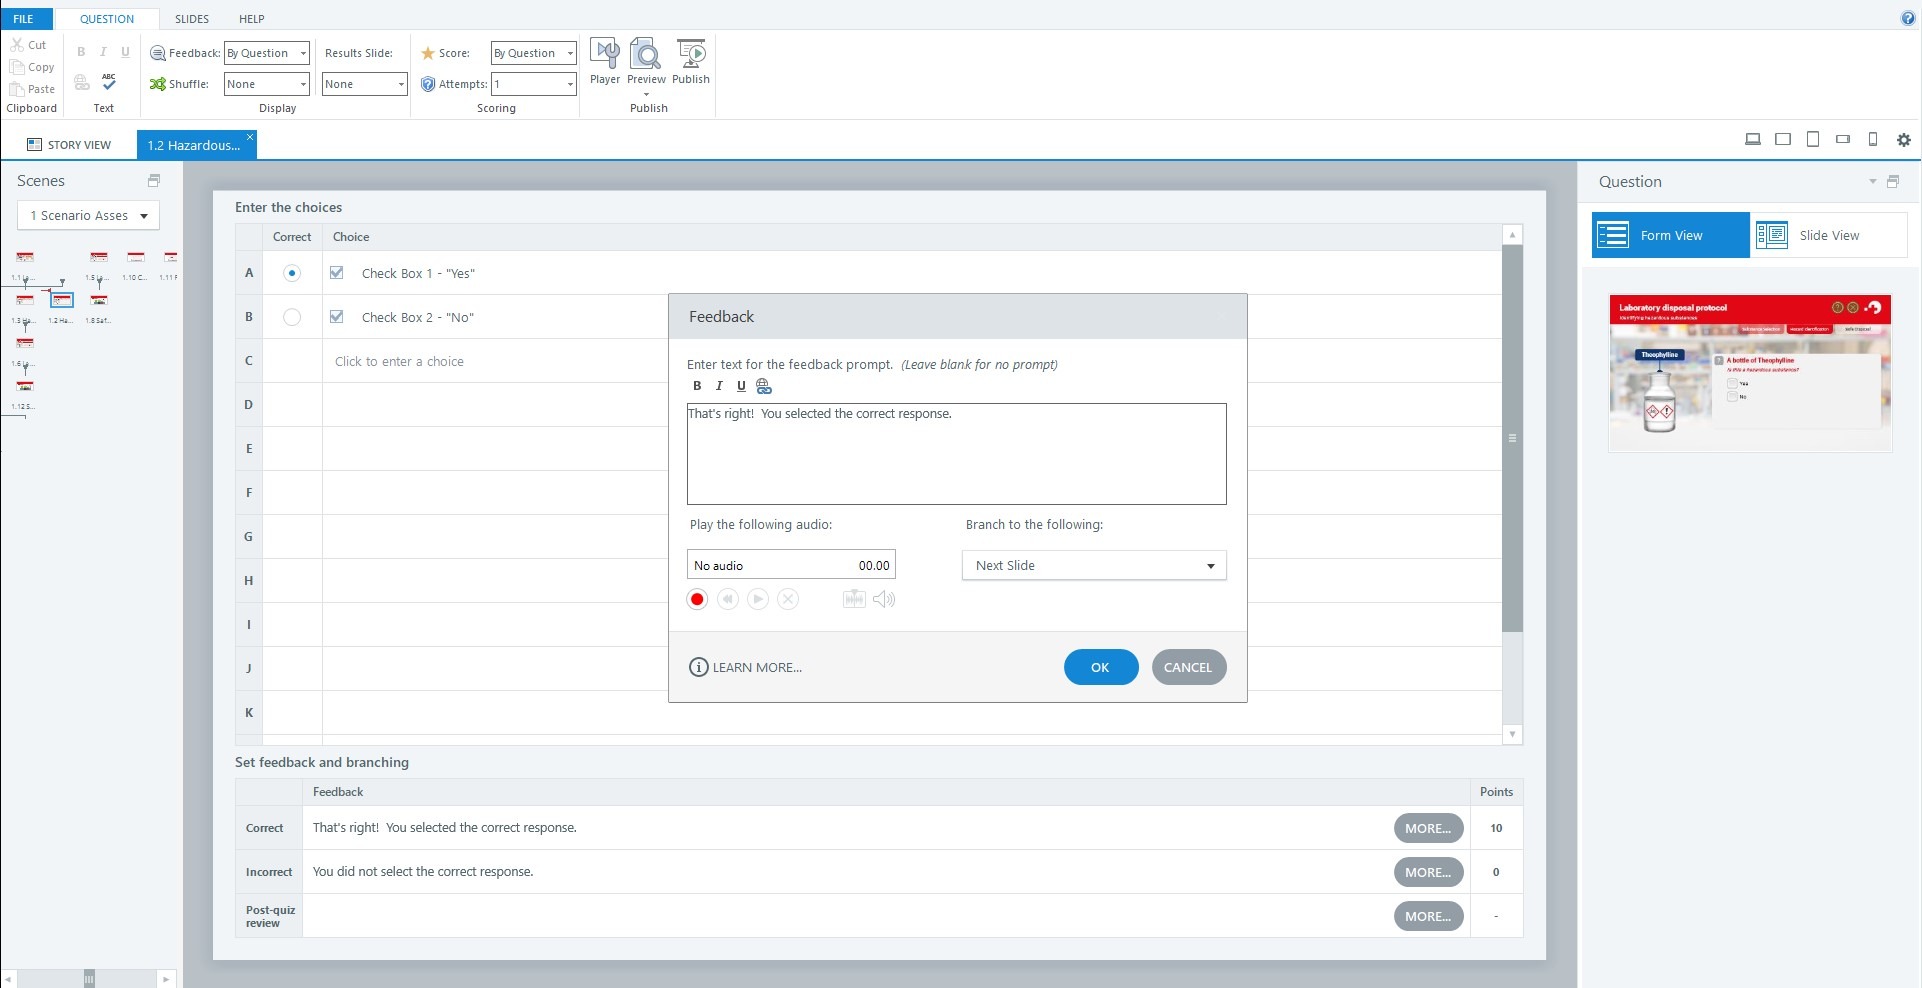
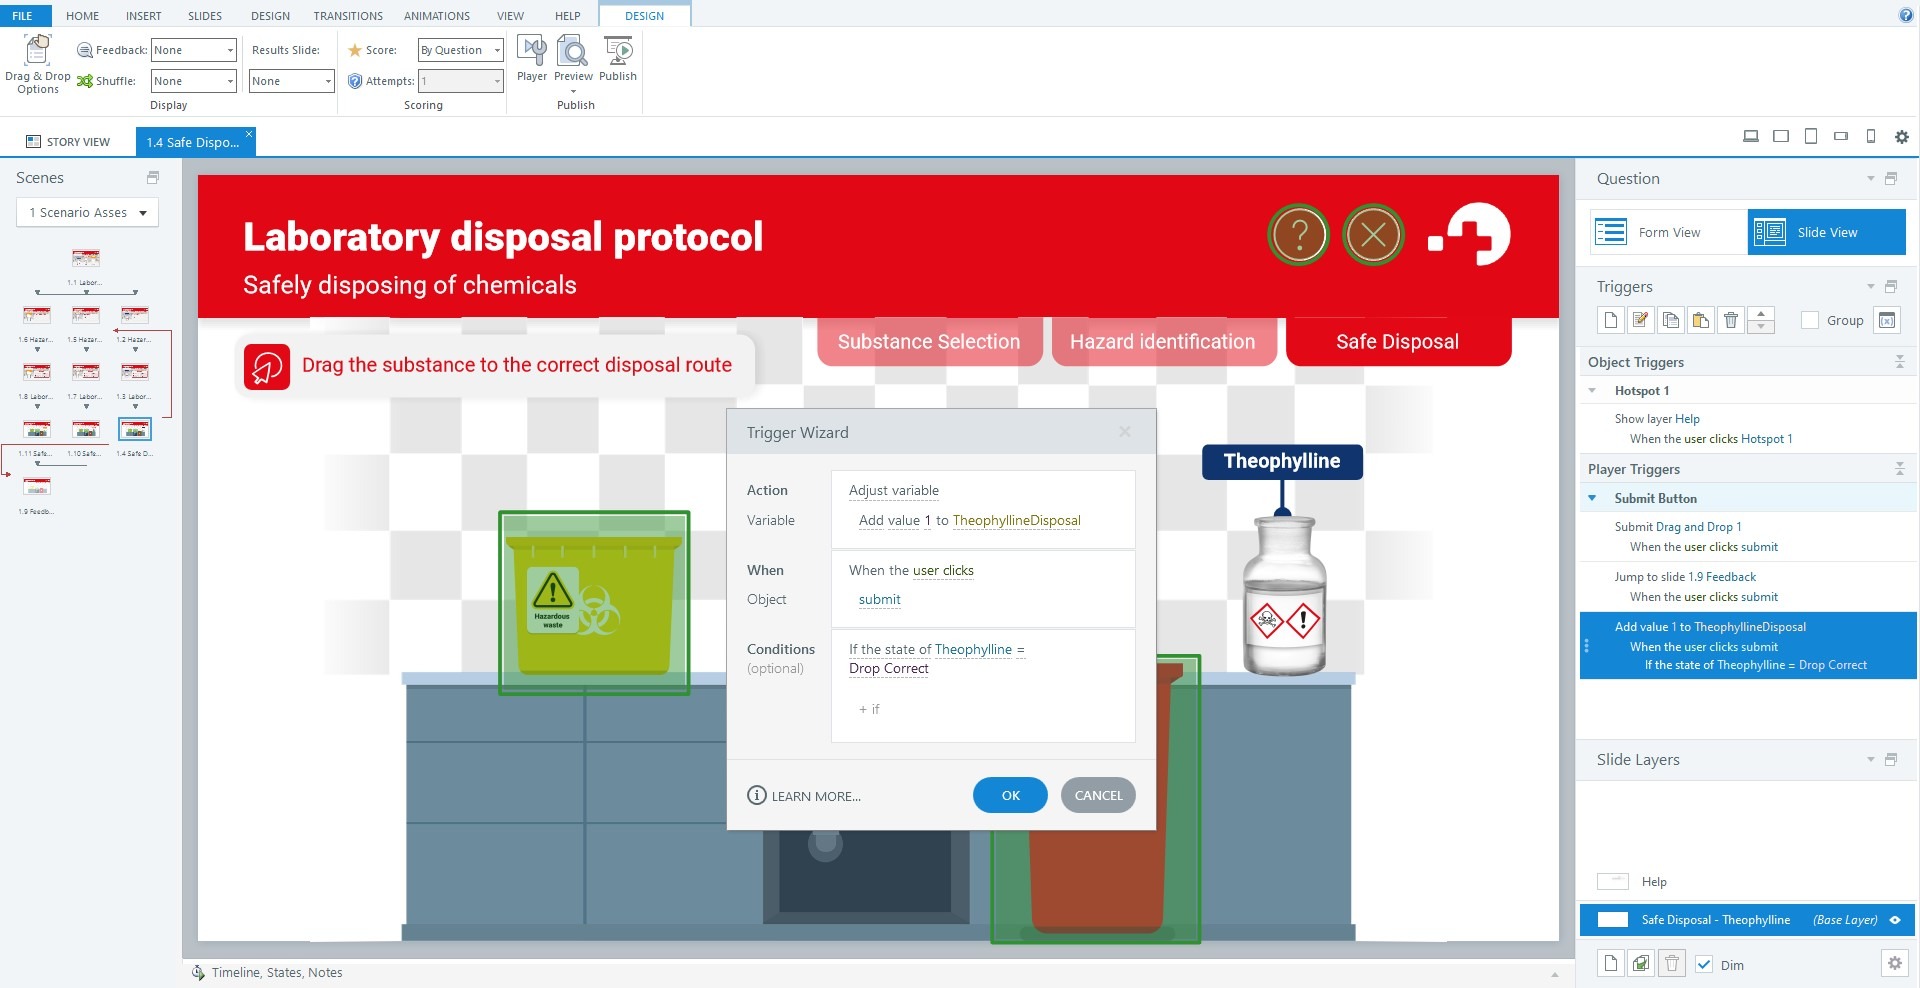
This freeform question approach isn’t just for multiple choice scenarios. You can also use it to create drag-and-drop, text entry, hotspot, and shortcut key interactions as part of your scenario-based assessment. Here, for example, the learner needs to decide which disposal route is best for the substance:
This could be built in the exact same way as the previous slide, just using the drag-and-drop freeform question.
Now let’s move on to the final part of this scenario, this time using regular content slides.
Option 2: Using content slides
Even if you don’t need to grade an assessment, you can still use freeform questions to create interactions quickly and easily. However, Storyline’s freeform questions have their limits. For example, you can only have one type of interactivity (e.g., hotspot, text-entry, drag-and-drop) per freeform question slide.
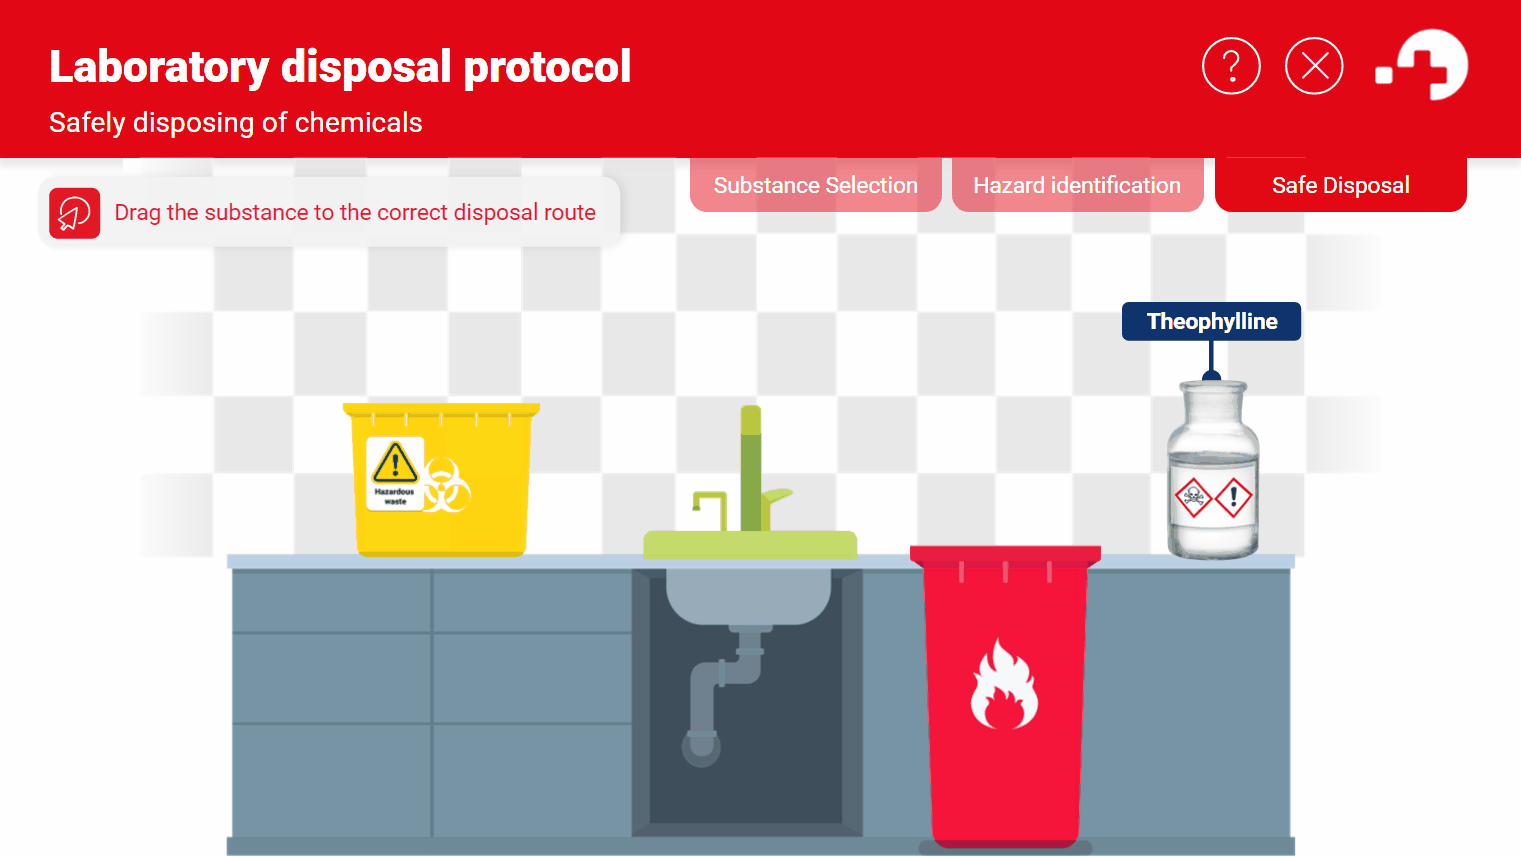
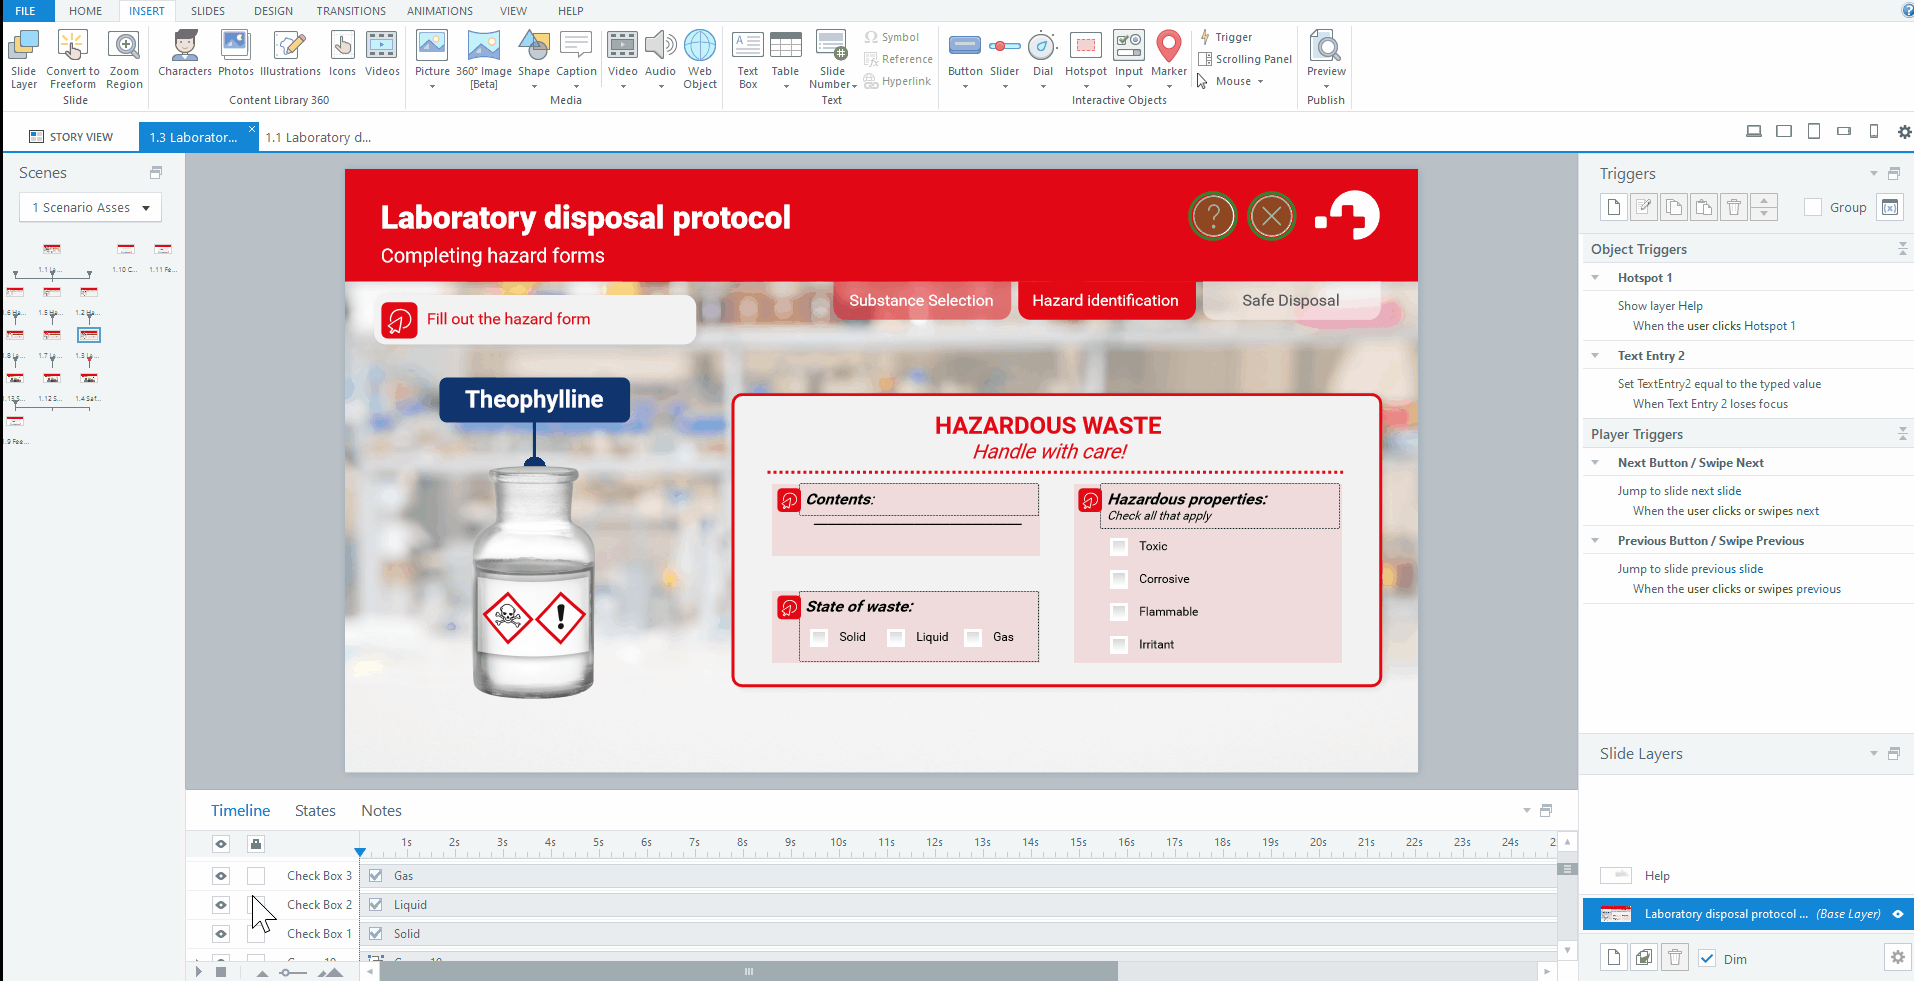
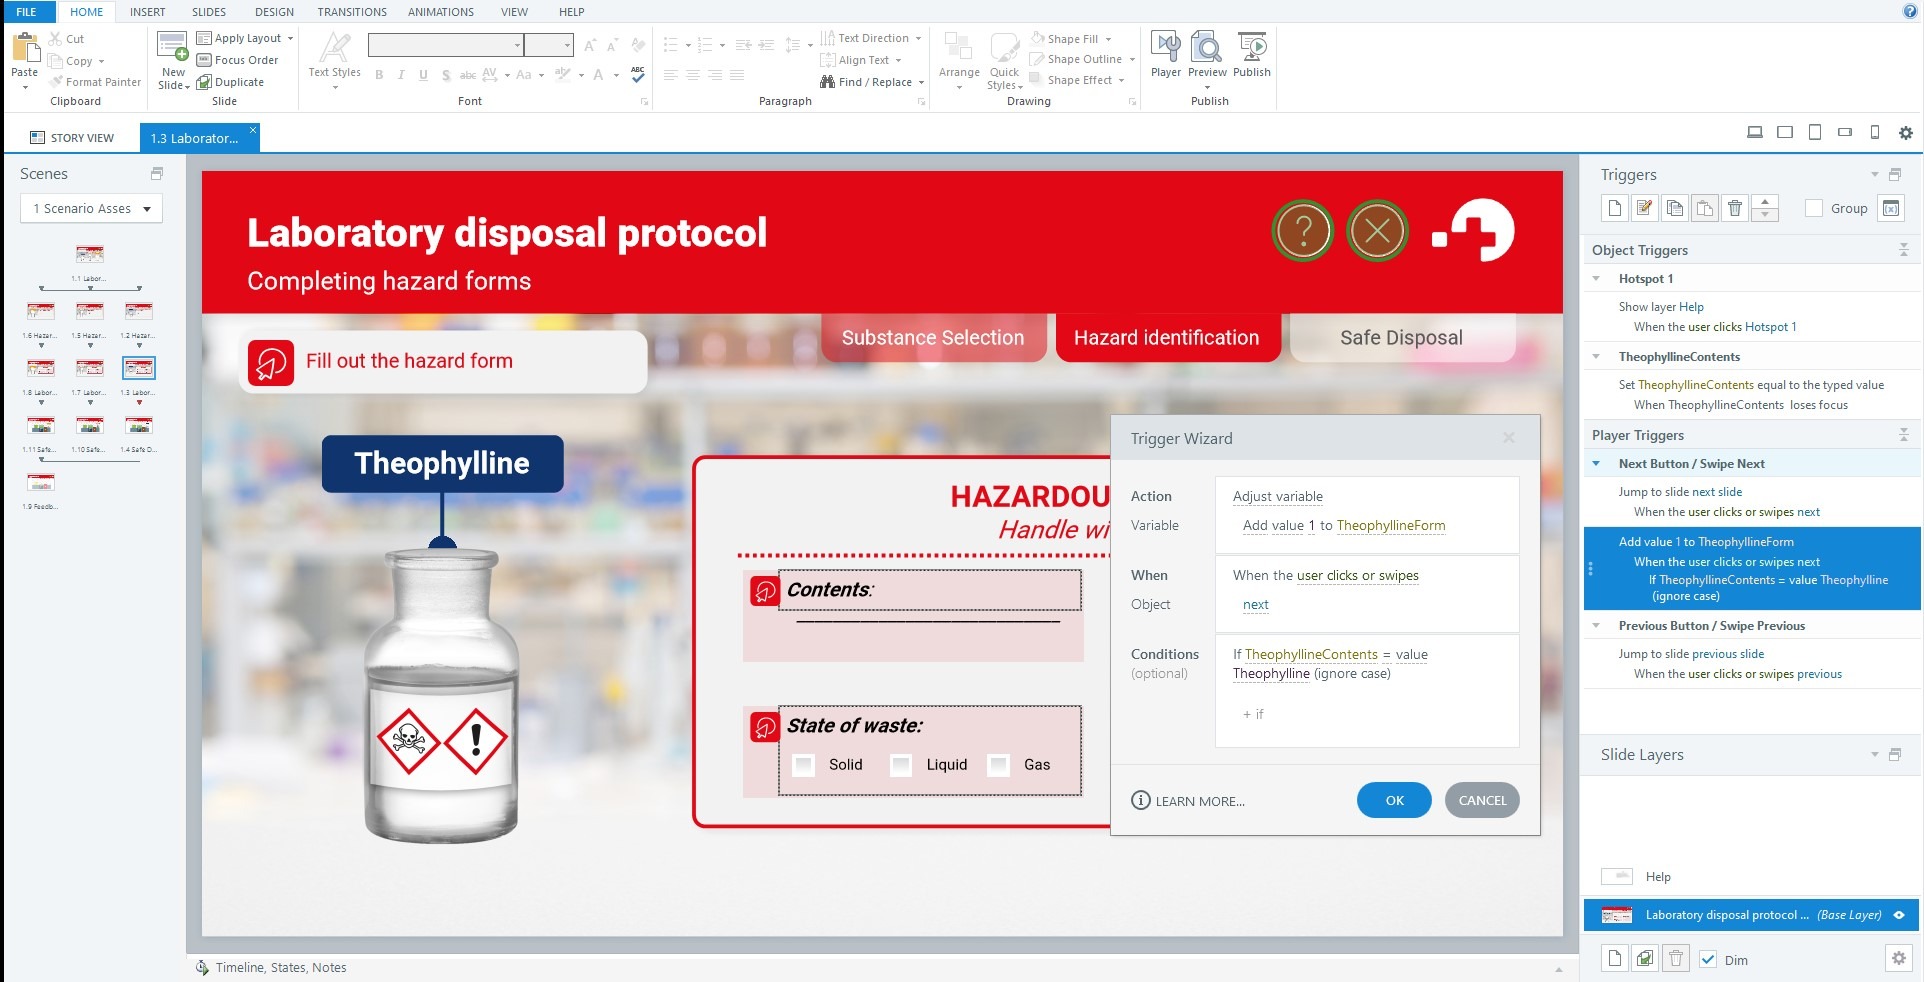
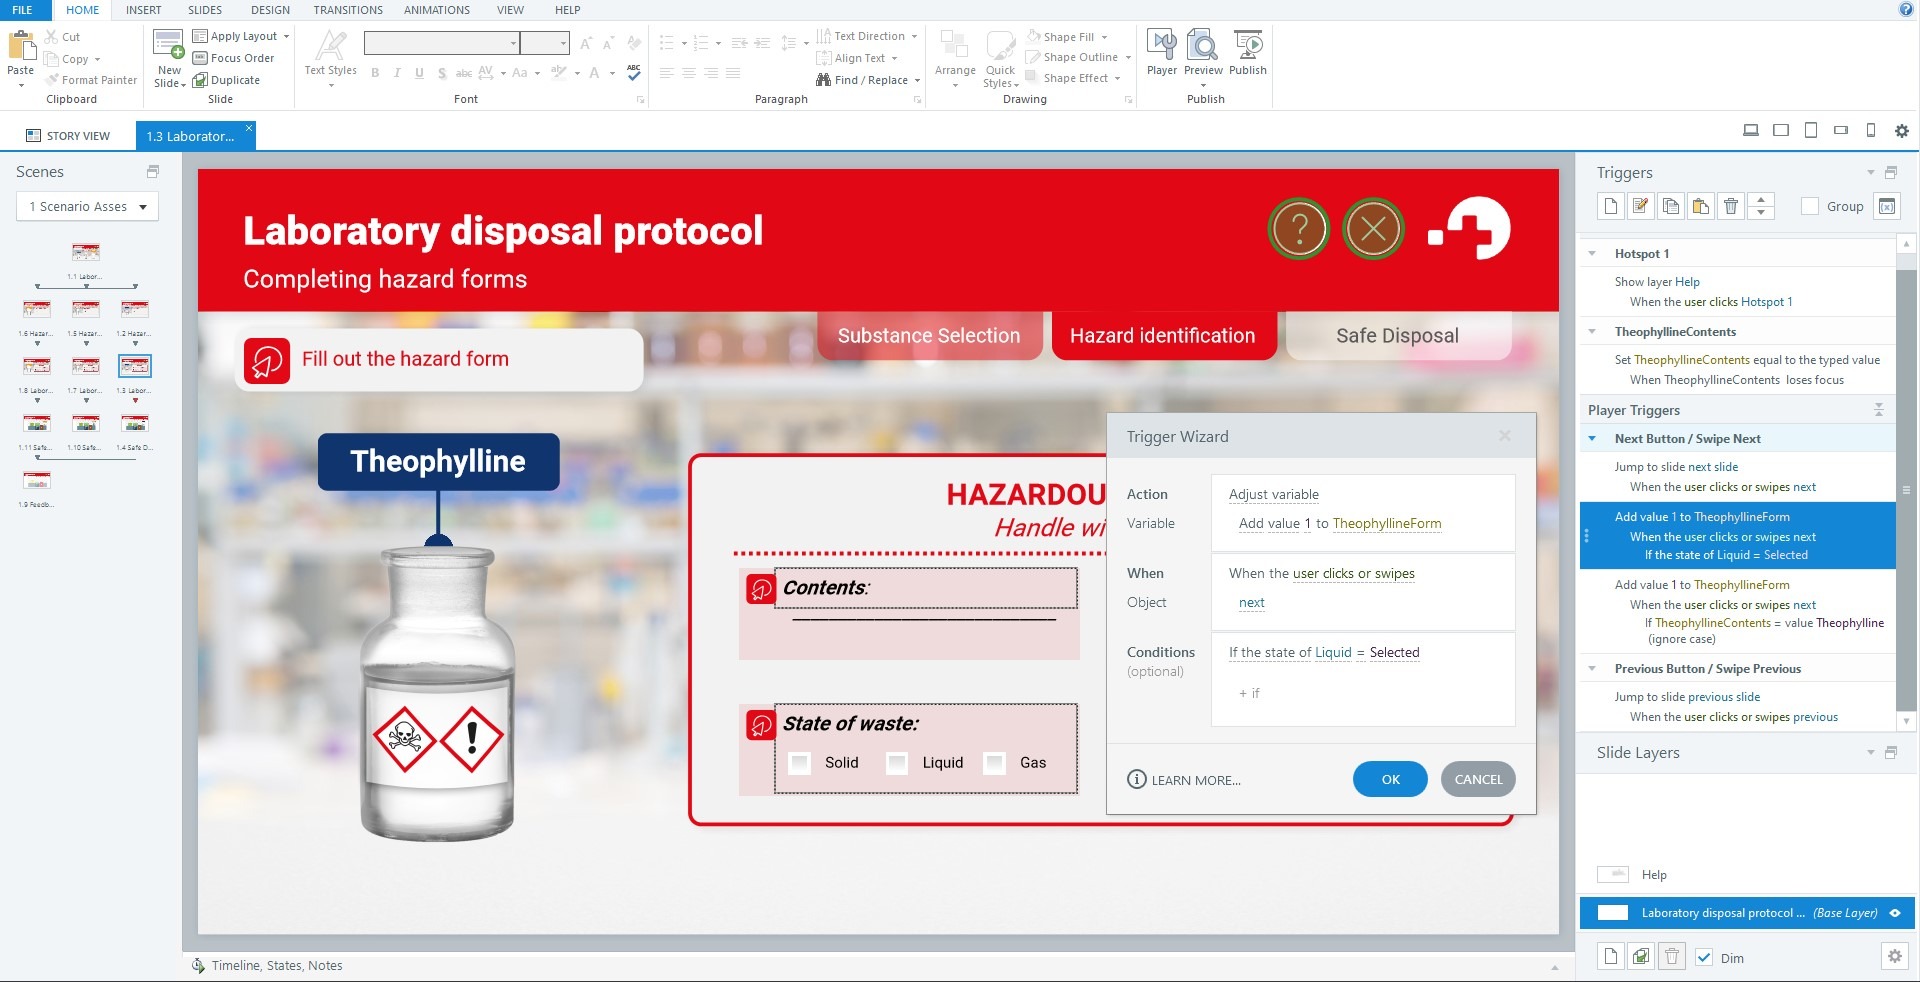
If you want a learner to do multiple tasks on one slide, then a bespoke interaction can be a better route. On this slide, for example, the learner has to fill in a form with multiple parts.
The form has a section where the learner has to type something in as well as two different multiple-choice sections. It’s more realistic for the learner to have to fill all these parts of the form in at once – that’s what they’ll be doing in the real world – but Storyline’s freeform questions aren’t able to handle all these parts at once.
To create this type of complex scenario, you can use bespoke Storyline triggers and variables. The first thing you’ll need to do is to lay out your assets on the slide. Again, go to the Insert tab and add visual and text content. You can add text entry functionality by going to the Input sub-menu and picking the text entry field from the dropdown menu.
Now everything is on the slide. By using Storyline’s inbuilt inputs we don’t have to do much programming. The text entry field can be filled in by the learner, and they can select any and all of the check boxes. We’re nearly done! The final thing to do is make the three check boxes in the “State of Waste” section part of a button set. This is because we only want the learner to be able to select one of these check boxes, unlike the “Hazardous Properties” section where they can select all that apply.
To create a button set, you just select all the objects that you want to be part of the set, right click and select Button Set from the menu. Then assign them a button set: we’d recommend renaming this to something descriptive e.g., “Waste Form”. This is a quick and simple way of making it so that the learner can only pick from one of the available options on your slide.
All the functionality is now working on this slide, but we need to be able to capture whether the learner has filled in the form correctly so that we can give them meaningful feedback on their assessment performance. So, how do we do this?
Tracking and summary feedback
In this example, we need variables to track inputs and present feedback. This is because the feedback is generated on a separate slide from the interactions we’ve built above. Unlike object states, variables exist across an entire Storyline project. They’re a great way of tracking a learner’s progress across a complex scenario-based assessment, as you can use triggers to adapt variables based on learners’ actions across a sequence of slides.
There is no one way to make use of variables in your project, and no one way to present feedback. For this project, we used a numeric grading system for the interactions and tracked learners’ results using a number variable for each slide.
To do this, we needed some number variables. To create a variable, you can select the Variables icon in the top-right corner of the Triggers pane on a slide. This brings up a list of all the variables in your course. Then, you can add a new trigger by selecting the green plus icon.
Name it something descriptive and use camel case to separate words, as you can’t have spaces in the name of a variable.
Then, choose the type of variable you want. True/False is good for binary choices. Text variables are useful for capturing information, for example a learners’ name. Number variables are good for a huge range of things, and can be manipulated with addition, subtraction, and more. We’ll use number values here to track scores.
You can set the default value, which we’ll have as 0 here.
You can create all your variables at the start of your project or add them as you go along. Just be sure to be consistent in how you name them, especially if you’ll have many variables across your project!
Now we need some triggers to adjust these variables based on the learners’ performance in the assessment. Here’s how we did that for each of the interaction we looked at above:
On the first slide, we created a trigger that adds 1 to the variable TheophyllineHazardous when the learner clicks the Submit button, if the check box next to Yes is Selected. This means that if the learner has selected the correct answer, we’ll add 1 to the score for this part of the assessment.
On the second slide, we created a trigger that adds 1 to the variable TheophyllineDisposal when the learner clicks the Submit button, if the state of the Theophylline image (Image 10) is Drop Correct. This means that if the learner has selected the correct answer, we’ll add 1 to the score for this part of the assessment. The ‘Drop Correct’ state is a special state that is automatically generated by Storyline on a drag-and-drop question: we didn’t have to make it ourselves.
Finally on the third slide, we created three triggers: one for each part of the form.
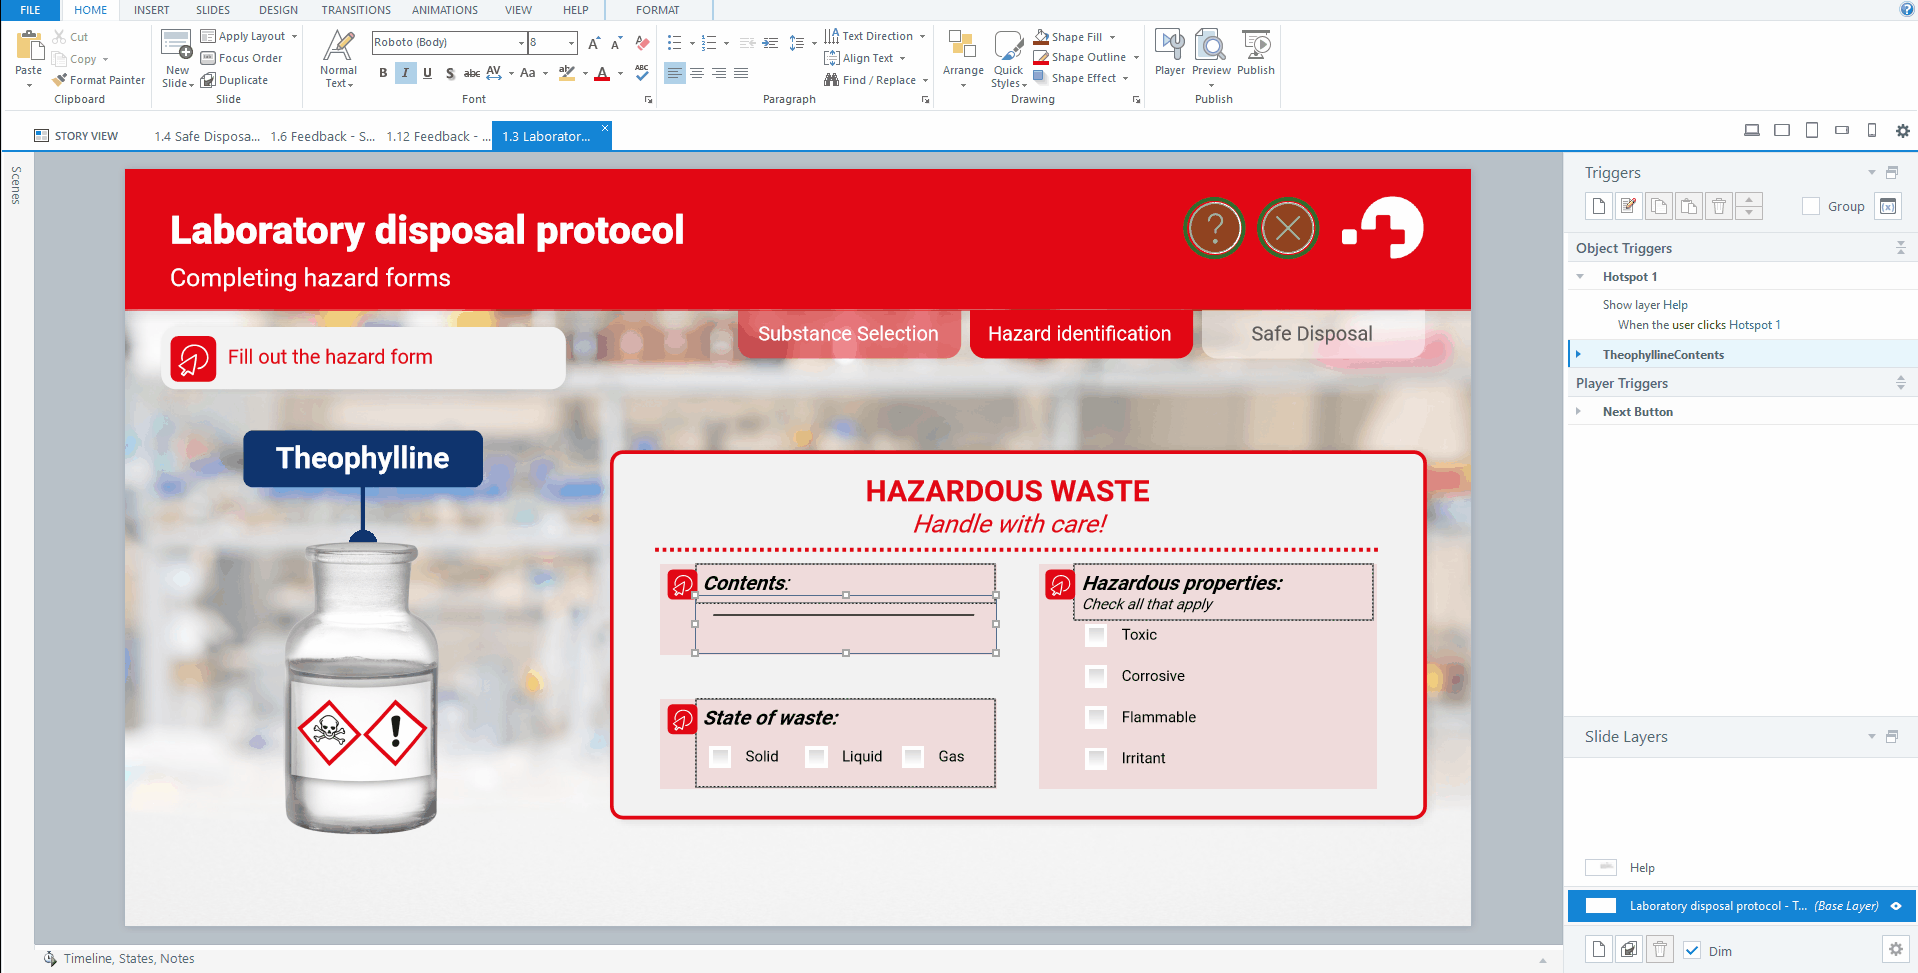
For the “Contents” text-entry, we created a trigger that adds 1 to the variable TheophyllineForm when the learner clicks the Next button, if the value of the variable TheophyllineContents (which is what we named the variable for the text-entry field) is equal to Theophylline. We made sure to choose ‘ignore case’ as it doesn’t matter if the learner capitalises the word or not for this assessment.
Then, we created a trigger that adds 1 to the variable TheophyllineForm when the learner clicks the Next button, if the Liquid check box is Selected. This is because Liquid is the correct answer for the state of the waste.
Finally, we created a trigger that adds 1 to the variable TheophyllineForm when the learner clicks the Next button, if the Toxic and Irritant check boxes are Selected, and if none of the other check boxes are selected. This is because these two, and only these two, of these properties apply to this substance.
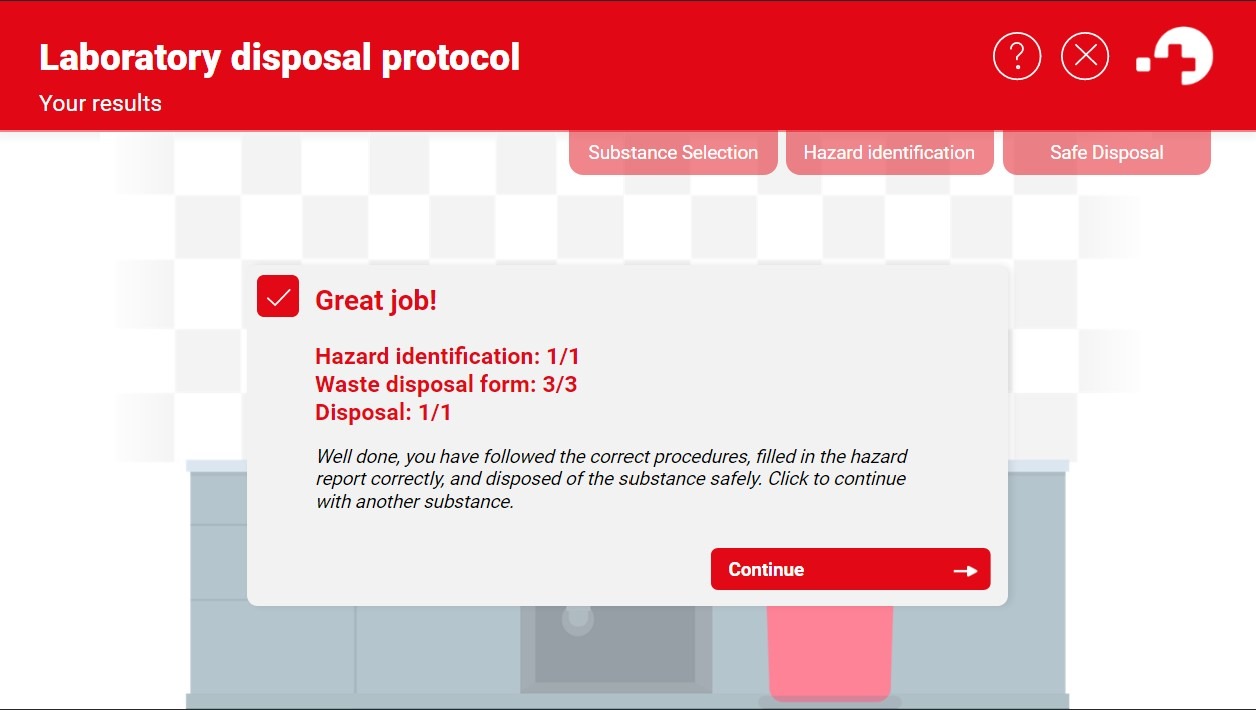
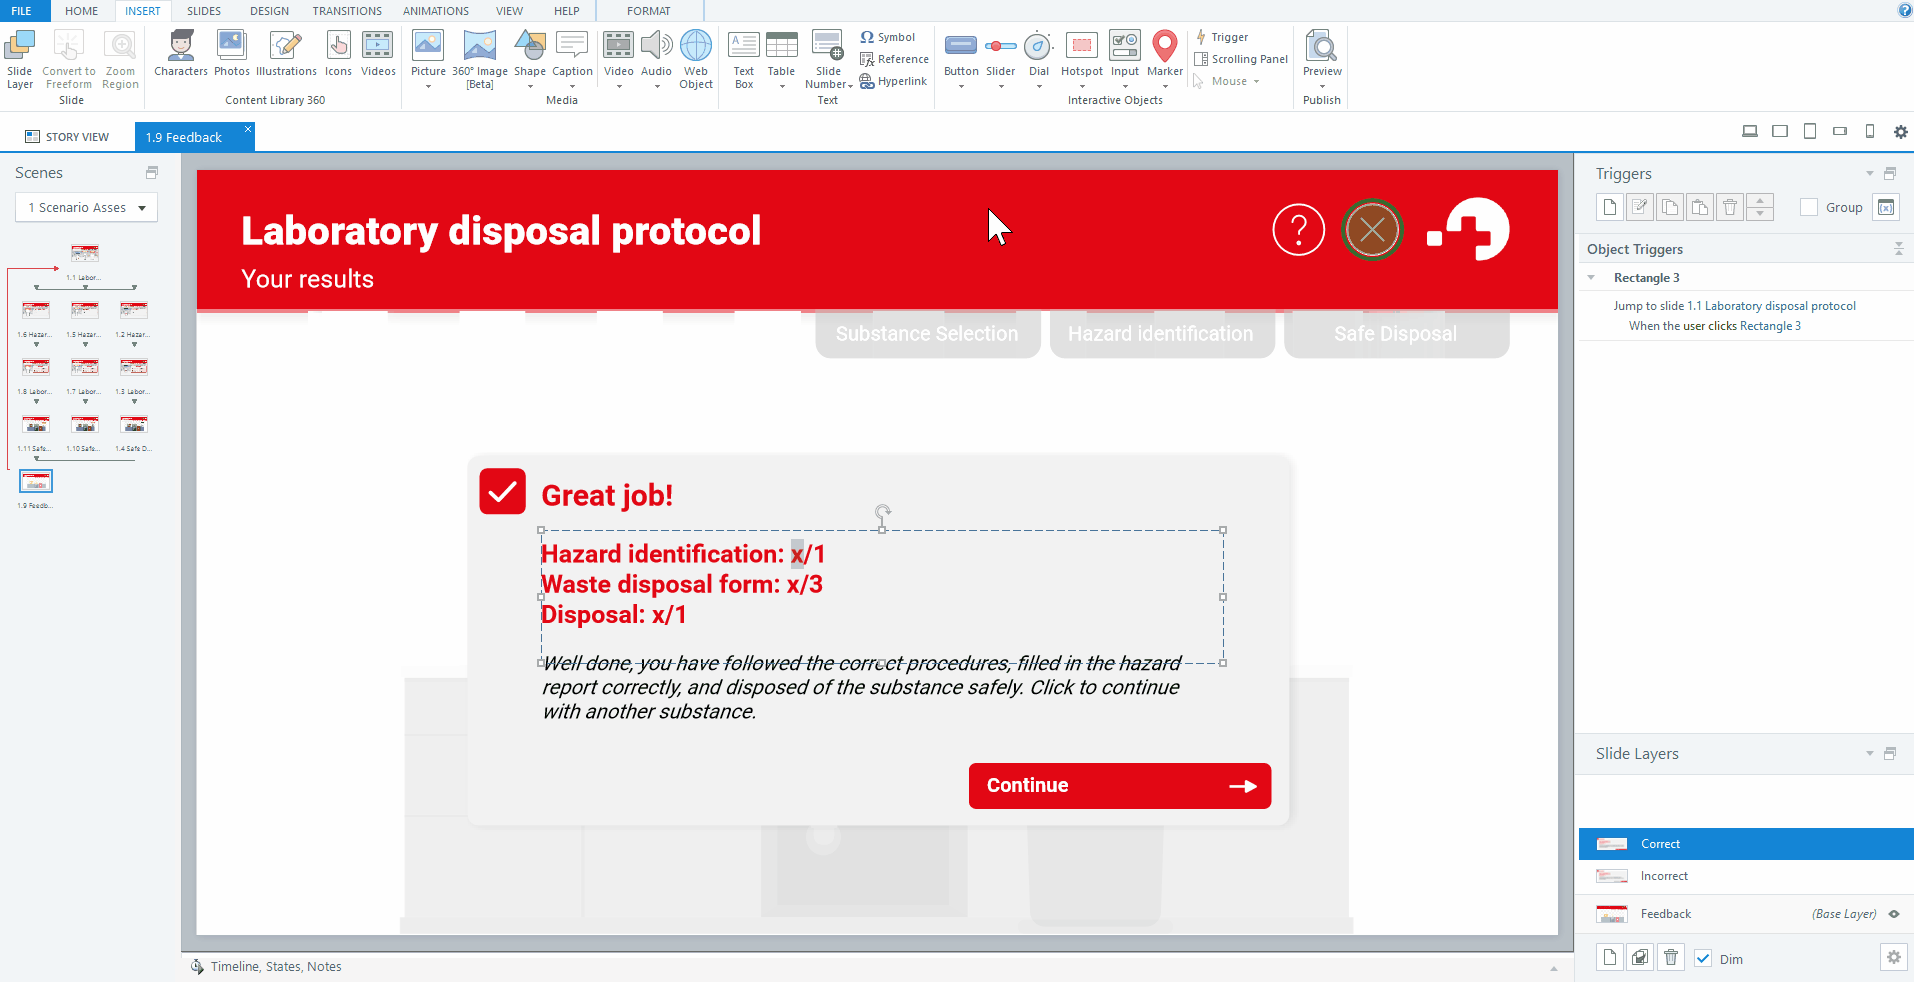
Finally, we need to display these variables on the feedback slide so that learners can see their scores. You can display a variable in two ways in Articulate Storyline 360. If you know the name of the variable, simply type the name between two % symbols e.g. %TheophyllineForm%.
But if you have a lot of variables, you might not remember them so easily. In this case, go to the Insert tab, and select Reference from the Text section of the tab. This brings up the list of all the variables in your course: simply select the variable you want to display and it will automatically appear in the format above.
A final word on variables in multi-slide interactions: if you wanted to allow learners to try again, you need a trigger that resets the scoring variable(s). This is because variables exist across the entire course and aren’t automatically reset when visiting a slide again. To do this, you would add a trigger that sets the value of the relevant variables to their initial value when the learner clicks the Try Again button.
This brings us to the end of our adventure in assessments in Articulate Storyline and the end of our series! Be sure to check out the full example from this scenario here. We hope you’ve learned some new ways of assessing your learners’ skills and knowledge, and picked up some awesome PowerPoint, Rise, and Storyline tips on the way. If you want more tips, be sure to check out our free weekly masterclasses where we cover a range of PowerPoint and Storyline topics as well as regular content on graphic design and visual communication!
Branching scenarios are a great way of providing authentic assessment in Articulate Rise. They offer learners a chance to put theory into practice, by facing realistic situations that they might encounter in real life and getting feedback on what they’ve done well or need to improve.
Interactive PowerPoint quizzes are a great way of levelling up your eLearning content. Whether used for formative or summative assessment, interactive quizzes help learners to have a more engaging experience, identify areas where they need more help, and retain more of what they learned in the course of their training. In this post we cover all the practicalities of creating interactive assessments in PowerPoint.
In this series we are taking you on a journey through the theory behind effective eLearning assessments and practical tips for building assessments it in three different authoring tools: Microsoft PowerPoint, Articulate Rise, and Articulate Storyline. In this post, we lay the instructional design foundations.