PowerPoint’s Morph transition really is a game-changing feature in the world of presentations. You no longer have to be a presentation animation expert to create dynamic and eye-catching content. We’ve written a guide on using morph, and you can read that here. But even though we love this feature, it’s not without it’s faults. So here’s a handy tip for using PowerPoint Morph with multiple objects.
How it works
At a basic level, this feature recognises common objects that appear across multiple slides and animates them to create lovely, smooth transitions like this:
The difficulty of morphing multiple objects
Morph is especially helpful if you want to animate multiple objects across multiple slides; it saves you having to animate each object individually. But sometimes PowerPoint isn’t that great at recognising which object is which – particularly if you have several of the same type of object (e.g. multiple rectangles).
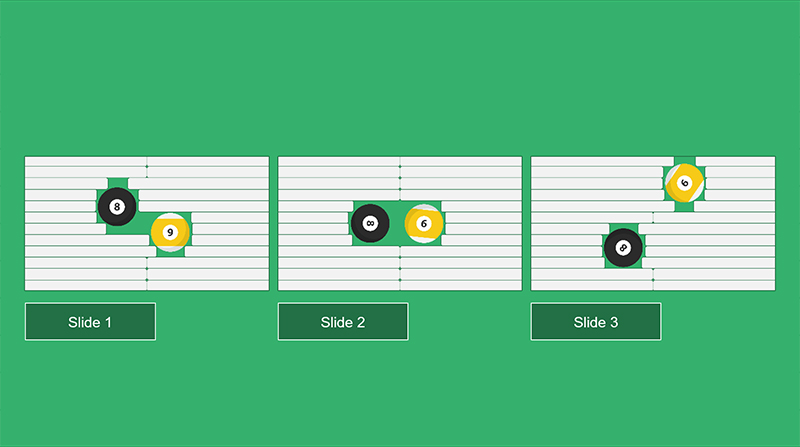
In the image below we have three slides with different arrangements of the same shapes. Let’s say we want to move the shapes on Slide 1 to the formation on Slide 3, via the formation on Slide 2.
But if we create the three slides above, and add a morph transition to each, this is what happens:
PowerPoint can’t recognise which rectangle is moving to which position, so we get a jumbled mess instead of the smooth transition we want.
How to morph multiple objects
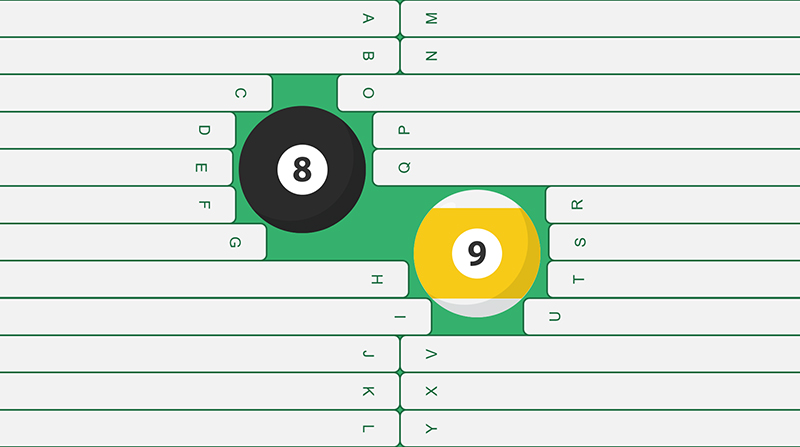
Step 1: The solution, you’ll be glad to know, is simple. Add a letter to each shape. Now, PowerPoint can recognise which shapes are the same when it morphs them.
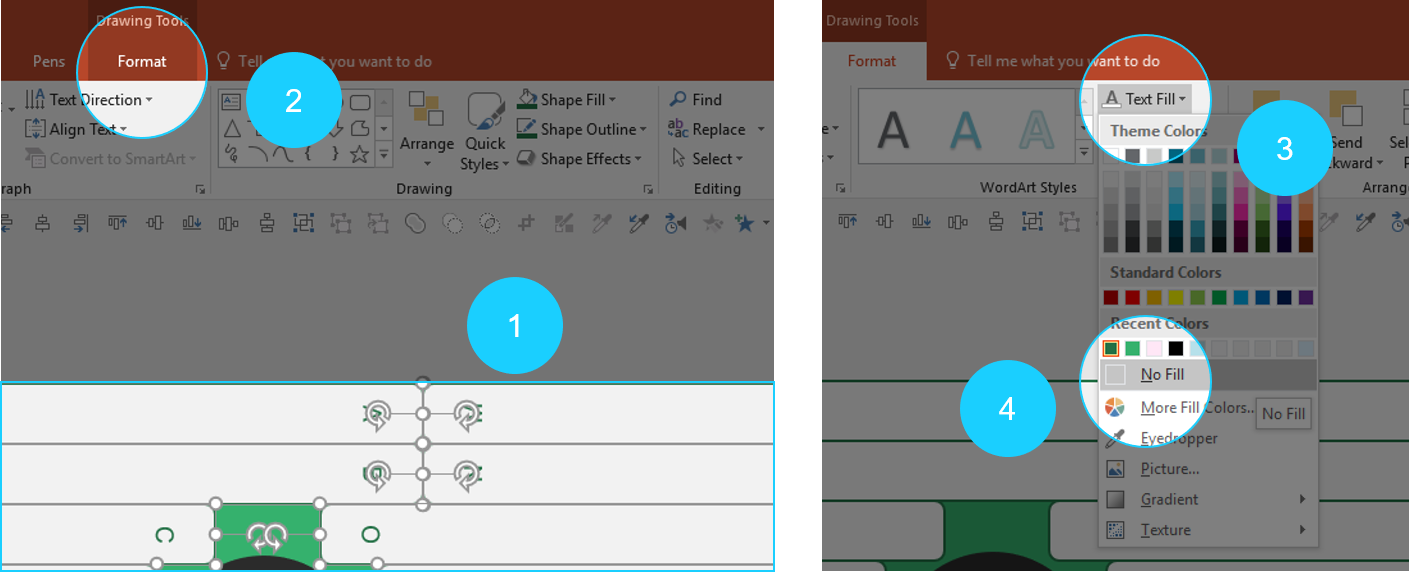
Step 2: Now we can make the text transparent (so that it doesn’t spoil your lovely design). To do that, select the objects, navigate to the Format tab. Select Text Fill and then choose the No Fill option.
Step 3: Add the morph transition and watch your shapes effortlessly glide to their new (and correct) position.
We’re calling out one of the major injustices of corporate rebrands across the globe – PowerPoint falling to the bottom of the rebranding checklist. We discuss why it's a problem and how to fix it!
Navigate your slides in PowerPoint like a pro with the help of hyperlinks! This blog post gives you a step-by-step guide on how to add a navigable menu to your PowerPoint deck.
Sweet hack! Even works with multiple instances of the same image by applying different fill colors and setting their transparency to 100… Thanks for the help!
Selecting objects to morph. I see how this works with boxes and hidden text. Nice! But I have lines that separate elements on the page, and I want them to transition along with other elements. However, like your example, PP doesn’t always know which line to morph where. No way to add text to line elements. Tried “Alt Text” but this didn’t help.
Hello Ms Paulie, thanks for your comment. My suggestion would be to group each line to a transparent shape containing a different letter, with a similar result as shown in the article. Another way, but you would lose editing capabilities, would be to copy and paste each line back into the deck as a picture. Let us know if any of these works!
Hi, Do you have a VBA command in which the transition of slides during morph won’t have a smooth end? What could should I use so that it won’t have a smooth start and end?
You emailed in, and we replied to that – but for anyone else reading… This isn’t possible because there are no acceleration properties in the transitions object so it’s not possible to modify the behaviour of Morph via VBA. We have asked Microsoft for them to do what you’ve suggested several times, but so far no sign that they will
Great idea!! I love your articles! Not sure if this is new, but I just read that you can now link objects from slide to slide by using !! before the object’s name in the selection pane. It works beautifully! https://support.microsoft.com/en-us/office/morph-transition-tips-and-tricks-bc7f48ff-f152-4ee8-9081-d3121788024f What’s more – this is a way to use the Morph transition on slide masters!! I’ve never gotten it to work any other way (This is AMAZING for presentations/lessons that are shared with the end user, when you want to ‘hide’ everything on the Masters to reduce the chance of users breaking something on accident.)
Hi there, thank you for this really helpful solution! I am having similar issues however instead of shapes i have pictures i’ve inserted that i cannot add text to and therefor cannot solve the issue of random pictures moving to wrong areas when applying the morph. Any help on this would be greatly appreciated!
Try making the letters/numbers the same background colour as your object, or you can also set the transparency of your text fill to 100%: highlight text > right click and select format shape > text options > fill > drag the transparency slider to 100%.
We have worked with BrightCarbon for over 5 years, across a number of healthcare divisions, where they have been a very important part of our bid programme, supporting numerous awards of new contracts.


Sweet hack! Even works with multiple instances of the same image by applying different fill colors and setting their transparency to 100… Thanks for the help!
Hi Kolja, thanks for the feedback. That’s a great trick with the transparencies! We’ll definitely be using it.
This I really great.
Thank you for the insight.
I really love and appreciate the work you do at Brightcarbon.
Selecting objects to morph. I see how this works with boxes and hidden text. Nice!
But I have lines that separate elements on the page, and I want them to transition along with other elements.
However, like your example, PP doesn’t always know which line to morph where. No way to add text to line elements.
Tried “Alt Text” but this didn’t help.
Any cool suggestions?
Hello Ms Paulie, thanks for your comment. My suggestion would be to group each line to a transparent shape containing a different letter, with a similar result as shown in the article. Another way, but you would lose editing capabilities, would be to copy and paste each line back into the deck as a picture. Let us know if any of these works!
Oh god, that saved the day! Thank you very much for the handy explanation!
Great hack. Was driving me crazy, that objects were moving randomly. So happy I wasn’t the only one with this problem.
Twp and a half years later, this still rocks. Saved me lots of nerves! Many thanks
I’m curious, how did you find this out?
Hi,
Do you have a VBA command in which the transition of slides during morph won’t have a smooth end? What could should I use so that it won’t have a smooth start and end?
Thanks!
Hi Joven
You emailed in, and we replied to that – but for anyone else reading… This isn’t possible because there are no acceleration properties in the transitions object so it’s not possible to modify the behaviour of Morph via VBA. We have asked Microsoft for them to do what you’ve suggested several times, but so far no sign that they will
Thanks for the reply, appreciate it.
Great idea!! I love your articles!
Not sure if this is new, but I just read that you can now link objects from slide to slide by using !! before the object’s name in the selection pane. It works beautifully!
https://support.microsoft.com/en-us/office/morph-transition-tips-and-tricks-bc7f48ff-f152-4ee8-9081-d3121788024f
What’s more – this is a way to use the Morph transition on slide masters!! I’ve never gotten it to work any other way (This is AMAZING for presentations/lessons that are shared with the end user, when you want to ‘hide’ everything on the Masters to reduce the chance of users breaking something on accident.)
Hi there, thank you for this really helpful solution! I am having similar issues however instead of shapes i have pictures i’ve inserted that i cannot add text to and therefor cannot solve the issue of random pictures moving to wrong areas when applying the morph. Any help on this would be greatly appreciated!
Doesn’t work
Hello how to I label the shapes? But hide the letter?
Try making the letters/numbers the same background colour as your object, or you can also set the transparency of your text fill to 100%: highlight text > right click and select format shape > text options > fill > drag the transparency slider to 100%.