
- PowerPoint design
- Comments: 4
With a bit of clever coding, and some BrightCarbon magic, you can create Smart Icons and Illustrations in PowerPoint.
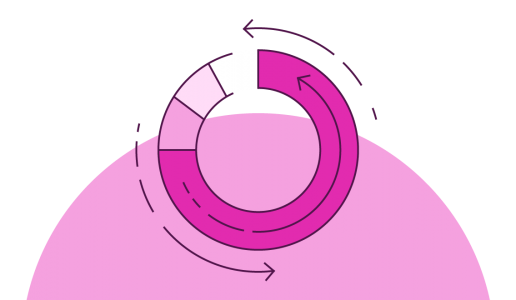
PowerPoint is widely regarded as an application that is relatively easy-to-use and accessible to all with a fairly simplistic animation system that anyone can use to add some visual spark or structure to their presentations. But sometimes the PowerPoint defaults just aren’t enough, and even the most casual of PowerPoint users are left wishing for a bit more functionality. No clearer is this the case than with the Wheel animation in PowerPoint: it goes one way, from one point. Or does it?
In this article we’ll briefly dip into the realm of combining and customising animations to open up new possibilities, which would otherwise be impossible to achieve with the default animation presets, and we’re going to use the Wheel animation to show you just how this works.
We’re going to solve a problem that previously defeated my colleague Chris, but with a bit of outside-the-box thinking, you can manipulate the wheel animation to do just what you want.
First of all, to make life a little bit easier we should reveal the Animation Pane and the Advanced Timeline feature built into the pane.
There’s no reason to feel overwhelmed by the Advanced Timeline, since there is hardly anything advanced about it. It will just give you a clear visual representation of what’s happening and when. This is extremely helpful when fiddling around with more complex animations.
If you’ve ever used the Wheel animation in PowerPoint before you might have noticed that you can’t really choose where the animation starts. It always starts from 12 o’clock and goes clockwise. But what do you do when you need the animation to start, let’s say from 4 o’clock? Luckily there is a way to achieve this by combining two animations to act as one. All you need for this is a basic understanding of maths!
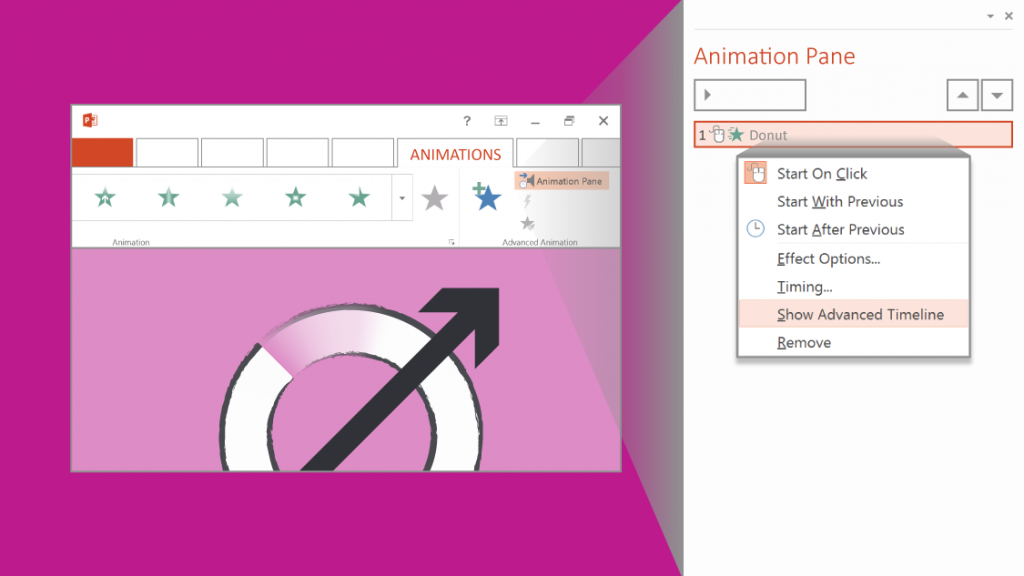
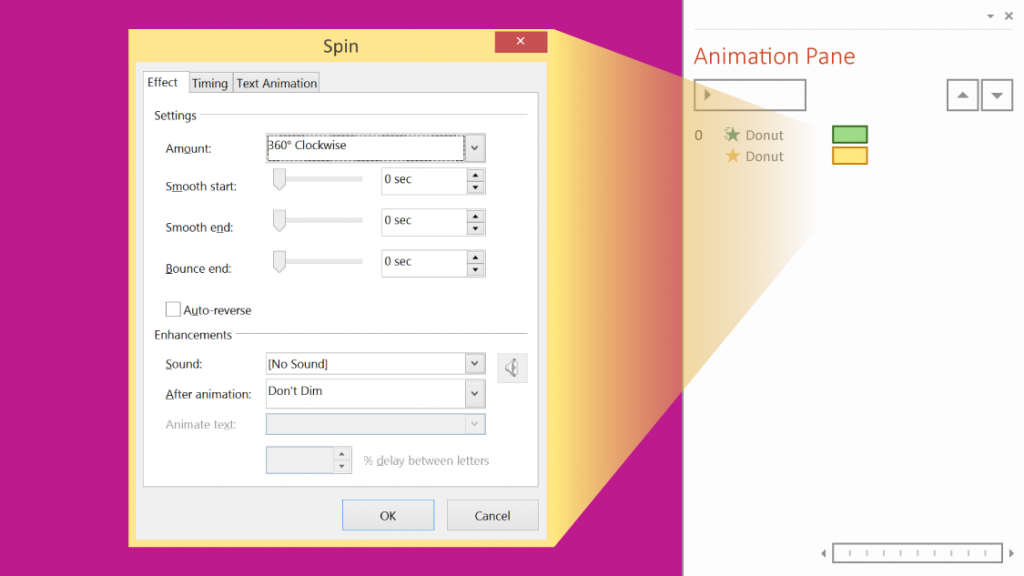
Right, let’s add a donut to the slide and put a Wheel animation on it. The next thing we want to do is add a Spin animation to the same object. We can do this by clicking on the Add Animation button in the Animations tab (it’s next to the Animation Pane button). If we don’t use the Add Animation button to add the second animation, we’ll see that our original Wheel animation has been replaced with the Spin animation. We should now have two animations showing up in the Animation Pane.
When adding new animations, PowerPoint will automatically set the animations to happen when you click your mouse. To make them go off simultaneously, select the two entries and right-click on them to reveal the Start With Previous option. The mouse icons should disappear and we’re ready to dive into the effect settings. Double-click the yellow Spin animation to open up it’s Effect Options window. This can be done for any entry in the Animations Pane and is essential when manipulating animations in this manner.
So what should we do now to make the animation start from 4 o’clock?
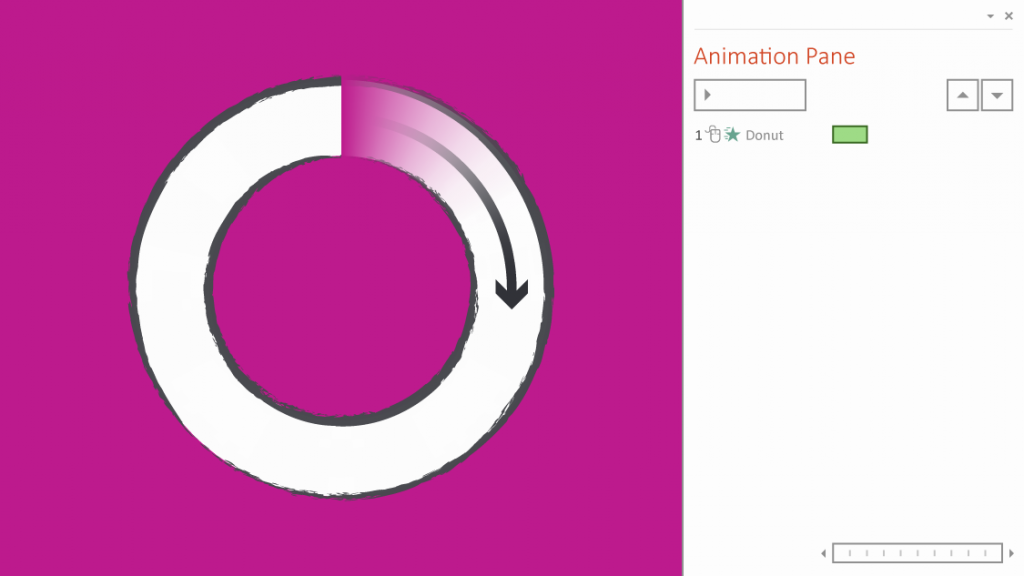
Basically we want the Spin animation to do two things – rotate the object, and do it fast enough that we don’t actually see it happening. This will effectively shift 12 o’clock to be 4 o’clock and makes the Wheel animation start from 4 o’clock. Let’s go ahead and change the rotation to 120° clockwise.
Now, in the Timing tab of the same window we can edit the duration of the animation. We should change the duration of the animation to 0.01 seconds, this will make it happen so quickly that PowerPoint doesn’t even have a chance to display the animation happening. This brings us to what we we’re after: the Wheel animation now starts from 4 o’clock. Naturally you can change the rotation to whatever you like to start the animation from wherever you please.

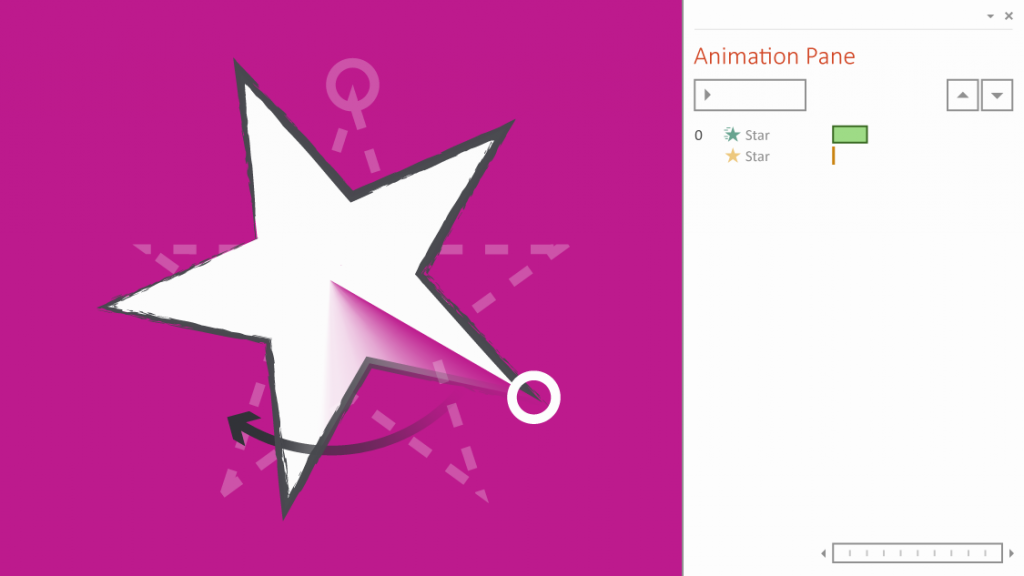
Now, combining animations and manipulating shapes with them will put some limitations in place. In this example we’ve used a completely circular donut, and on this shape the trick works flawlessly.
If we were to use a star as our shape, we wouldn’t get the result we were initially after. This is because we rotate the star and unfortunately it’s tip will end up at 4 o’clock, leaving us with something that looks different from our original design. So this trick doesn’t really work if you’re using non-round shapes.
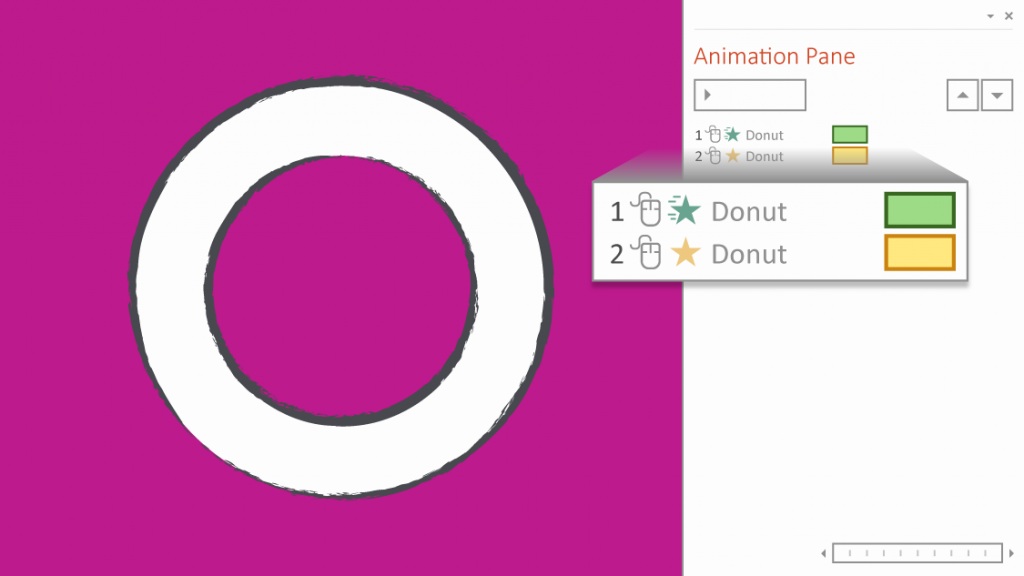
As we explored before, the Wheel animation in PowerPoint goes clockwise by default and the Effect Options window does not include an option to change it’s direction. Happily we can change this with yet another Spin animation. So let’s go ahead and add another Spin animation to the donut and change the animation to play With Previous. We now have three entries in the Animation Pane.
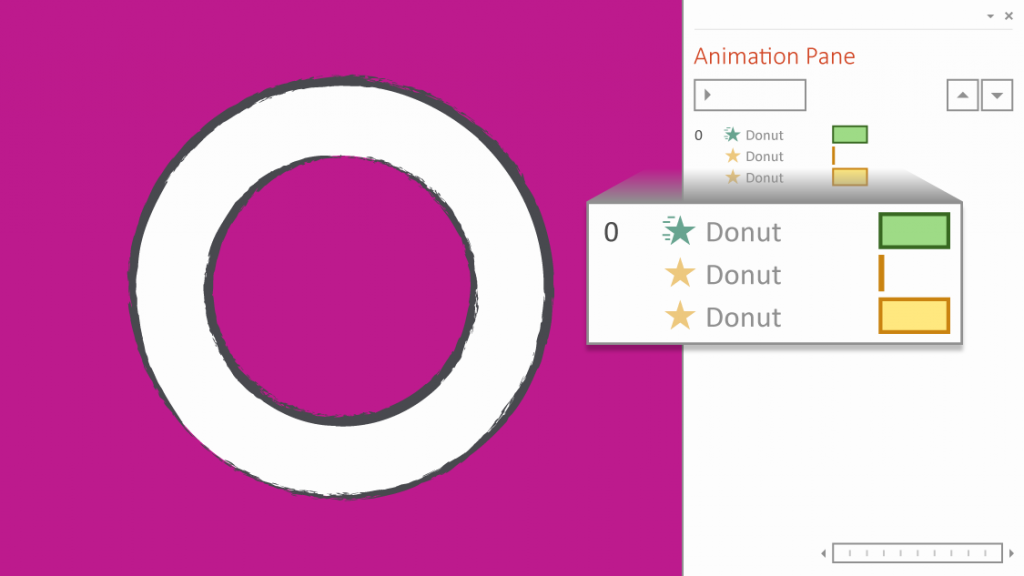
Another thing to keep an eye on is that the green animation’s always above the yellow ones. The order here literally dictates the playback order for the animations. By reversing the order, we’ll make the donut abruptly appear before the start of the Wheel animation. This is something to avoid for a smooth playback.
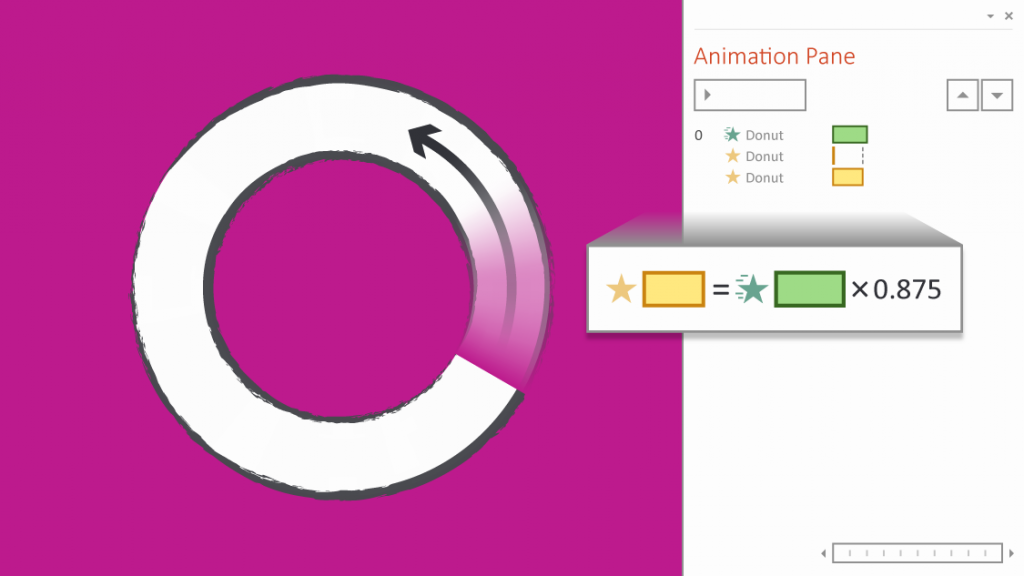
Alright, heading back to the matter at hand. Let’s open up the Effect Options window for our new Spin animation. We want this animation to do a full counter-clockwise 360°. This essentially should do what we were after.
It is important to note that the duration on the new Spin and the original Wheel should be the same. PowerPoint creates both animations with a default duration of 2 seconds. According to common sense this should make the animation look smooth, yet one end of the donut keeps slightly rotating along. If common sense won’t help, then trial and error will.
By changing the Spin duration to 1.75 seconds we end up with a neat counter-clockwise animation. We can derive the Spin duration value by multiplying the Wheel duration value by 0.875, this gives us the desired animation with every possible duration value for the Wheel.
Effectively this allows us to animate circular shapes in ways which were not possible before. As with the previous workaround, limitations apply. Using this with anything, but a perfectly round shape will end up with the shape frivolously spinning around on the slide.
These tricks are great to have in your PowerPoint animation arsenal. We use the Wheel animation in PowerPoint a lot when we’re telling stories, and now you know how to spin it anti-clockwise as well as clockwise, there are plenty more storytelling opportunities open to you! You might need to use them if you’re animating time on a clock face, or how about if you’re creating a complex process? And hopefully you’re convinced that the PowerPoint defaults aren’t your only option when making exciting animation sequences.
Do you have any impossible PowerPoint animation problems that you can’t possibly solve? Post them in the comments, or drop us a tweet and we’ll get to work!
Leave a commentWith a bit of clever coding, and some BrightCarbon magic, you can create Smart Icons and Illustrations in PowerPoint.
Have you ever started working on a presentation to find that pieces of content have been pasted in as images instead of editable text? But fear not! Help is at hand. Here is all you need to know about how to convert images to text in PowerPoint.
A PowerPoint template is the only brand element you put in the hands of the whole organisation – regardless of computer literacy, or design skill: it has to be robust enough so that it can’t be broken, but strong enough to carry your brand voice into every meeting, or leave-behind, or proposal it gets used for. Read on for a list of the essential elements every PowerPoint template needs to have.
Join the BrightCarbon mailing list for monthly invites and resources
Tell me more!BrightCarbon is our “go to” for all of our professional presentations, always delivering high quality projects on time and on budget.
Cynthia Rogan Apex Learning


What about rotating log towards viewer
Nice, Very clever.
and thanks
Thanks for this: quickly got my circles performing the right tricks. 🙂
This is a wonderful article. kodus to you! saved my life! Thans.
Great idea!
Thank you for not only an awesome solution but also a perfectly pedagogical explanation!
This was very helpful, thank you!
This is amazing! I was wracking my brain about how to make PowerPoint start the wheel at 9 o’clock, but couldn’t do it. Thank you so much for this info! You guys always do such a great job showcasing tricks in PowerPoint!
I do have other one that’s giving me grief: diagonal wipe! Ugh. As if in 2022, PowerPoint does not have a setting for diagonal wipe! I usually fake it with placing a cover shape that flies out diagonally and it works but in more complicated animations it becomes a real pain, so if you have another trick up your sleeves on this one, i’d love to find out what it is! 🙂
Hi Steffi, thank you for the kind words. I’m glad you found the article useful!
As for the diagonal wipe, there’s no elegant way to achieve that I’m afraid. I’ve just done a test and you can get a seeming diagonal wipe like this:
1) Rotate the shape you wish to animate by 45 degrees clockwise
2) Add a wipe animation to it
3) Then also add a spin animation to that shape
4) Set the spin to be 45 degrees counter-clockwise, remove the click on this animation, and set the duration of the animation to 0.01 seconds
5) You now have a diagonal wipe, although the downside is that your shape will appear rotated by 45 degrees outside Slideshow mode
Feel free to email me, and I can send you the slide I’ve put together.
I tried a lot but didn’t find solution.
Kindly provide the solution
To get rid of all the animation clutter in non-presentation mode (e.g. if I know I need to send the presentation to someone), I you can cover everything with a white square, or your background as a separate object and animate it to disappear parallel to the slide loading in presentation mode (i.e. top of the animation list and “start with previous”). Then add (or re-add) any graphic or text that you want to be seen as a stationary view in non-presentation mode. You can group all this cover-up into one object to make it easier if you need to push it to the side to do re-work on your animations underneath it. Keep in mind that everything added on top of your animations needs to disappear at slide-start. This way your non-presentation mode stays clean, this way someone viewing still gets an idea of what the slide contains… although they may wonder why the slide is magically different in presentation mode. 😉
This was all going well until where I am told to change the duration to 0.01 seconds – there are only options for 5, 3, 2, 1 or 0.5 seconds on this animation – am I missing something? Thanks
Thank you very much. I have been having a lot of trouble trying to find a way to get a wheel to spin from specific starting points and stop on specific points. This was very helpful. Not sure I have completely achieved what I need to but this was a big help. Trying to get a wheel to spin from 12:00 to 12:00 and stop then spin counterclockwise from 12:00 back to 12:00, then spin clockwise from 12:00 (540degrees) and stop on what would 12:30 the spin (540degrees) back to original 12:00 position. So it would spin 1 full turn to the right(clockwise) 1 full turn to left (counterclockwise) 1 1/2 turns to the left(counter clockwise) then 1 1/2 turns back (clockwise) to original position of 12:00. Sorry this might be confusing. FYI I am using this animation to teach parallel parking to students in my Drivers Ed class.
Steven G.
Hi Steven,
not sure if your question is still relevant, but for anyone else looking for this it is actually quite easy. The important thing to remember is to NOT add animations using the quick animations in the menu group “Animation”. This only allows one animation per object and will overwrite any other animations you may have for a given object.
Instead use the “Add Animation” in the Advanced Animation menu group. This allows you to add as many animations as you like for a given object…. Do not ask me what the logic behind that is, it is what it is.
With that in mind all you have to do is add an animation to spin your object 360° Clockwise, then add another to spin it 360° Counterclockwise, add yet another animation to spin it 540° (for this just double-click on the new animation and in the Effect Settings click in the Amount field and enter 540 in the field next to custom)… and so on.
for your Drivers Ed training, you will probably want to leave each spin to start on a mouse-click so that you can start the turning only after you have a chance to do any explaining.
That’s genius and so simple! Thanks.
I was wondering if you have a solution for making a non straight line to “wipe” on it’s own path? For example, if I have a line in a S shape and want the wipe effect following the pathway of the S. Many thanks
Not sure if there is not an easier way, but (assuming you have a white background) you can create a white circle, remove the border, set the fill color to be a gradient with white on one side and the gradient white on the other side with 100% transparency. The transparent side should be covering the line you want to wipe away. You will also have to get the cut-over from white to transparent in the middle as thin or wide as your situation needs by moving the gradient chevrons. Then just add a spin animation to the circle clockwise or counterclockwise as you need it somewhere between 90° to 180°. For an “S”-shaped line, you will have to do this twice one for the lower curve and one for the upper. Just copy&paste the circle and the animation will be copied as well, then all you need to do is change the animation settings to be a mirror image (i.e. change clockwise to counterclockwise, etc.). You will need to time the spin animation of the 2nd to start at the end of the 1st’s animation (some tweaking may be needed to get the effect that you are looking for). Hopefully you do not have any more than 2 curves, as this can be a pain to time everything.
One drawback… If you have a background with a picture or any kind of pattern, this will not work for you.
Depending how your “S”-shaped line looks, the solution may need to be more complex. If needed, you might need to use 2 of the above mentioned circles (set for no more than 90°) for only one curve in the line to avoid the wipe becoming too diagonal (i.e. bottom half of the curve, then the second circle for the upper half of the curve… and then all of that again for the second curve). If so, then you will likely need to have the second circle appear while the first is already spinning to avoid it from covering up part of the “S”-shaped line too soon.
Hope that makes sense. Certainly not easy, but if you get everything working and timed correctly, a real eye-catcher.