With more recent versions of PowerPoint (2016 and later), you can make an image transparent very easily. With versions of PowerPoint earlier than that, though, it can be a little more tricky. Read on to get the low-down on both methods for making your image transparent, whether you’re working in the newest version of PowerPoint or not.
PowerPoint 2016 or later
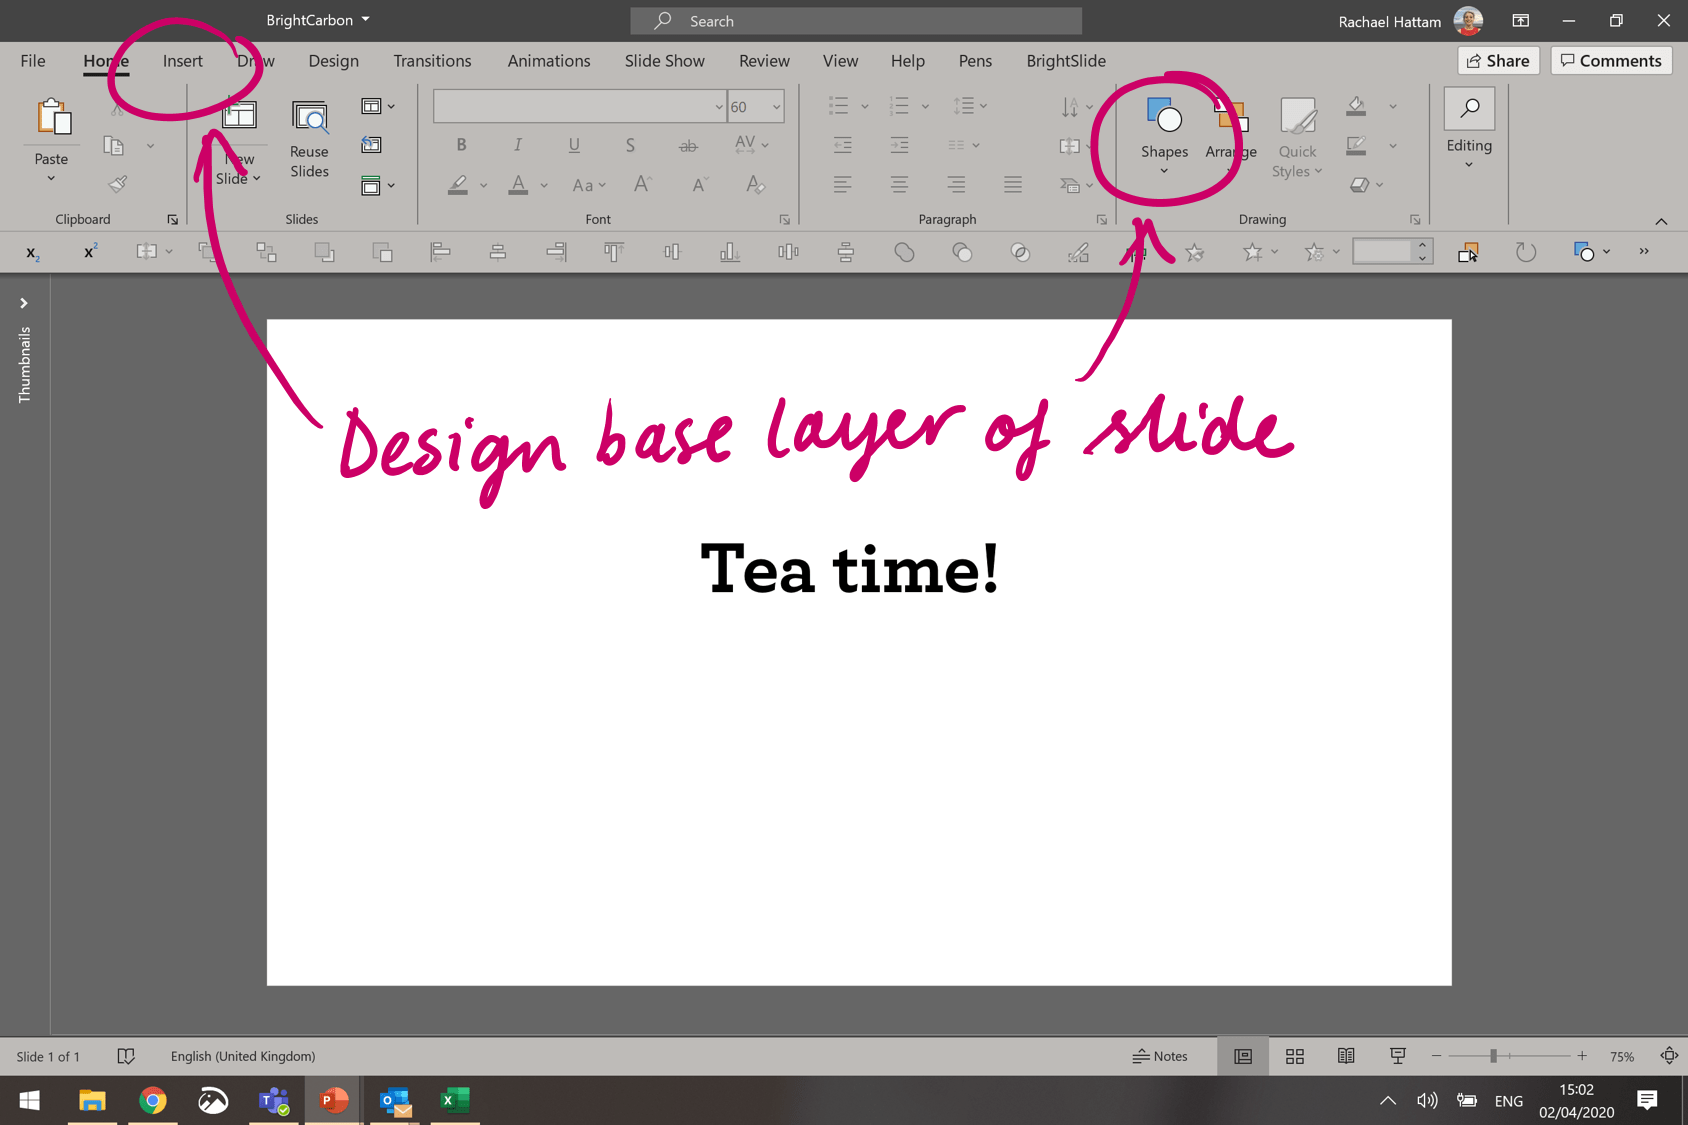
First, make sure that all the pieces that will be underneath your image are arranged. Here I have just added a simple text box using the Insert tool.
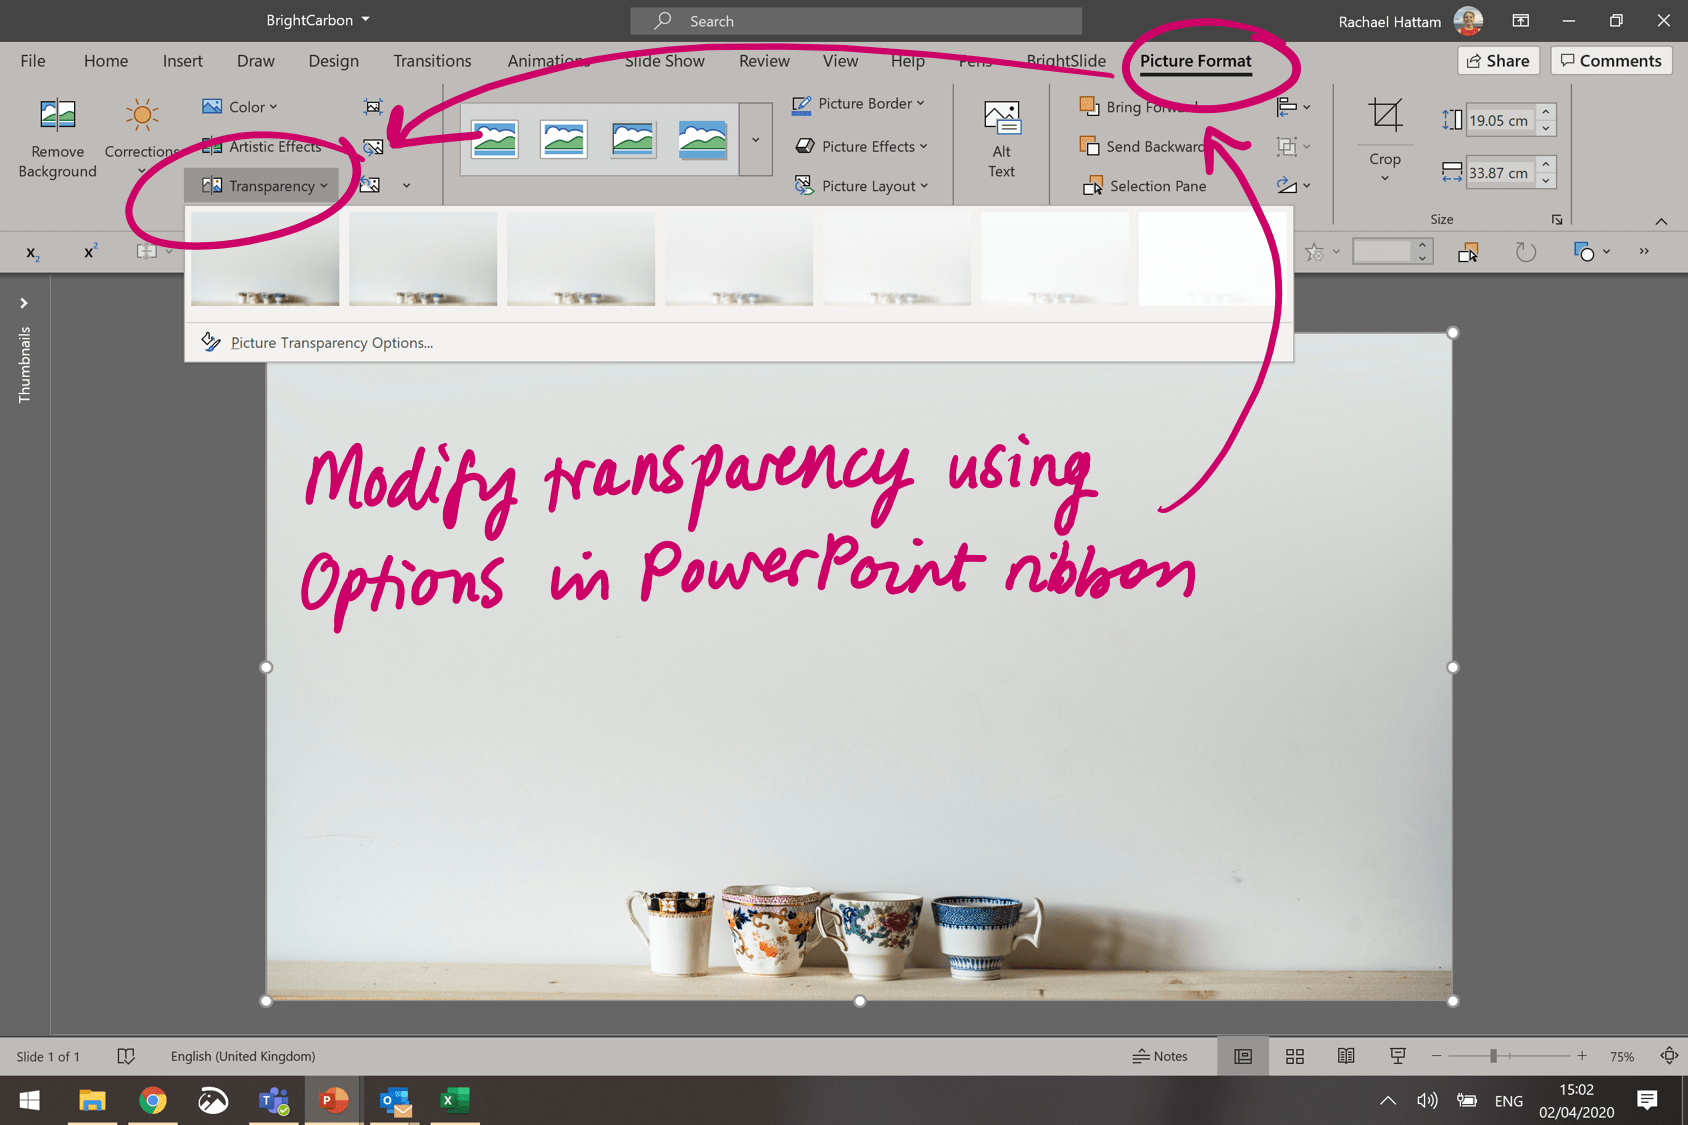
There are two quick ways you can change the transparency of an image. First, you can navigate to the Picture Format tab in the ribbon, and select Transparency. This gives you a range of pre-programmed transparency options for your picture.
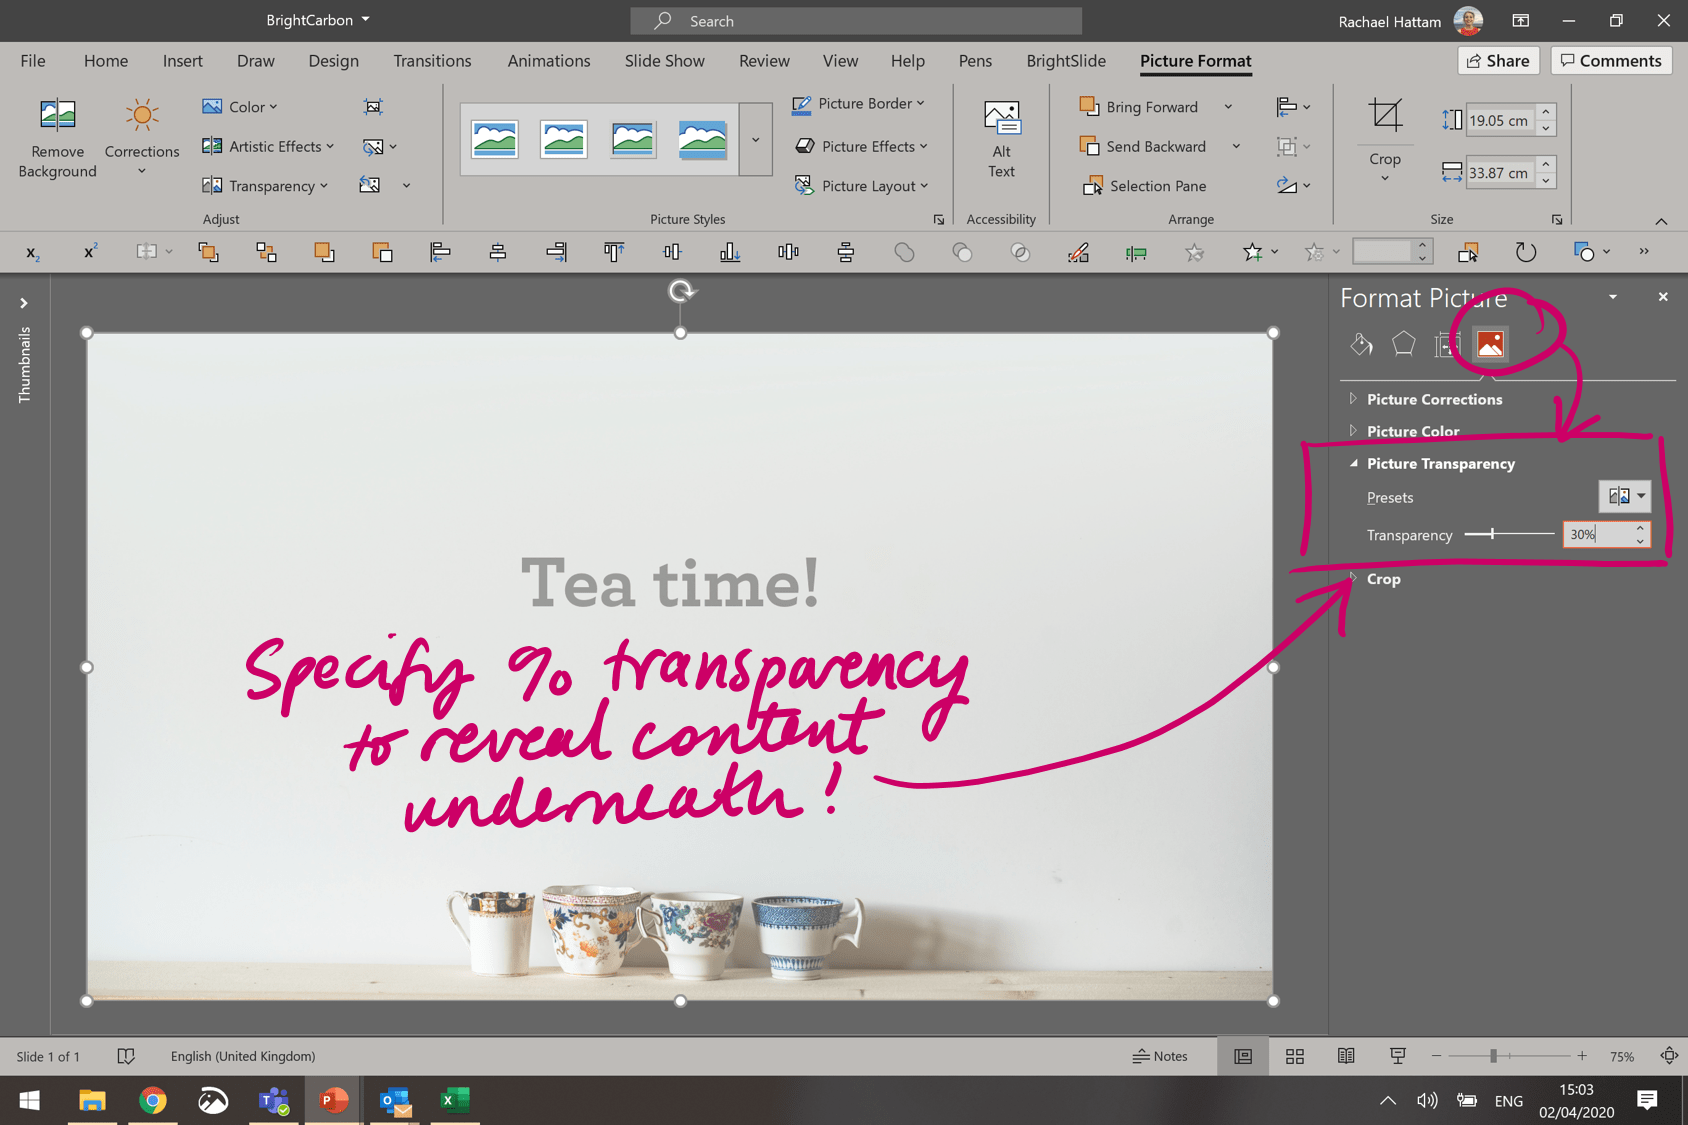
Alternatively, you can right click on your image, and select Format Picture… to bring up the right hand pane. Select the icon shown, and from the Picture Transparency drop down menu, you can use the slider or the text input box to specify exactly how transparent you’d like your image to be.
Et voila! You’re done!
Earlier versions of PowerPoint
Though it takes a little longer in earlier versions of PowerPoint, it’s still possible to make your images transparent. Here is how to do it…
Rather than importing your images directly onto a slide in PowerPoint, you need to insert the image into a PowerPoint shape.
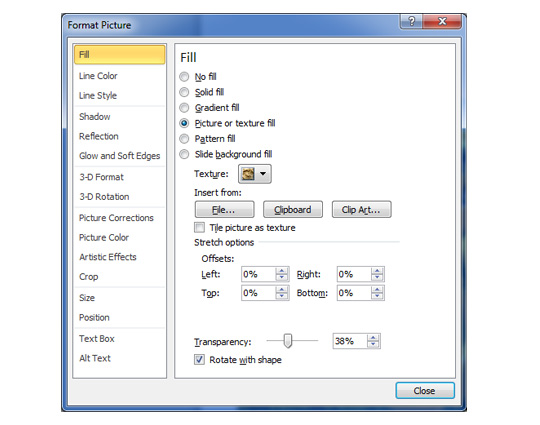
Create a PowerPoint shape on your slide, then right click on it and select Format Picture, this will open the format picture window.
Click on Fill tab on left, then select picture or texture fill as an option.
Now click on the Insert From: file… option. Navigate to the image you would like to place into the shape and double click.
Your image will now have been placed into the PowerPoint shape, in the Format picture window there is a Transparency option (near the bottom) you can use this to set the transparency of the image anywhere between 0-100%.
There is an animation option in PowerPoint allowing you to turn your image transparent, but to achieve this, your image has to be on the screen in its original format before-hand; there is also no smooth action when using this animation, the image simply switches from its original state into transparent in the blink of an eye.
Below is a video demonstration of how to make an image transparent in PowerPoint:
Want to know about other cool ways you can use and modify images in PowerPoint? No need for Photoshop – you can crop your pictures exactly how you want, or convert images to text.
Getting yourself a basic computer mouse is one of the quickest and most effective ways of revolutionising your presentation design. Think about it, no graphic designer in their right mind would work in their creative programs without wielding their mouse like a mighty sword
At BrightCarbon we've started to think that Shutterstock may have overtaken iStock as the commercial stock-photo site of choice for finding photos for presentation design. It's Shutterstock vs. iStock in our breakdown of the best stock-photo site.
When carrying out BrightCarbon's Advanced PowerPoint training course, showing Keyboard shortcuts to help people carry out every-day tasks much faster than normal is always a really big hit. Download our PowerPoint Keyboard Shortcuts PDF here...
Doesn’t work with animated gifs. Sometimes the dumbness of Microsoft really pisses me off. They add useless things like 1 color transparency, but can’t add simple picture transparency. What a bunch of a-holes!!!
You guys are the best! I’ve scoured the web in disbelief that there was no good way to do a proper watermark in Powerpoint. Yours is the only site that I found with a solution. Many thanks for sharing.
Janka – Why are you trying to make a gif transparent? I think you may be asking a little too much of Microsoft on that one. Can’t you make the gif transparent in the program you’re creating it in?
Mat – You’re very welcome. You’d think that with such a simple workaround Microsoft could have just built the function in the first place.
Danny – we aim to please! Do let us know if there are any other issues you encounter in PowerPoint, happy to help whenever possible.
Been using both Macs and PCs since 1995. The transparency slider has been on the Mac version since 2008 without having to embed an image into a shape. You would by 2014, Microsoft would have brought it to par with the Mac version? Guess not. Time to switch?
Vincent – I needed to add a slight “old TV distortion” effect.. and I didn’t make it, I got it from the net.
Not sure if asking for a basic transparency is too much, ESPECIALLY when they implemented one color transparency, which is a lot more complicated and is not needed most of the time.
Also, you can adjust the transparency of shadows and reflections, glow and other effects you apply to a picture, but not to the picture itself. It’s just ridiculous.
Bob – You’re right, you would think they could have built in this functionality by now. I’d love to be able to fade down parts of an image in a similar way to creating a gradient.
Janka – I feel your pain, perhaps the effect could be created and then animated in PowerPoint with transparency applied. You can apply transparency to an image by the way (its what this whole article is based on), perhaps worth another read?
Gif is also an image. And this article just describes a work-around, which sometimes doesn’t work. All I’m saying is that we wouldn’t have to look for work-arounds if MS would implement this BASIC feature (which is present in OpenOffice/LibreOffice and other free office alternatives, but isn’t there even in the newest Office versions).
Older versions of Powerpoint used to have this function (2007 – 2008). I was frustrated recently when I was trying to make a picture transparent with the newer version and couldn’t find the feature. I ended up copying a transparent picture from an old version. But this doesn’t help with new material.
Thanks Vincent for showing this work around. Maybe Microsoft can consider bringing back that old feature we all seem to like so much.
Duane – its true, older versions of PowerPoint did have the functionality, its so strange that Microsoft take things away for no good reason. Perhaps we should start a campaign, I know there are quite a few basic functions the team at BrightCarbon would like to see implemented.
Brilliant, thank-you so much for this tip, it had been driving me crazy not being able to set transparency on pictures in Powerpoint and with no photoshop to work with I had absolutly no solution until I read this post, thank-you again you are a real star!!!!!
This was really, really useful. I knew there HAD to be a way since you can make background images transparent. Really baffling how Microsoft has made this so hard.
I want to overlay one transparent picture on another solid. Your advice works fine till the very end: when I stop sizing the overlaid image, it reverts to solid and blanks out the transparent first image. A workaround is to take a screenshot while holding the mouse button down for the resize – what have I done wrong?
Pedrito – the transparent image should still show the solid one behind. What I think may be happening is that the transparent image is sat behind the solid one, that’d explain why it isn’t showing through.
In order to bring it back in front, right click on the transparent image and select bring to front option. Hope this helps.
Thanks for the video, but I think we can all agree that having to shape-fill a picture is a work-around. We need to inform Microsoft that not having the ability to directly change the transparency of a picture is a mistake and that this ability needs to be added as an office patch ASAP.
The workaround is really useful BUT when I print the slides, the transparency of some (but not all) pictures is lost. This is a real problem if you have put text in over a transparent picture. Any work around with that if I use this solution?
Hi Kevin How frustrating, never fear, we have the answer: Once you’ve carried out the process above, right click on the image and cut it from the slide. Then right click again and paste it in as a picture. This will pop your transparent image onto the slide again, but this time it will be a PNG file, meaning the printer will understand and be able to print it. hope that sorts it out for you.
Thanks for this workaround. I swear back in the day I was just able to click on a picture in my slides and there was a bar to make it transparent or not. So dumb that this is so hard to do. What I was doing before I read this article was to make a gray shape in my image, and overlay that on the image. Then adjust the transparency of that.
BrightCarbon provided us with a fantastic service ... and left us with a presentation that secured us a £4 million contract. BrightCarbon is our first choice for presentations in the future.


Just wanted to drop a line of thanks! This was causing me to lose hair!
Thanks Dave – glad we could help with the hair pulling!
Doesn’t work with animated gifs.
Sometimes the dumbness of Microsoft really pisses me off. They add useless things like 1 color transparency, but can’t add simple picture transparency. What a bunch of a-holes!!!
Thanks so much. What a simple solution. So glad you thought of it and shared!
You guys are the best! I’ve scoured the web in disbelief that there was no good way to do a proper watermark in Powerpoint. Yours is the only site that I found with a solution. Many thanks for sharing.
Janka – Why are you trying to make a gif transparent? I think you may be asking a little too much of Microsoft on that one. Can’t you make the gif transparent in the program you’re creating it in?
Mat – You’re very welcome. You’d think that with such a simple workaround Microsoft could have just built the function in the first place.
Danny – we aim to please! Do let us know if there are any other issues you encounter in PowerPoint, happy to help whenever possible.
Been using both Macs and PCs since 1995. The transparency slider has been on the Mac version since 2008 without having to embed an image into a shape. You would by 2014, Microsoft would have brought it to par with the Mac version? Guess not. Time to switch?
Vincent – I needed to add a slight “old TV distortion” effect.. and I didn’t make it, I got it from the net.
Not sure if asking for a basic transparency is too much, ESPECIALLY when they implemented one color transparency, which is a lot more complicated and is not needed most of the time.
Also, you can adjust the transparency of shadows and reflections, glow and other effects you apply to a picture, but not to the picture itself. It’s just ridiculous.
Vincent – this is a super helpful tip, thanks so much! I’ve been looking for a way to do this easily for ages
Bob – You’re right, you would think they could have built in this functionality by now. I’d love to be able to fade down parts of an image in a similar way to creating a gradient.
Janka – I feel your pain, perhaps the effect could be created and then animated in PowerPoint with transparency applied.
You can apply transparency to an image by the way (its what this whole article is based on), perhaps worth another read?
Richard – Glad we could help.
Gif is also an image. And this article just describes a work-around, which sometimes doesn’t work.
All I’m saying is that we wouldn’t have to look for work-arounds if MS would implement this BASIC feature (which is present in OpenOffice/LibreOffice and other free office alternatives, but isn’t there even in the newest Office versions).
Older versions of Powerpoint used to have this function (2007 – 2008). I was frustrated recently when I was trying to make a picture transparent with the newer version and couldn’t find the feature. I ended up copying a transparent picture from an old version. But this doesn’t help with new material.
Thanks Vincent for showing this work around. Maybe Microsoft can consider bringing back that old feature we all seem to like so much.
omg thank you SO much. brilliant!
Duane – its true, older versions of PowerPoint did have the functionality, its so strange that Microsoft take things away for no good reason. Perhaps we should start a campaign, I know there are quite a few basic functions the team at BrightCarbon would like to see implemented.
TG – glad to be of service, happy PowerPointing!
Thank you for this Very useful information and tips. I just wonder why this process didn’t came in my mind. Anyway thanks once again.
Very useful Vincent… many thanks 🙂
I found this article most helpful. Thank you.
No problem Hersh, glad we could help!
Brilliant, thank-you so much for this tip, it had been driving me crazy not being able to set transparency on pictures in Powerpoint and with no photoshop to work with I had absolutly no solution until I read this post, thank-you again you are a real star!!!!!
Ian, we aim to please. Glad the post came in handy for you.
Happy PowerPointing!
Thank you SO much for this! It has been annoying many of us for a while now. This has been the simplest way so far.
Cheers!
This making the image transparent solution is great. It worked for me and was quick. Thank you Vincent!
This is fantastic!!! Thank you!
Thank you very much , that was exactly what i needed … very nice 🙂
This was really, really useful. I knew there HAD to be a way since you can make background images transparent. Really baffling how Microsoft has made this so hard.
very helpful. thanks
Wow, this tip has changed my life! lol joking aside thanks for this post it has helped me out a lot i just could not figure it out.
Great tip… thanks!
my artistic effect is not working how to remove this bug plz help me
OMG I’ve spent hours trying to work this out! you are brilliant! (By the way, I used it in Word not Powerpoint, but same function)
Wow… This IS useful! Finally!!! I just wanted to take a minute and thank you for this. I was suffering!
Fantastic, been trying to do this all morning. Thank you
Thank you So much!! This Helps a lot.. 🙂
I want to overlay one transparent picture on another solid. Your advice works fine till the very end: when I stop sizing the overlaid image, it reverts to solid and blanks out the transparent first image. A workaround is to take a screenshot while holding the mouse button down for the resize – what have I done wrong?
Pedrito – the transparent image should still show the solid one behind.
What I think may be happening is that the transparent image is sat behind the solid one, that’d explain why it isn’t showing through.
In order to bring it back in front, right click on the transparent image and select bring to front option.
Hope this helps.
great tip, thank you very much 🙂
Thanks for the video, but I think we can all agree that having to shape-fill a picture is a work-around. We need to inform Microsoft that not having the ability to directly change the transparency of a picture is a mistake and that this ability needs to be added as an office patch ASAP.
Well, Microsoft do listen Vincent. You can request features here – https://powerpoint.uservoice.com/
The workaround is really useful BUT when I print the slides, the transparency of some (but not all) pictures is lost. This is a real problem if you have put text in over a transparent picture. Any work around with that if I use this solution?
Hi Kevin
How frustrating, never fear, we have the answer:
Once you’ve carried out the process above, right click on the image and cut it from the slide. Then right click again and paste it in as a picture. This will pop your transparent image onto the slide again, but this time it will be a PNG file, meaning the printer will understand and be able to print it.
hope that sorts it out for you.
I’m trying to take a dolphin picture and make it a certain color I want it in the rebel flag colors how can I do this
Thanks for this workaround. I swear back in the day I was just able to click on a picture in my slides and there was a bar to make it transparent or not. So dumb that this is so hard to do. What I was doing before I read this article was to make a gray shape in my image, and overlay that on the image. Then adjust the transparency of that.
Thank you! Huge time savings.
this was so helpful!!!! thank you!!!!
Thank you…excellent work-around!
really thanks for this blog. I am also searching for this topic
nice and easy lesson thanks a lot !