PowerPointLabs is a PowerPoint add-on developed by enterprising students at the National University of Singapore. This add-on pops a ribbon of handy shortcuts into your existing PowerPoint program under it’s own tab. Everything PowerPointLabs does you can do yourself, but it cuts out several, time consuming steps. So, if you’re an ambitious PowerPoint user who doesn’t have time to fiddle around learning the tricks of the trade, then you might find PowerPointLabs very helpful.
PowerPointLabs is available for free download. Though their website suggests it may not be free for long, PowerPointLabs has been free since 2014 when we first reviewed it, so you’re probably safe!
Once you’ve downloaded and installed the software, you’ll be prompted to read through a PowerPoint file tutorial which gives examples of PowerPointLabs’ features. Note – this is not intended to be viewed in presentation mode because it’s an interactive, instructional guide.
Tip: If you don’t see a tab labelled PowerPointLabs at the top of your PowerPoint window, restart the application. If that doesn’t work, restart your computer.
How can PowerPointLabs help you? Let’s take a look at the different tools this software offers.
Highlight Points, Text, and Background
These three features can be used to make different text items on your slide stand out. The Points and Text features change the color of the text, while the Background tool creates a highlighter effect behind the text.
At BrightCarbon we discourage text heavy slides. However, if you absolutely insist on using bullets, this is a good way of keeping your audience on track as you can highlight each point in turn. All you need to do is click Highlight, then HighlightPoints or HighlightBackground and the effect is applied. Under the Highlight drop down, select Settings to change the highlight color. The HighlightBackground effect is probably the best because it’s the most obvious.
This effect can be easily achieved without PowerPointLabs by following these steps:
Start by using the Shapes tool to create a box around your text
Use either Sendtoback, under the Arrange tab, to make the box appear behind the text, or adjust the transparency of the box to get a cloudy effect (this can also be used to hide text items you don’t want emphasized).
Next add in the animations: Fade and Wipe are good choices
If you have text that goes onto two or more lines, repeat this process, making a box for each line.
Open up the AnimationPanel, right click each line and select AfterPrevious to highlight the lines of text one after another, just like in karaoke!
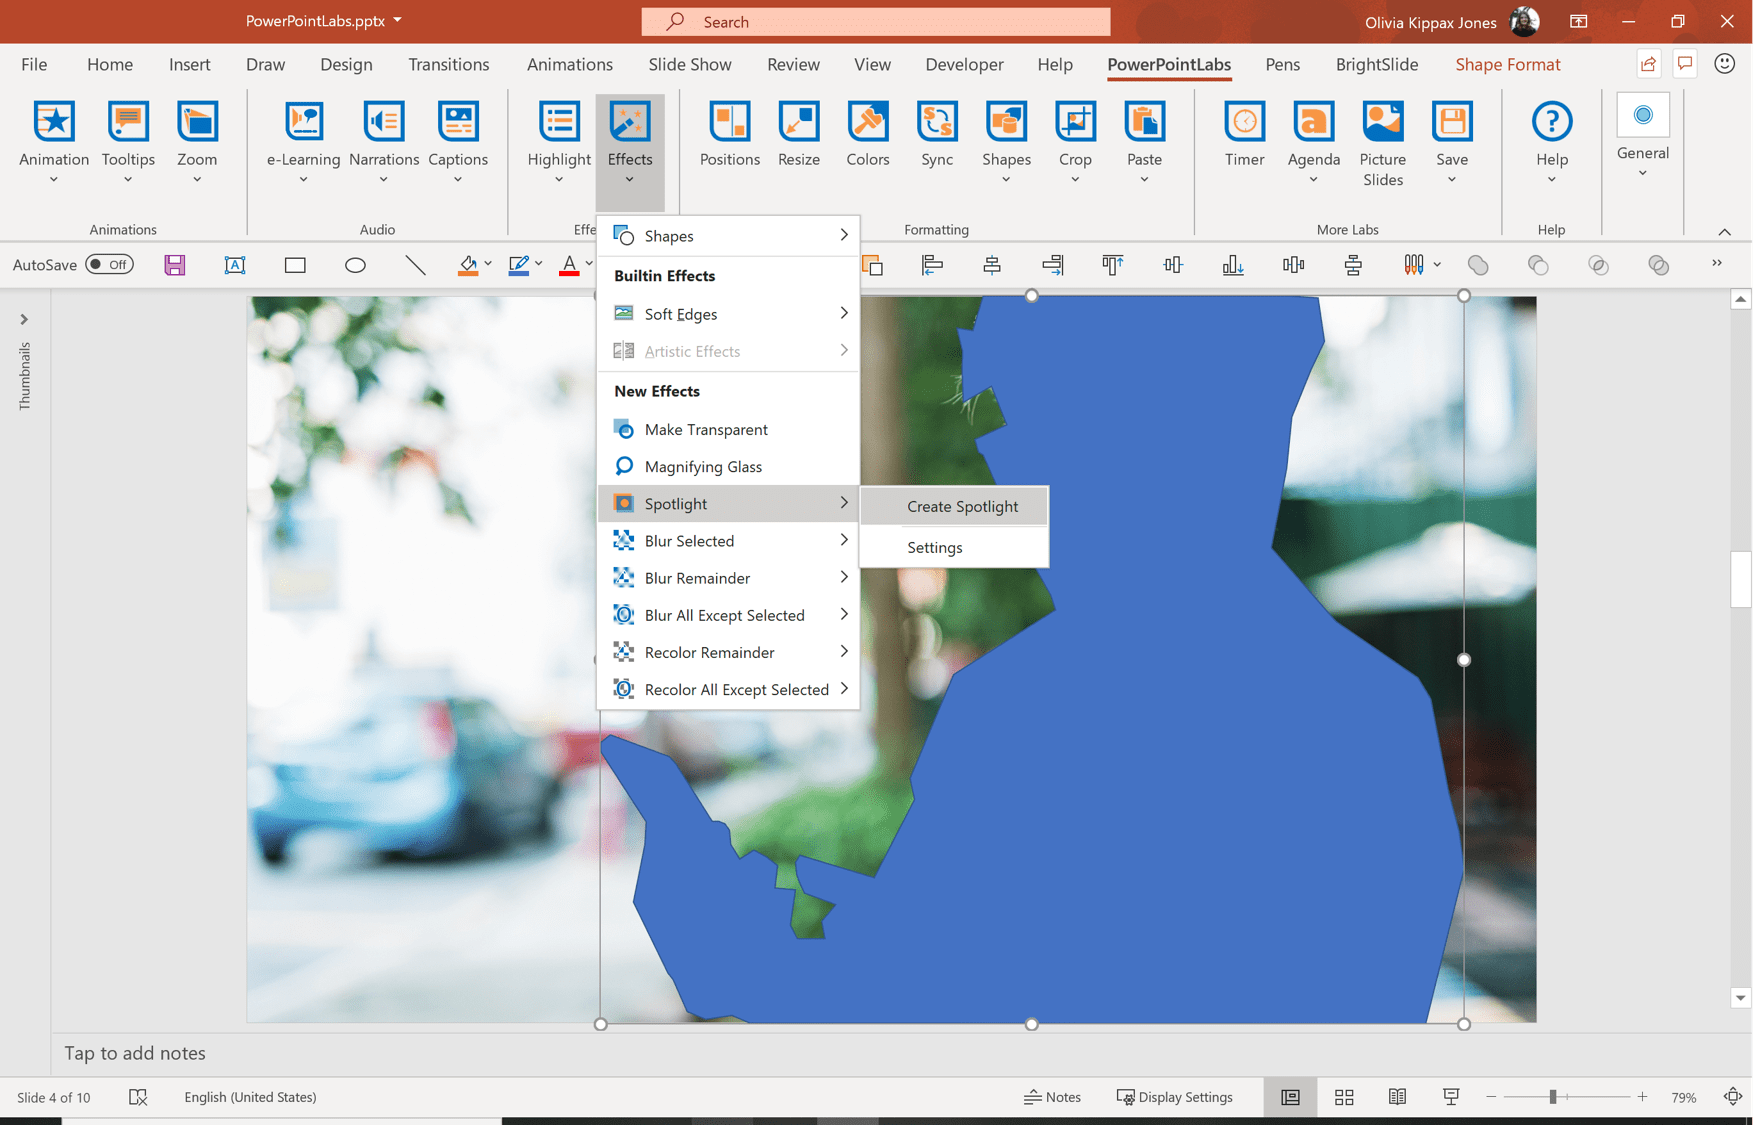
Create Spotlight
The CreateSpotlight function (under Effects) allows you to highlight a region of your slide by blurring and darkening everything else. This function is very handy, and looks really cool. It’s also decently functional in that it allows you to adjust both the transparency and the softness of the edges of the area you’re trying to highlight. I created this in about 30 seconds.
To use it, use the Shapes tool and draw a shape over the area you want spotlighted. Click on that shape then navigate to the Create Spotlight tool under the PowerPointLabs tab and select Create Spotlight.
You can adjust the color, edges, and transparency of the spotlight under Settings – do this before using the tool as if you try to adjust the color afterwards with the normal Fill tool, it changes the color of the spotlighted region as well.
To create this effect manually:
Create a box over the entire slide and adjust the color and transparency to your liking.
Go to the Shapes tool and select Freeform, then outline the area of the slide you wish to highlight. (If you have trouble viewing the object beneath the box, make the box more transparent and readjust it once you’ve cropped out the right area.)
Using the Boolean shapes tool, Subtract the highlighted area from the transparent box.
Just like the create spotlight tool you can adjust the edges of the shape, by rightclicking and selecting FormatShape.
Add Animation Slide
This function has the potential to save you some serious time with tedious tinkering. Let’s say you have three objects scattered across a slide and you want to add an animation to make them line up. Simply create one slide with the objects in the starting position, and one with the objects in the end position. Then select the first slide and click AddAnimationSlide in the PowerPointLabs tab. This will create a slide in between the original two, with motion paths on each object taking them from the start to the end point you specified. You can adjust the start and end positions on this slide then hit RecreateAnimation.
While you can create this effect yourself using custom motion paths, it’s likely to take a lot of time and effort to get each object placed in exactly the right position, especially if you end up changing your mind down the road.
Here’s a trick if you want to steal the perfect motion paths from PowerPointLabs without having the slide in between:
Use AddAnimationSlide to create the effect you want
Select one of the objects from the animated slide, and underneath the Animations tab, click on the AnimationPainter. This copies the animations for that object onto your clipboard.
Click on the corresponding object on the original slide and the animations will automatically be applied. Repeat this for each object you’re trying to animate.
Tip: When you paste an animation using PowerPoint’s AnimationPainter, all animations on the object are wiped and replaced by the new ones. To retain previous animations, use BrightSlide’s Animation Painter +. BrightSlide is BrightCarbon’s very own design and productivity add-in – download it for free here!
Animate in Slide
This is another handy, time saving tool. This function allows you to draw several objects of various sizes in different locations on your slide, then create the effect that they are one object changing size and location. You can also do this with objects of the same size, the function will simply create motion paths between the objects. Remember to click on the objects in the order you want them to animate in, then click AnimateinSlide and the software will create the desired effect using a series of motion paths, grow/shrinks, appears and disappears.
Again, this is something you can do yourself, but it would be super fiddly, so this tool is a real time saver!
Zoom to Area, Drill Down and Step Back
Before you start to play with these effects, save everything! They can make PowerPoint run really slow or even crash – especially the Zoom to Area! I’d suggest saving an alternate copy of your presentation and play with the effects there as a precaution.
These functions will create the effect that you are zooming in or out of a specific area of your slide. It takes screenshots of areas you select and uses a series of zooms, motion paths, and appear/disappears. With Zoom to Area you can select multiple sections to zoom in on. Although you can change this in the settings, it will automatically create one additional slide for each section you select. This is probably the reason PowerPoint crashes, so I’d advise de-selecting this option. The DrillDown and StepBack options create additional slides to give the effect that you’re either zooming into particular section to show detail, or zooming out to show how one section is part of something larger. These functions caused far fewer problems in PowerPoint.
Crop to Shape
This might be my favorite function! The normal crop function in PowerPoint only allows you to cut into rectangular shapes. PowerPoint’s own Crop to Shape tool now works with any shape but you can’t chose which section of the image is included and you might not get the effect you want.
However, with the PowerPointLabs Crop to Shape, you can crop out a section of a picture using any of the shapes available in PowerPoint, including the freeform tool. Simply place the shape over the area of the photograph you want to crop out, and it will create a copy of the photograph within that shape, the same size, leaving you with the original intact.
This is helpful if you want to crop out a single object from an image. The Format tab in PowerPoint has a RemoveBackground tool, but that doesn’t always work perfectly. You could use programs such as Photoshop or Gimp to select the object, but many of us don’t want to take the time to learn how to use the software. With Crop to Shape you can use the FreeformShape tool to trace the object and crop it out of a photograph. This is also possible if you use the Boolean tools but PowerPointLabs cuts out a few steps.
Shapes Lab
If you’re someone who likes to create a lot of custom objects using either the Boolean or Freeform Shapes tools, this is going to be very exciting! The Shapes Library is exactly what it sounds like- a catalog of different shapes. However, you can add any shape you create within PowerPoint to the Shapes Lab simply by rightclicking on that object. This allows you to easily re-use custom shapes in future presentations.
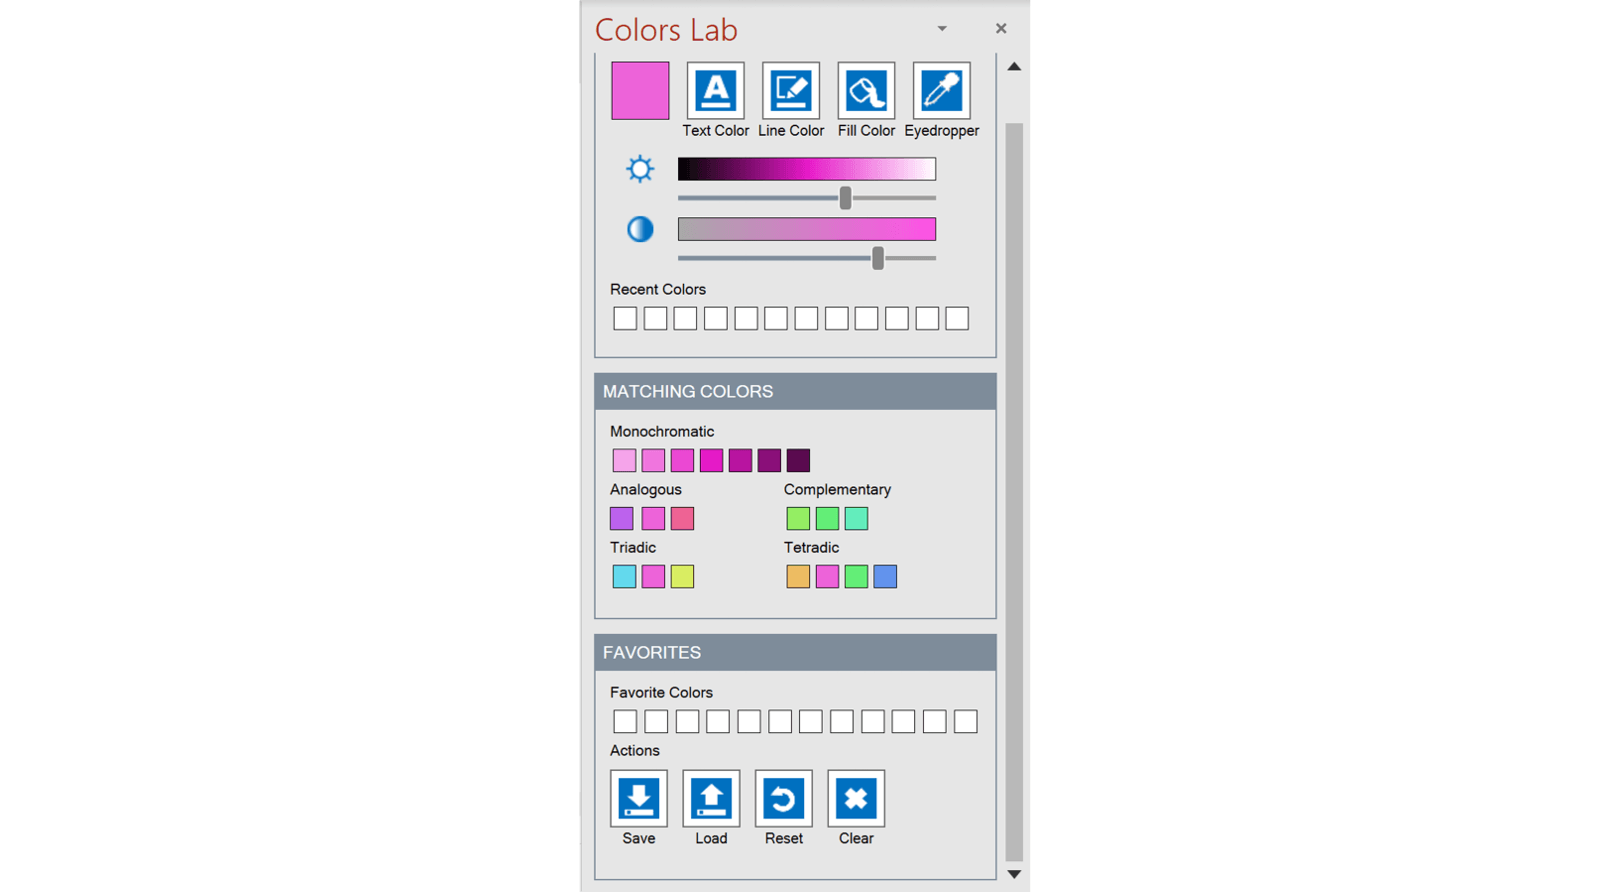
Color Lab
This tool is similar to the Color Lab in that it allows you to store custom colors for future use. You can also save your favorite color palettes and upload existing ones with the click of a button. It has a few helpful features for those who struggle with chromatic synthesis. For any color you select the Colors Lab will offer matching colors in a monochromatic, analogous, complementary, triadic, and tetradic scheme.
Audio and Captions
PowerPointLabs has three functions that allow you to add audio narration or captions to your presentation. Using the Add Audio button, you can either record your own voice or have a narration automatically generated for you from your speaker notes. The record function is standard PowerPoint software, you can find it under the SlideShow tab. It’s pretty dependable, but the sound quality depends on the equipment you’re using and the environment you’re in.
We’d advise against using the auto-narrate function, because it generates a robotic reading of your speaker notes that will surely bore your audience! If you’re including an audio recording of your speech or presenting it live, you might want to include captions to make your presentation more accessible. The PowerPointLabs captions feature generates text boxes to appear on the bottom of your screen from your speaker notes. They are fairly unobtrusive but might be too small if you’re presenting to a large audience or in a big room, they also won’t give hard of hearing audience members the full impact of your speech unless you’re reading from a script (which you really shouldn’t!).
It might be more effective to use a live captioning tool. Try out PowerPoint’s own offering – it’s pretty good and getting better all the time! Find it under Slide Show > Captions & Subtitles and check Always Use Subtitles.
We’d say that PowerPointLabs is definitely worth the download. Try it out and see how much use you get out of it. Though not every tool is revolutionary, it does offer a lot of timesaving short cuts to make your life a bit easier. It’s also completely free, and, unlike many other free services, doesn’t send you spam email or newsletters which is refreshing!
If you’re looking for more ways to supercharge your PowerPoint presentation creation, check out our very own add-in, BrightSlide. BrightSlide will help you create, polish, and edit presentations at speed. It draws on industry-standard shortcuts to boost your workflow and provides amazing, extra functionality for free!
Glisser is an online platform that allows you to create interactive presentations that can be used for marketing, training or any other type of events. The site has different functions available for presenters, attendees at events and event planners which all focus on allowing for increased presenter-audience interaction. Since creating engaging visual presentations is what we do, I decided to take a closer look at Glisser and see what it’s all about and how the various functionalities work.
Jamie Garroch puts the ‘power’ in PowerPoint add-ins. He’s written code for dozens of amazing functionality boosters, some for specific organizations and some available for all users, and he's joining the BrightCarbon team! Read on to learn about the experience that Jamie is bringing to BrightCarbon and how it will help clients and the presentation community use PowerPoint more effectively.
Keeping track of all your company slides is a challenge, especially if you don’t have a proper intranet or server system. SlideKick is PowerPoint add-in that manages presentation content for a flat annual fee. It helps you to make your presentation assets readily available to other users, give everyone the most current information, and quickly search within content.
All of the content I've seen so far has been valuable and definitely worthwhile. The resources are awesome, and you're really crushing it with useful content.


great program
Is this program free of cost?
@Prakash – yes it is. Our review says it’s free ‘for the moment’ – but that was written five years ago… Still free!